CS22/122 Loeb

Most models are more complex than the simple primitive and require a more complex mapping. We do that using projections onto the model surface. This can be a painstaking process but it allows for precise and detailed texturing without distortion.
Let's get to it
Let's make a toy block.
In your Practice Project, Save the Scene as ToyBlock
Download the Blocks.tga Texture https://drive.google.com/file/d/1m2o7oi8rhhecE7B-QYcydEEGLy1zXlVm/view?usp=sharing
- Drag the textures into your Source Images Folder in your current project (Practice)
NOTE: This is where it becomes critical that you are working in the correct project, that the project is not on your desktop, but rather in the proper folder (Users/imac/Documents/maya/projects/ and have your textures in the Source Images folder for THAT project. You don't move the folder, just the images in the folder go to the Source Images Folder for your Practice Project Folder.
If that is not the case for you, set that up NOW.
- Create a cube (CTRL + Shift + u)
- Hit "f" to frame up on it in the view port.
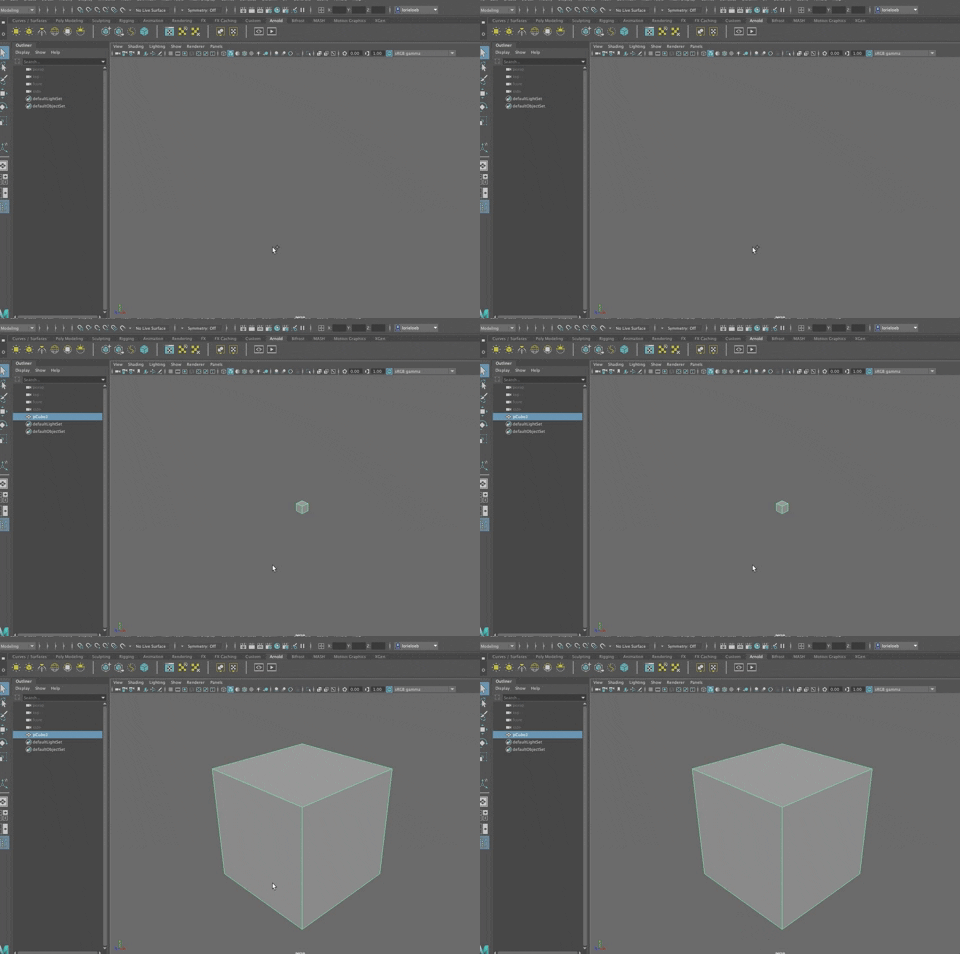
- Rename the pCube1 to Block
- Right click on the block and Choose "Assign New Material" to replace the material/shader on the block to a matte material called Lambert.
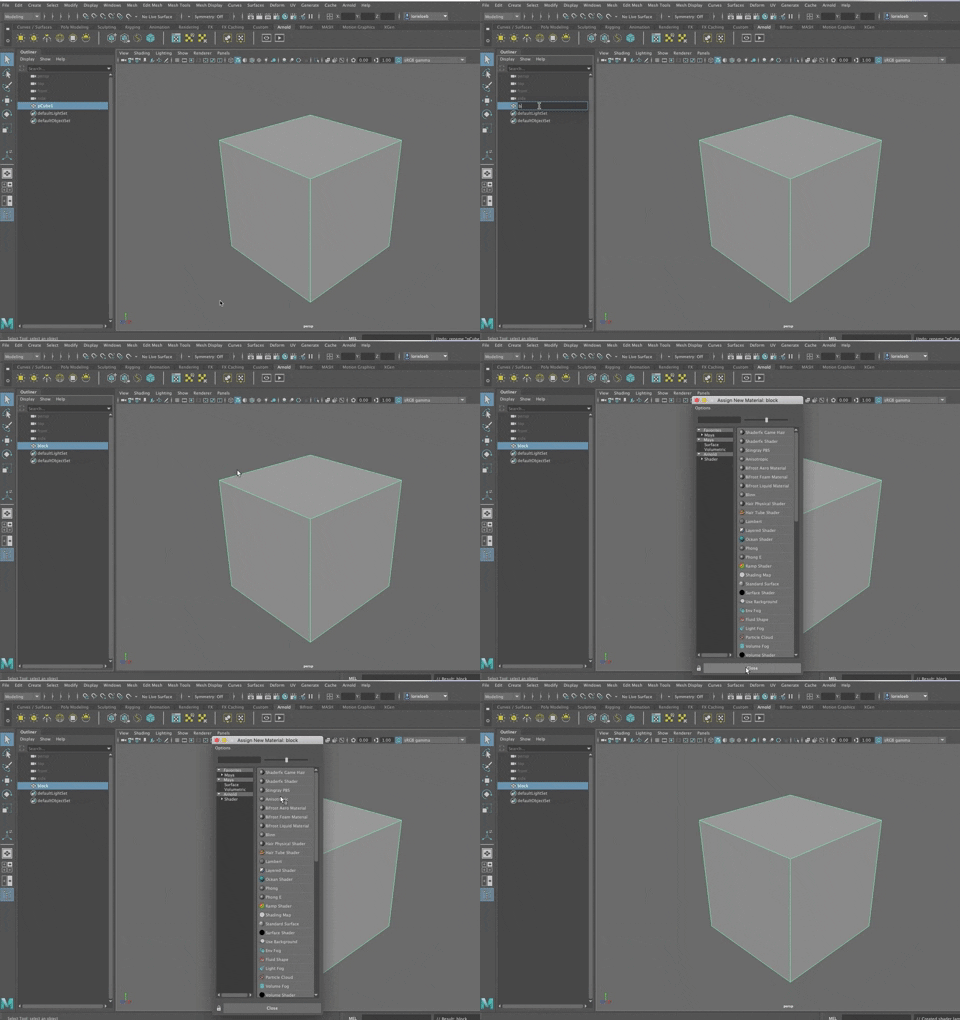
Note: The default material is Lambert1, which is a medium gray. You NEVER want to edit that material. If you do, anytime you create a new object, it will appear with that material and color, which is a pain to work with. Instead, always replace Lambert1 with either a new material or one of the other materials you've created.
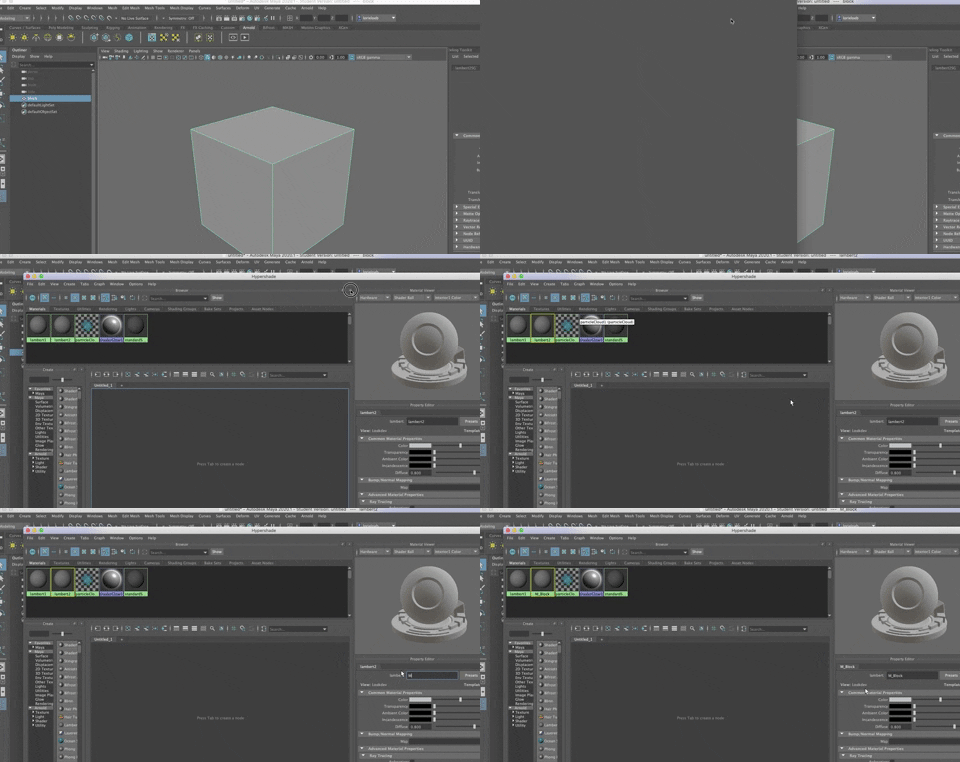
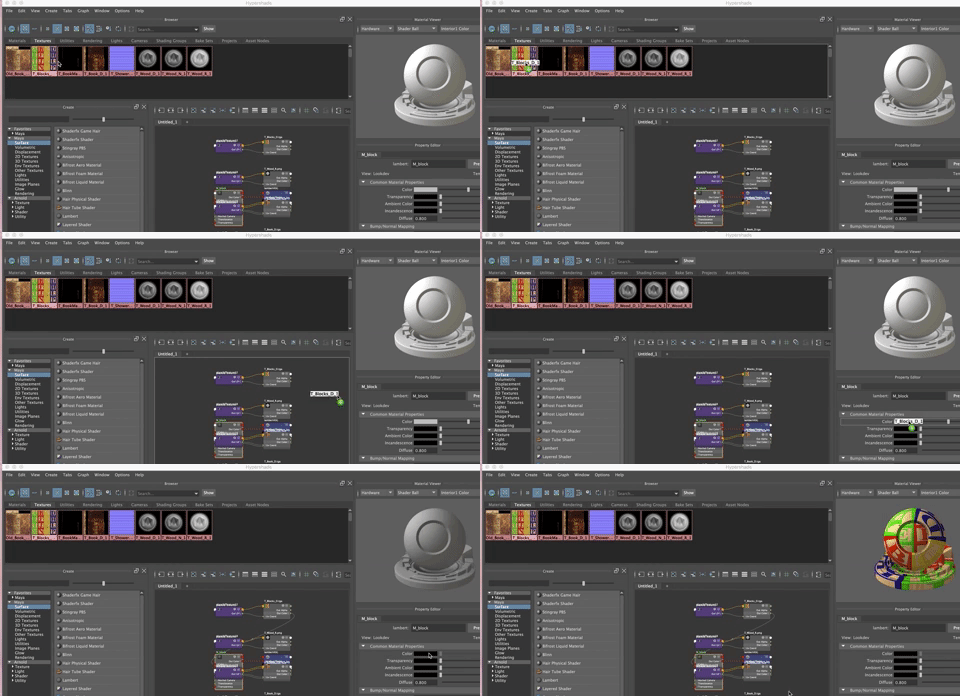
Open the HyperShade Window (The eightball like image in the Menu or Windows>Rendering Editors>Hypershade
- Select Lambert2 in the Materials Window and Rename to M_Block
- Now, in the Hypershade Textures tab, LMB drag the textures to the tab
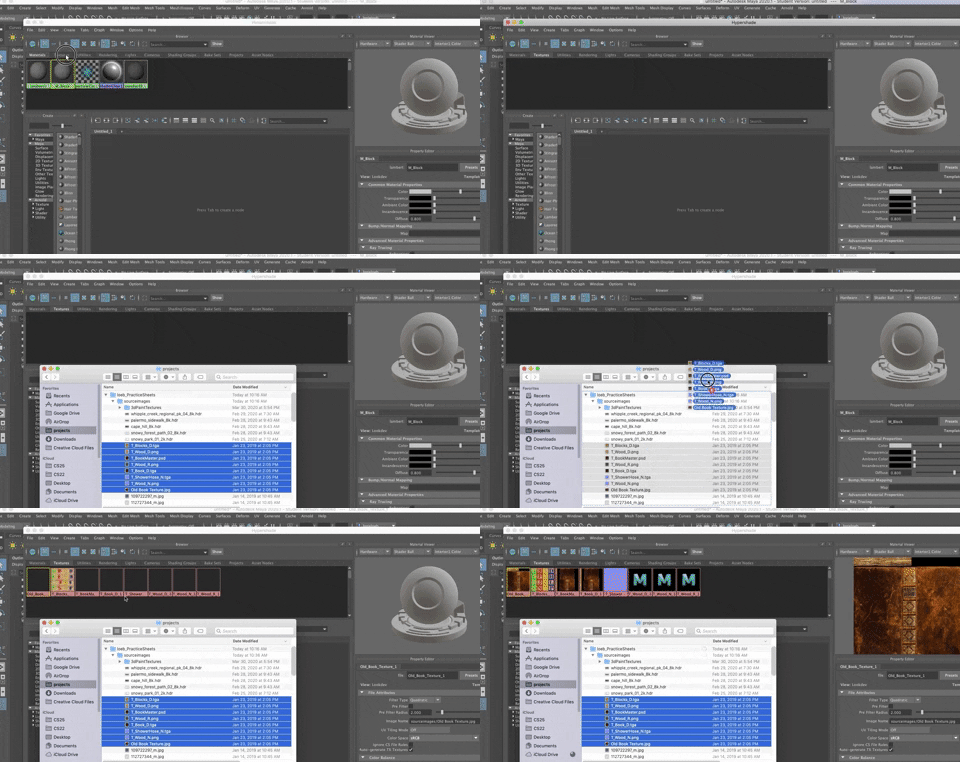
- MMB drag the T_Blocks_D.tga file to the Color on the M_Block
If you don't see your texture, hit the 6 key.
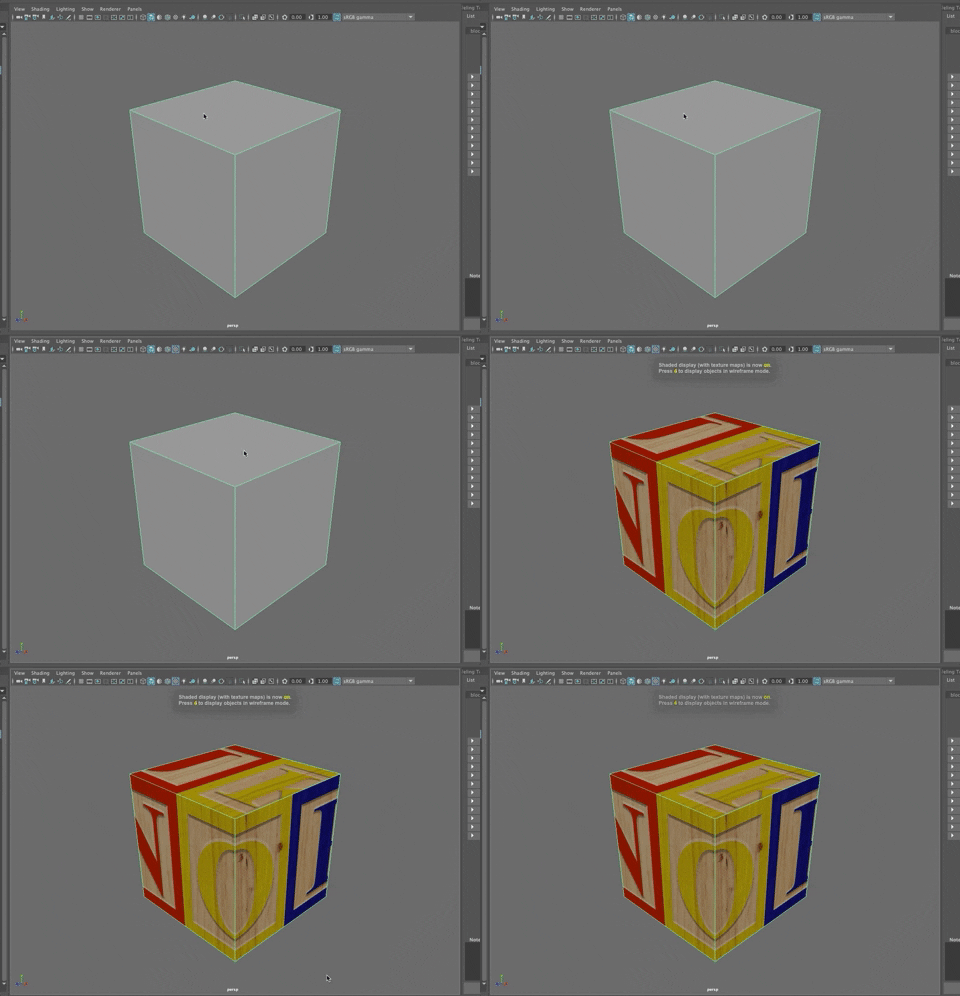
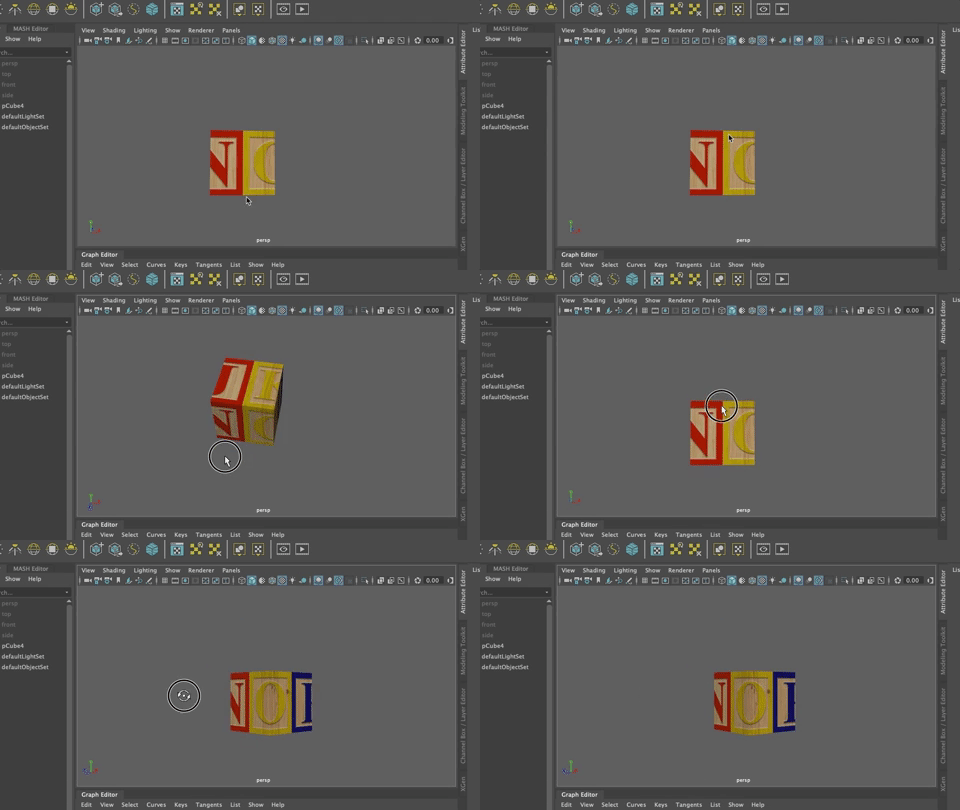
The texture doesn't map correctly from the flat, square texture file onto the cube.
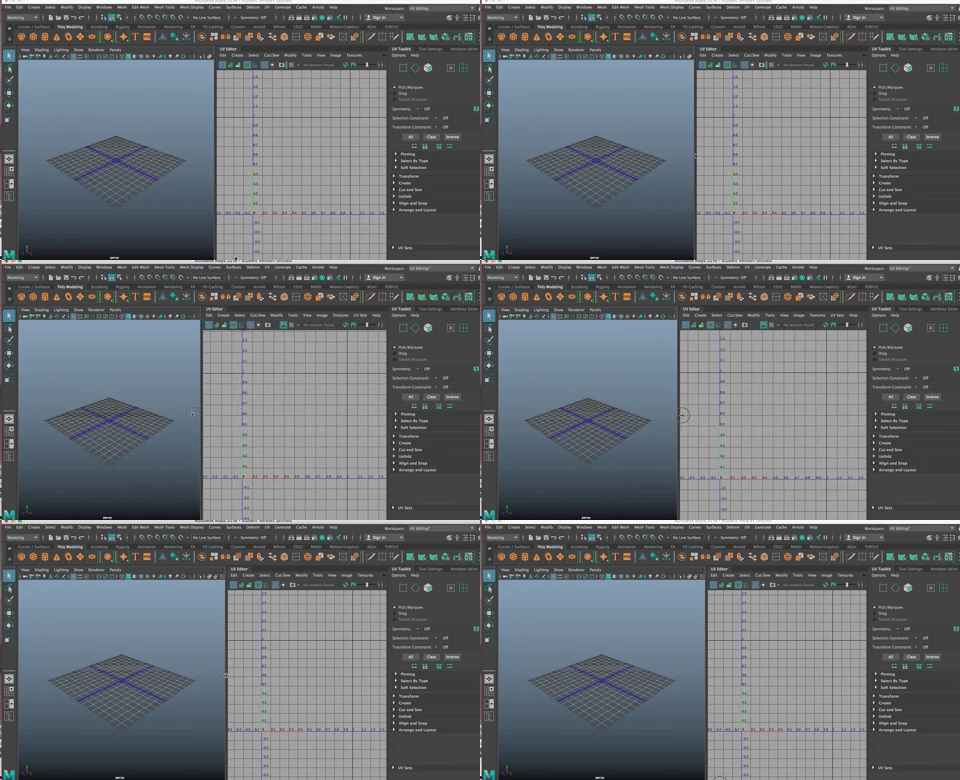
Setting Up Your UI for UV Editing
As there are custom workspaces for modeling, there is also one for UV Editing.
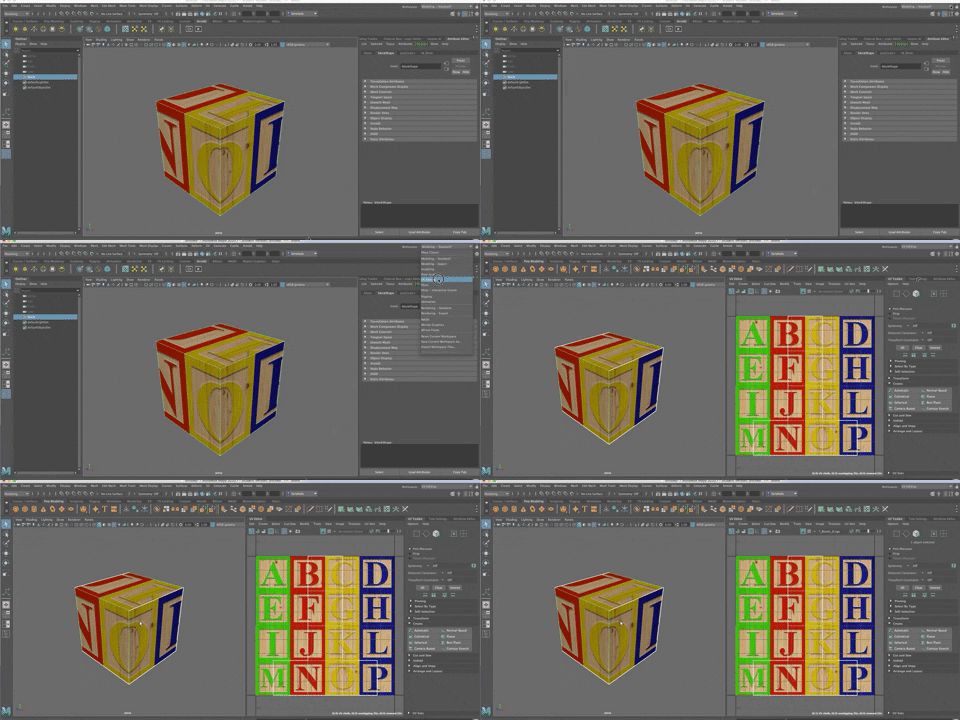
and as with any view panel in Maya, you can navigate around the space using ALT + the right or middle mouse buttons. You cannot tumble in the UV Editor.
Select the cube and you will see the block texture in the UV Editor and a white outline of the block, laid out flat, like an upside down T
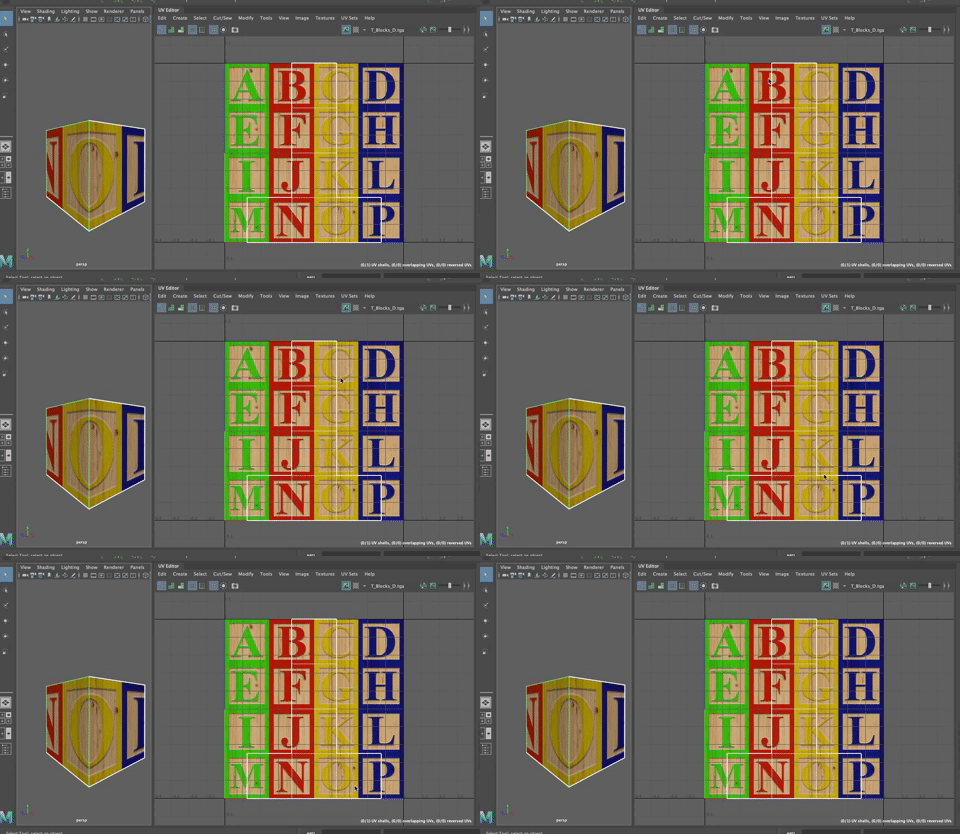
To see the cube shape a bit easier, click on the blue shaded icon on the upper left of the UV Editor
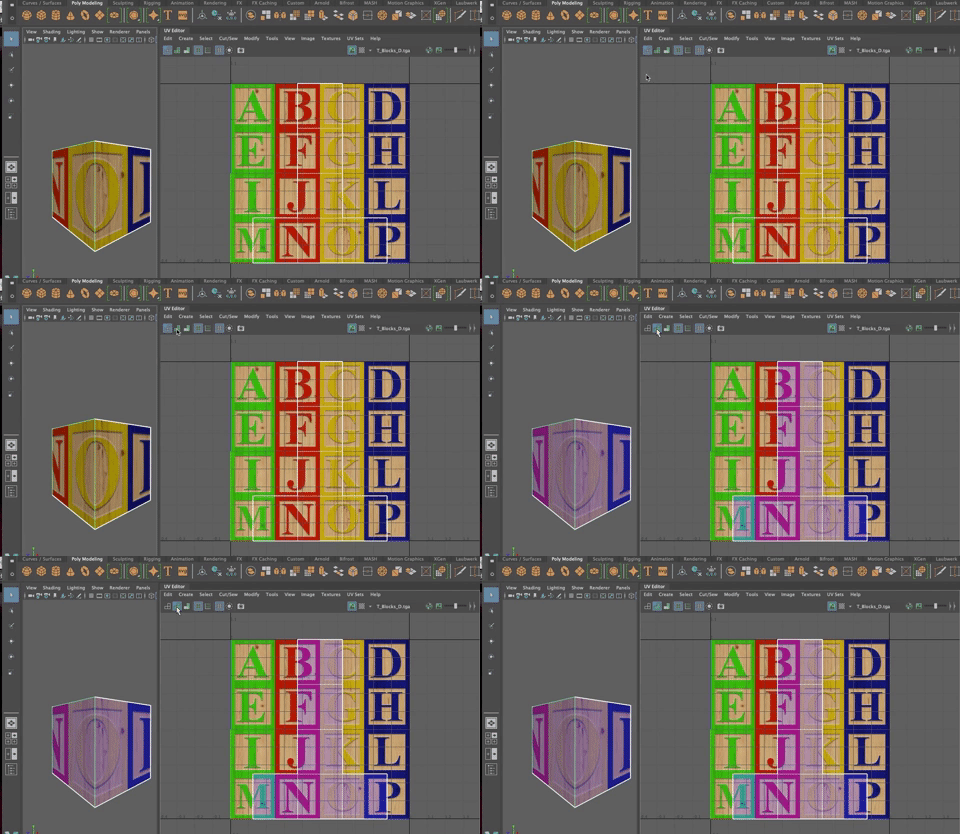
If any UV's were overlapping the shading would be darker, but because this is a simple primitive, it unwraps to the 2D shape quite nicely.
It is just that the UV's for the cube and the texture are not lining up as we'd like. Let's fix it.
- Right click on the UV's of the cube in the UV Editor and Choose UV Shell.
- using the Move Tool, move the UV's of the cube on the texture so that the red letters are down the long part of the UV map as shown.
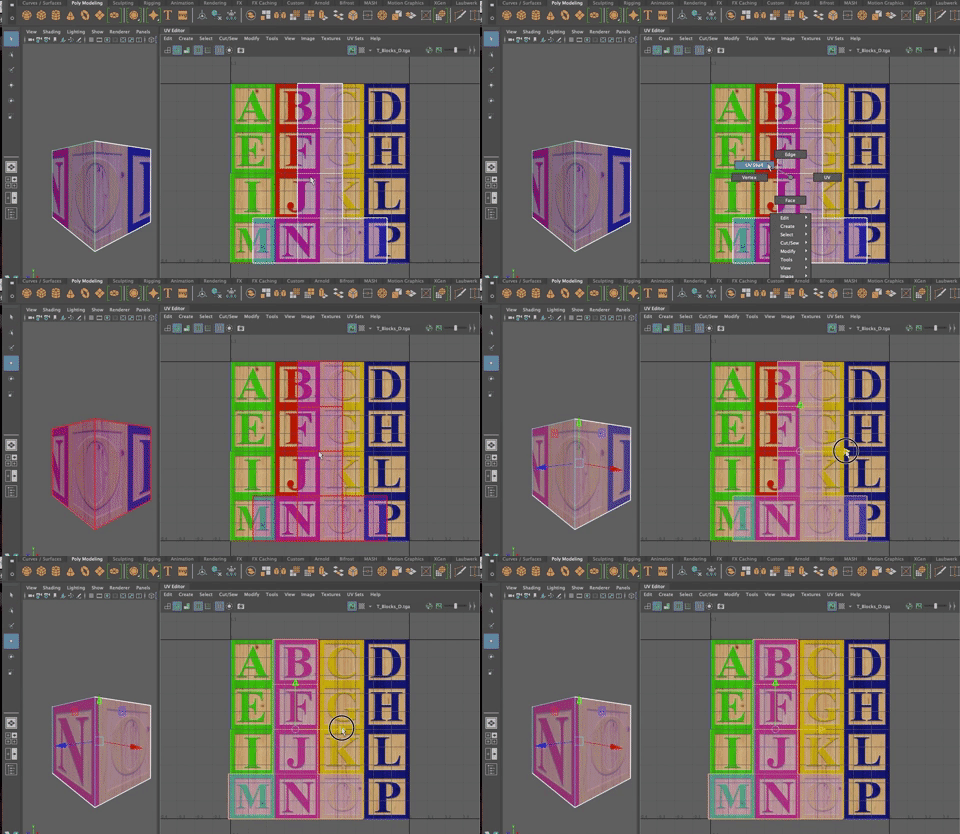
You will notice that the cube now has red letters around it with one yellow M and a green M--exactly what you would expect from the way the UV map of the cube lays on the texture in the UV Editor.
But a block has multiple colors around it. Right now, if you move the shell, the texture stays with it but it isn't doing what we want.
In order to map the texture as you want, you need to separate out the sides of the cube's UV's and place them on the texture where you want the letters to show up.
Let's do a simple automatic projection to fix this.
- In object mode, select the cube
- In the UV Toolkit
- Open the Create Tab
- And SHIFT + click on Automatic to open the Options Box for Automatic Mapping
- Since there are six sides to a cube, the default setting of 6 projections is perfect. The automatic mapping uses the shape of the object to determine how it will divide up an object.
- Hit Project
- YOu sill see six blue rectangles in the viewport and six in the UV Editor
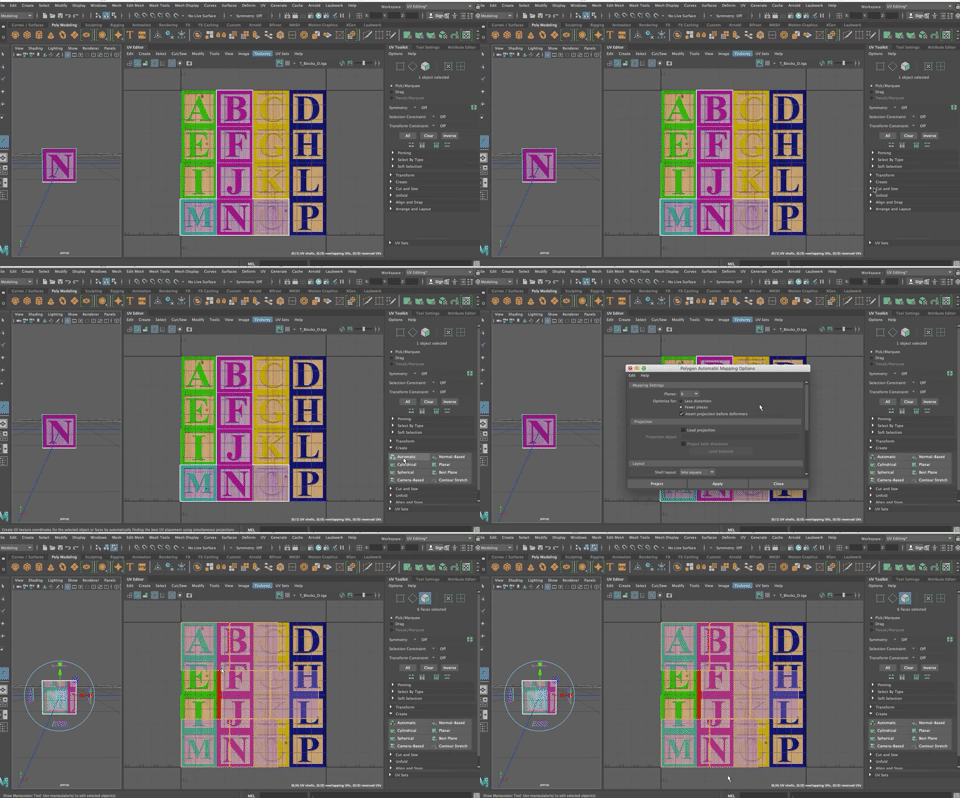
The square UV's aren't in the right places and aren't the right size to make the blocks look right. To fix it.
- In UV Shell Mode (right click on the UV's in the UV Editor)
- Marquee select all the UV squares
- Use the Move tool (w) to move the UV squares so that one of them is lined up with one of the block faces
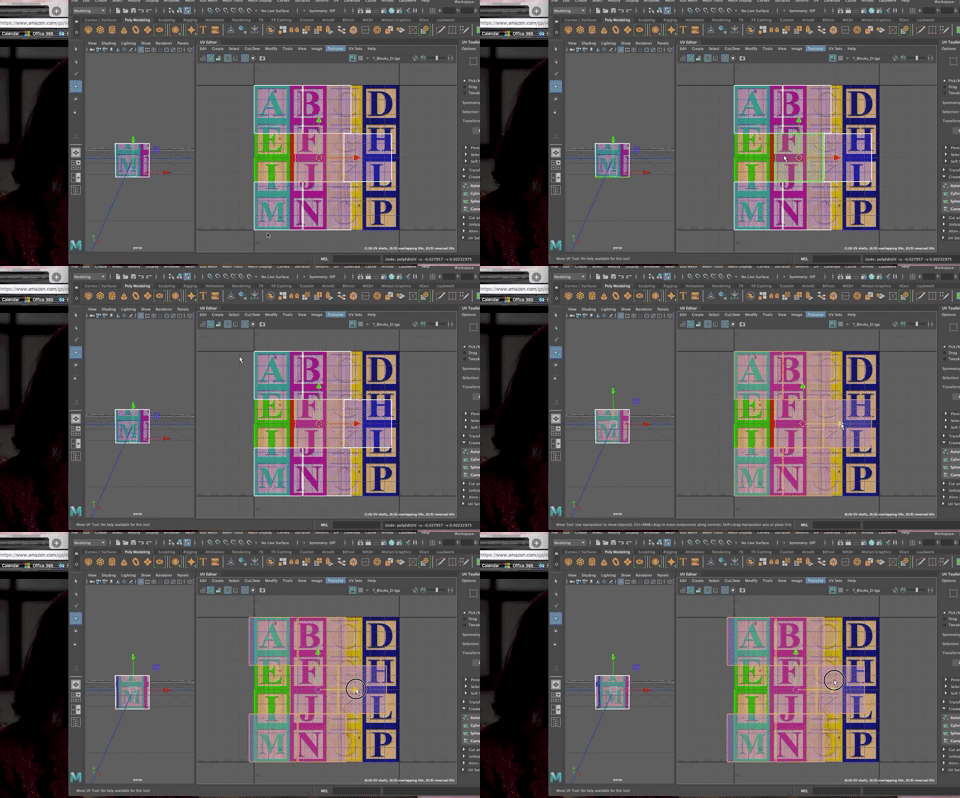
- Use the scale tool (r)
- And LMB drag on the yellow square to scale uniformly until you get the square uv shell to line up with the texture you are trying to match.
- Be precise (zoom in in the viewport as needed)
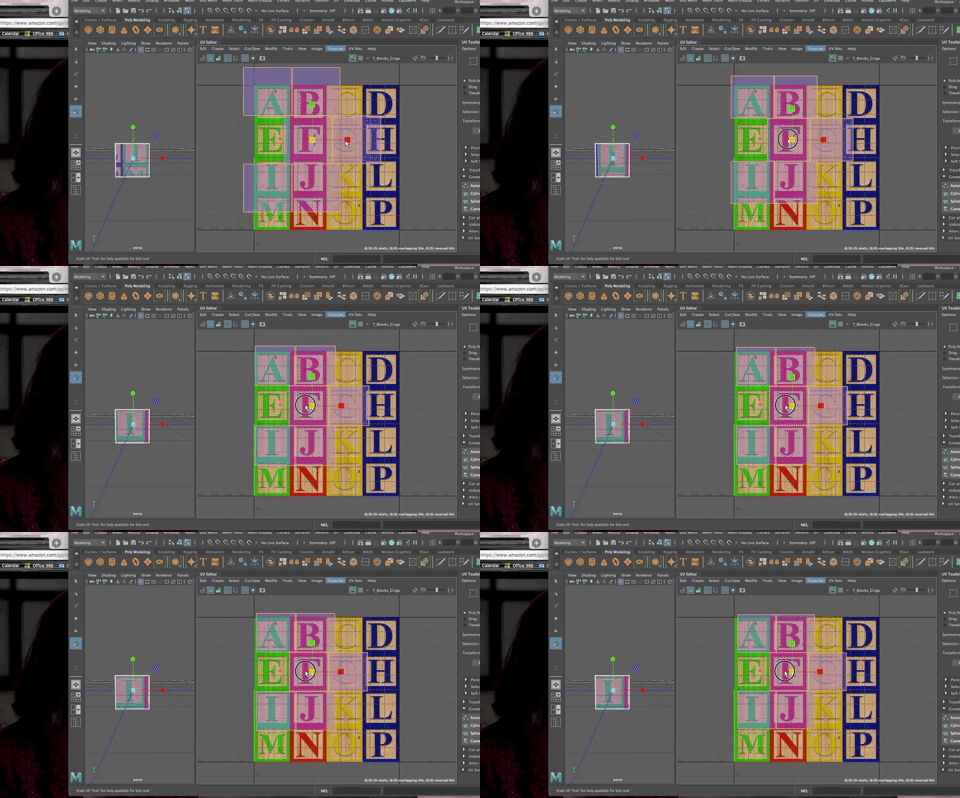
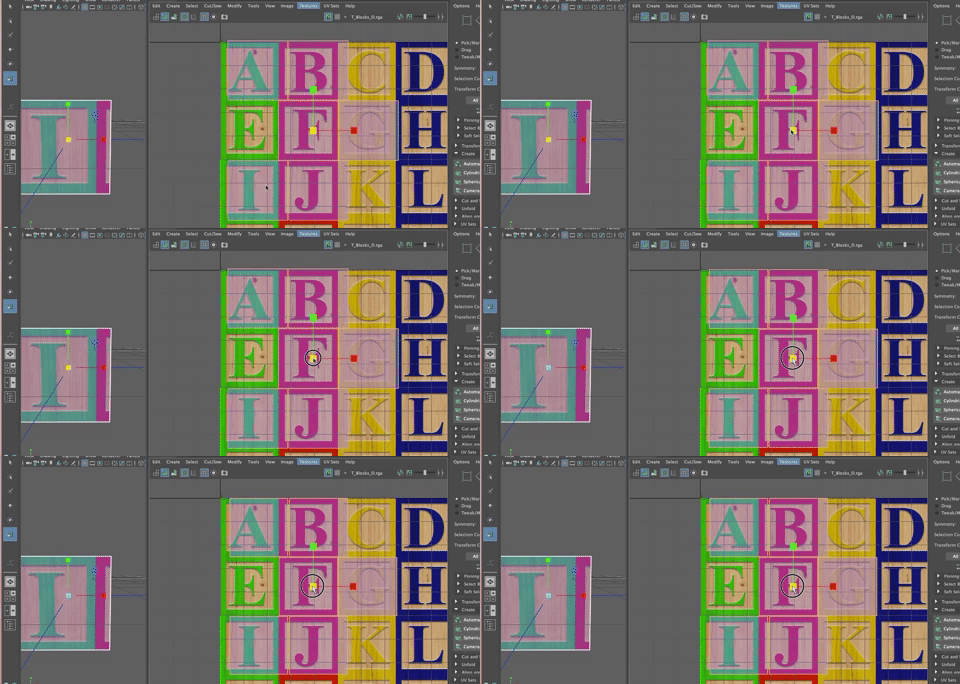
Because you had all the UV shells selected when you scaled, they should all be the same size now.
If they aren't the same size, you can fix that using tools in teh UV Toolkit
I scaled up one of my UV squares to show you what would happen if they weren't the same size, but you wanted them to be.
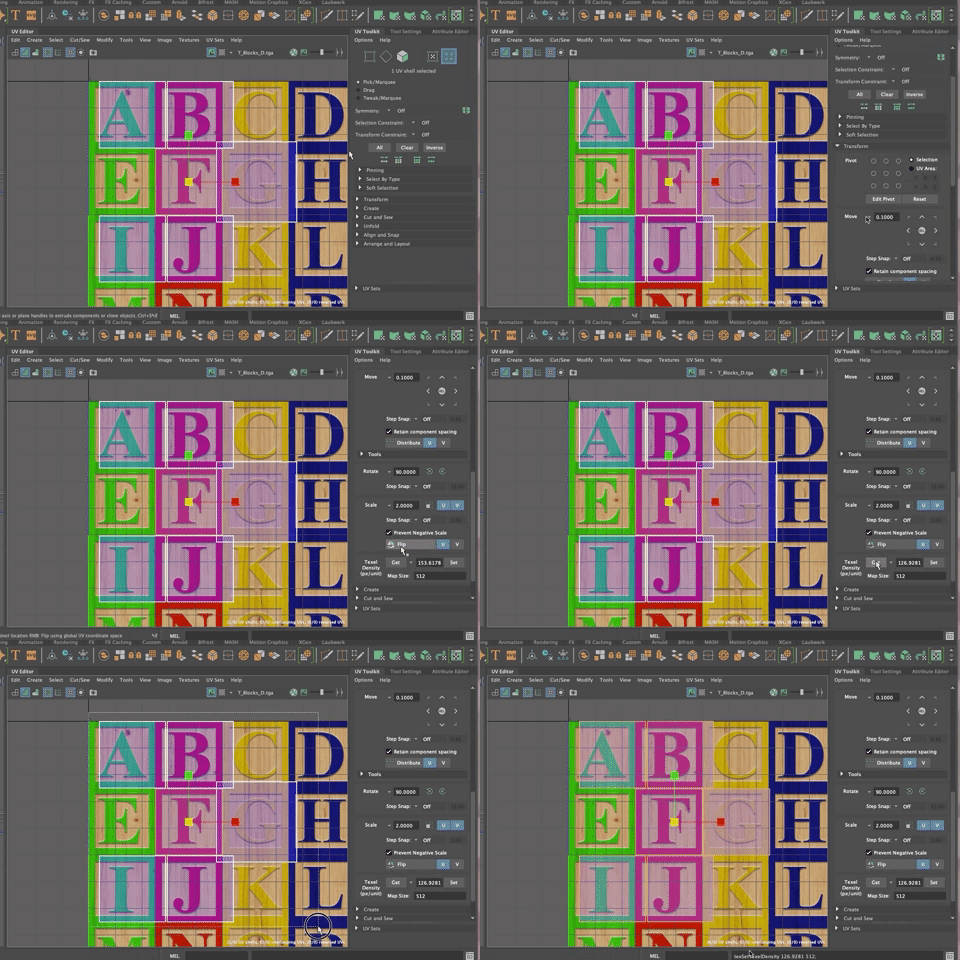
- Select a UV shell that is the correct size.
- In the UV Toolkit, go to Transform and open the tab
- Scroll down to Texel Density
- With the properly scaled UV shell selected, click GET
- Then select all the UV shells
- Hit Set
- All the UV's are scaled so that the textures should show at the proper size.
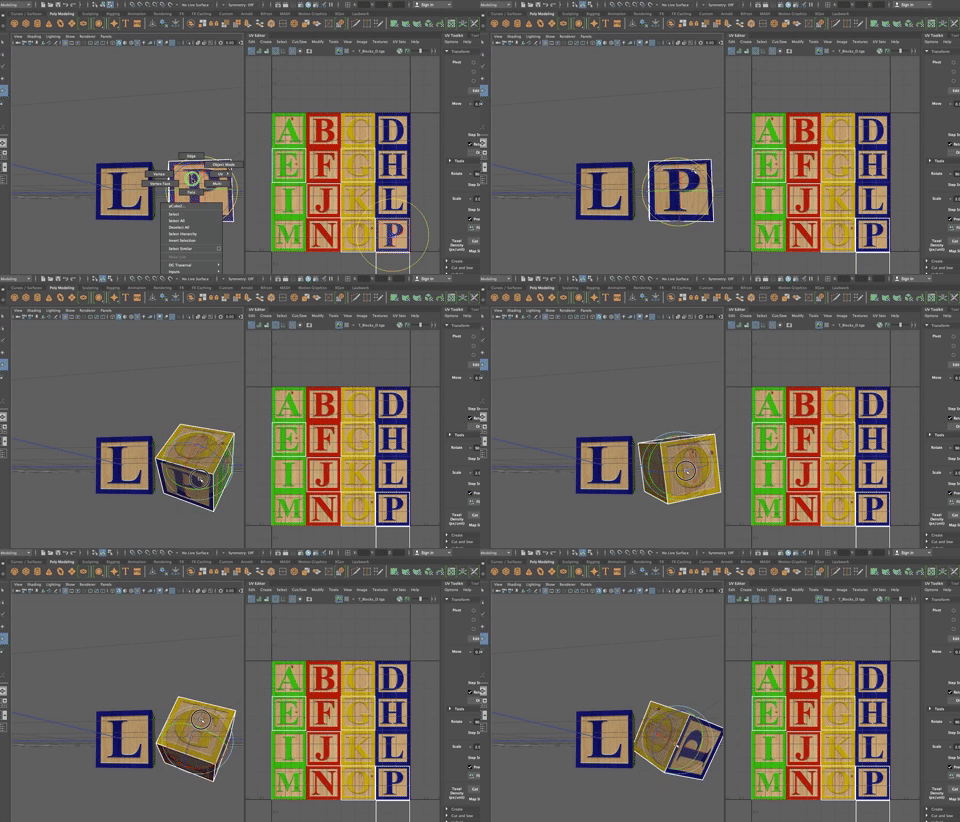
Now that they are all scaled the same, you can select each UV shell individually and move it them to different letters as shown.
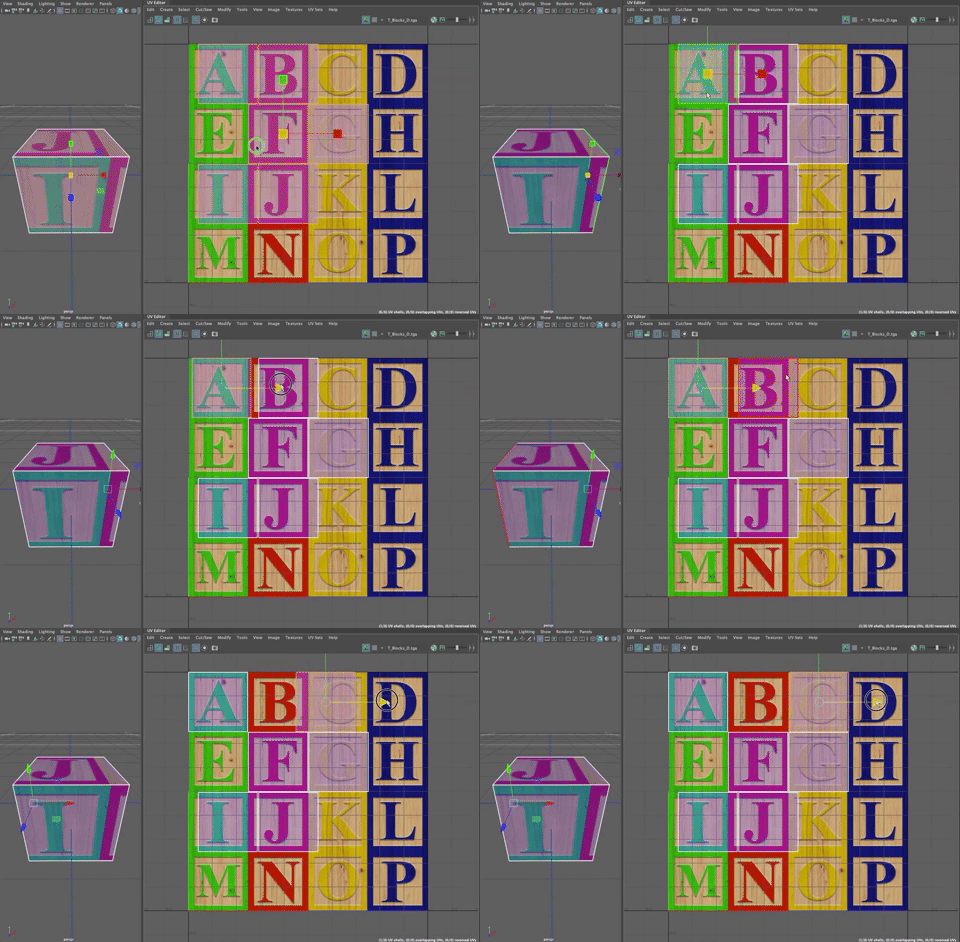
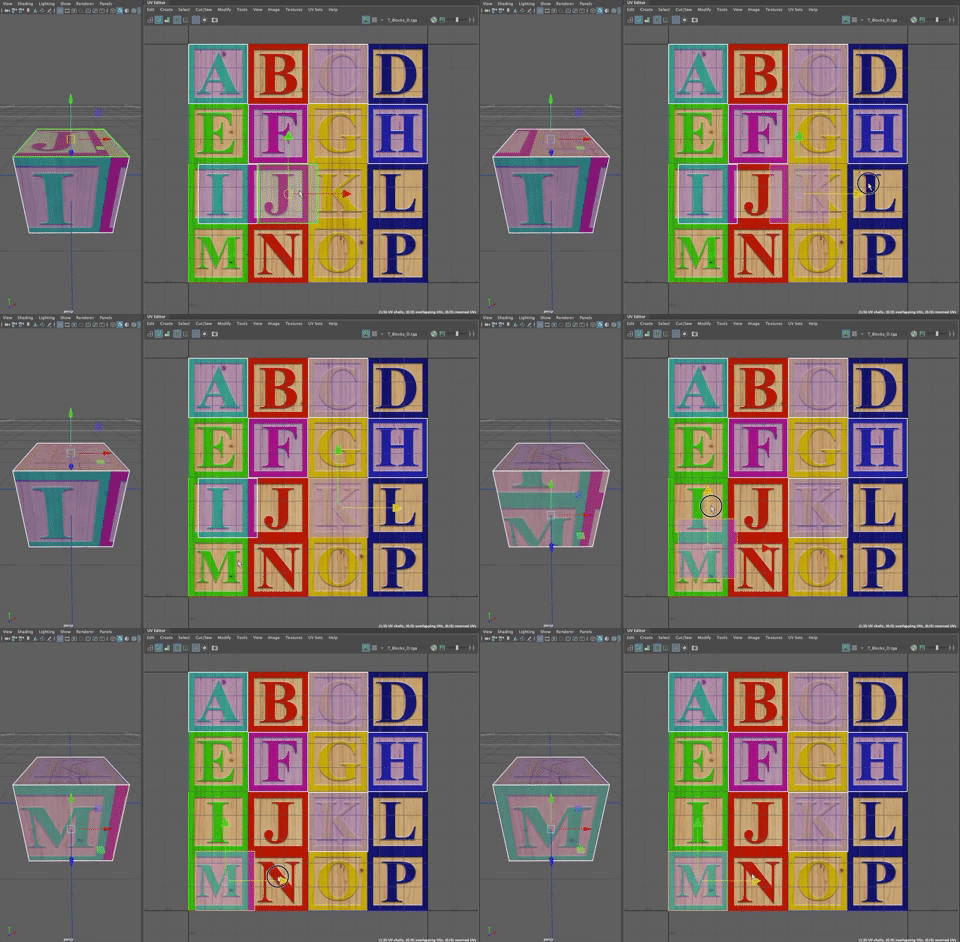
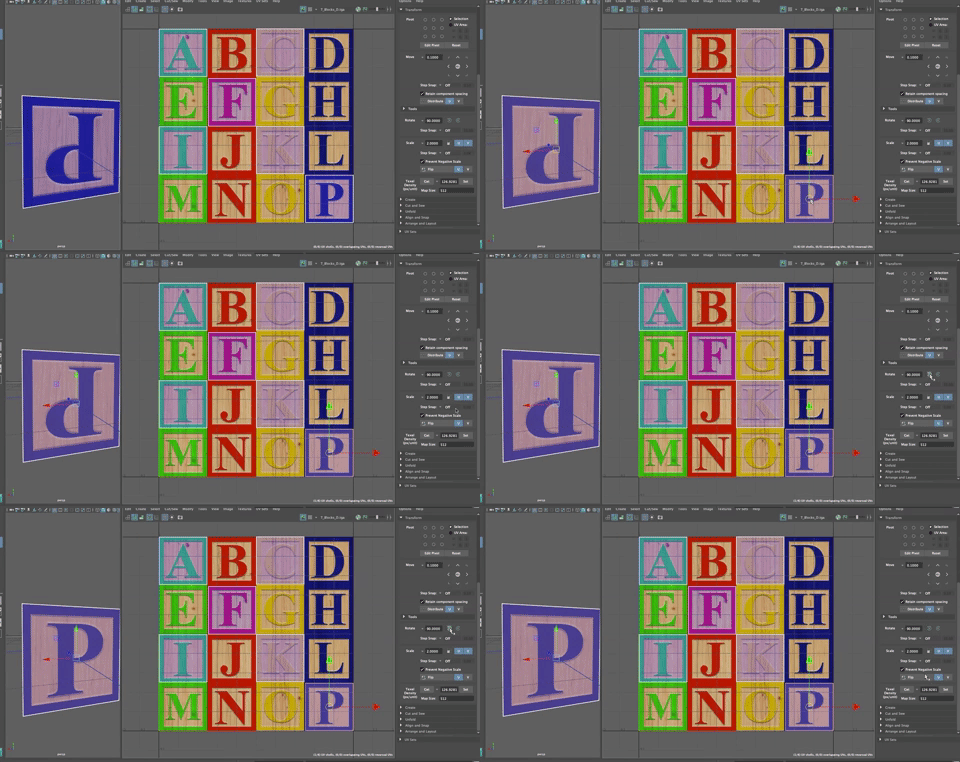
Because of the way UV Mapping works with a cube, though, one of the letters will be upside down.
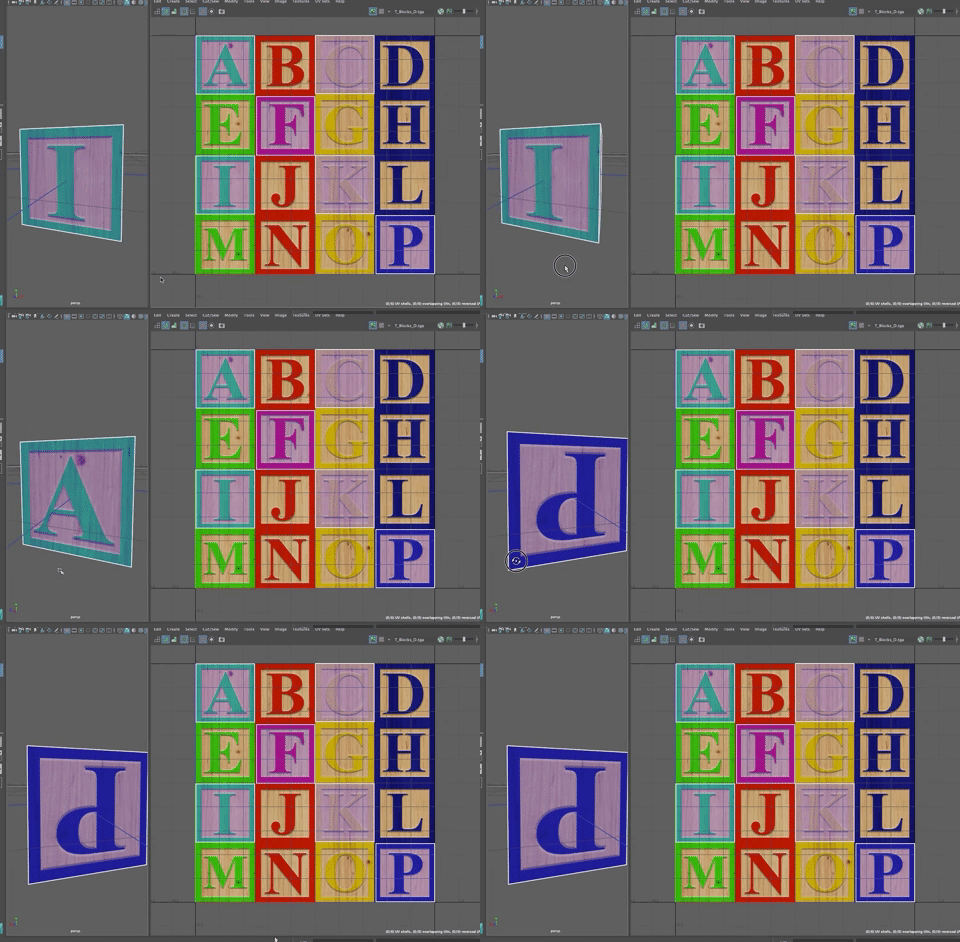
In my case, it is the "P"
Find the UV shell that is on the upside down letter and we can rotate it. There are, of course a few ways to rotate the shell, but the easiest, is to
Go to the UV Toolkit and under Transform>Tools Choose the rotate icon and click it until your letter is right side up as shown
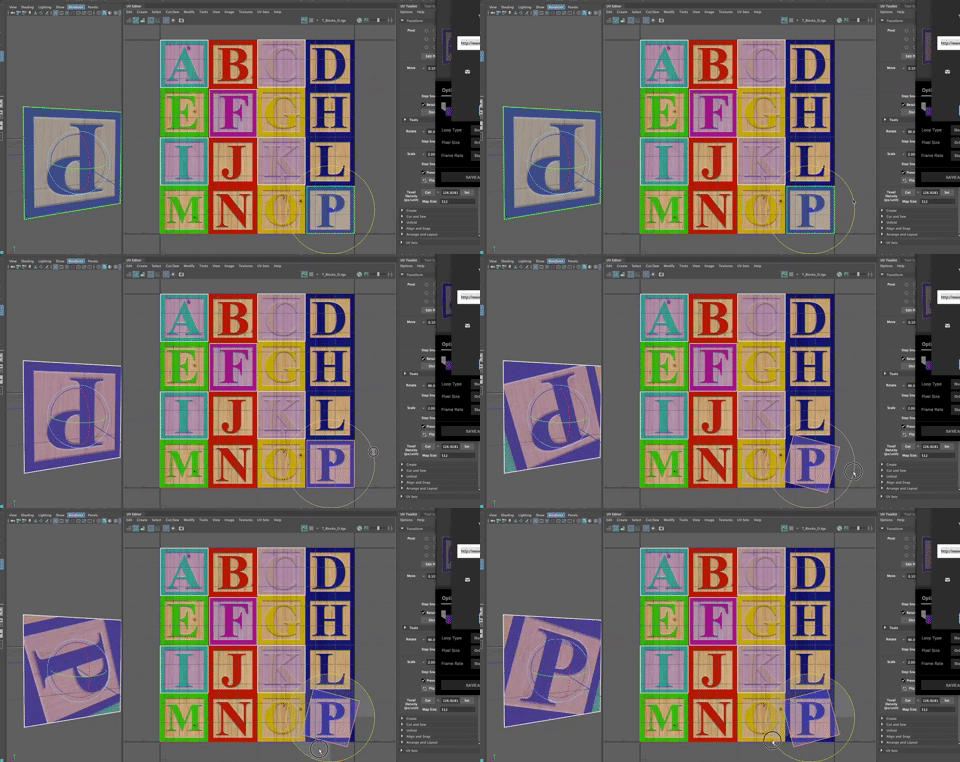
You can also use the rotate tool on the UV Shell, but it is very difficult to get the shell exactly right. You can use the rotate tool but hold down the "j" key to snap the rotation in 15 degree increments
Duplicating
Once you've laid out the UV's on an object, you can duplicate the object and the UV mapping goes with it.
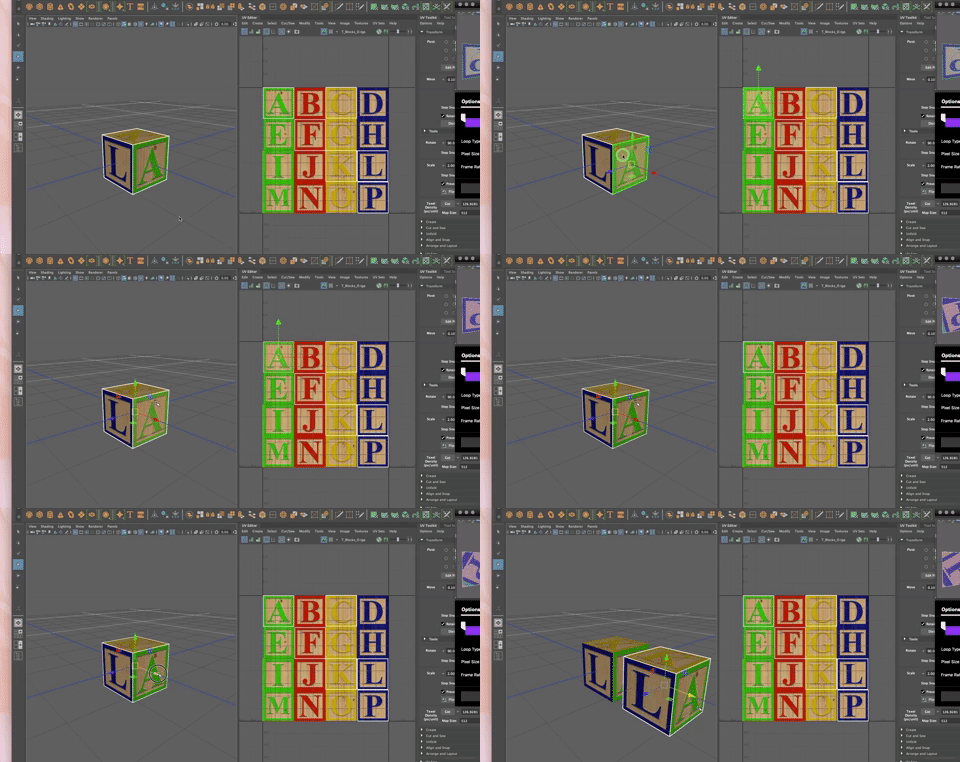
It is now easy to change the squares so they aren't identical.
To fix this
- Select the new cube
- In the UV Editor, go to UV Shell mode
- Select all the UV squares
- Use the move tool to move the all the squares down (you could also move them up or over)
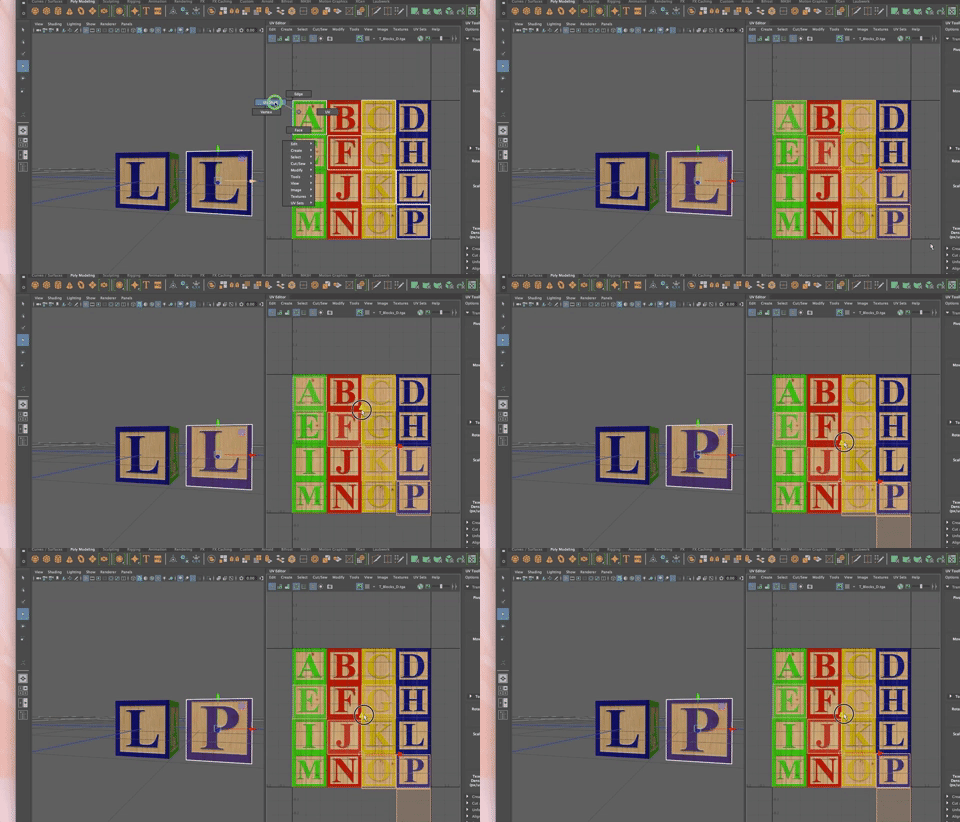
- You will notice that even though you went beyond the image of the texture, the texture repeats and your cube looks as it should.
Primitives and UV Mapping
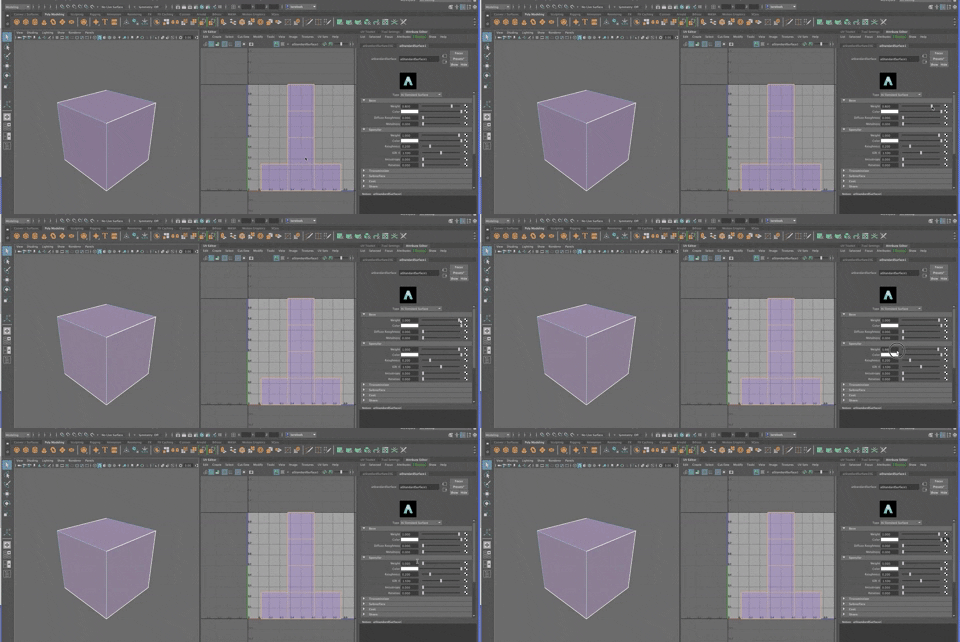
Create a poly cube. By default, all primitives are assigned a UV Texture Layout. You can see that by selecting the cube and looking in the UV Editor.


- Assign a New Material (aiSurfaceShader) to the cube,
- Change the Base Weight to 1.0
- Turn down the Specular Weight to 0
- Click in the checker to the right of the color attribute and Assign a Checker.
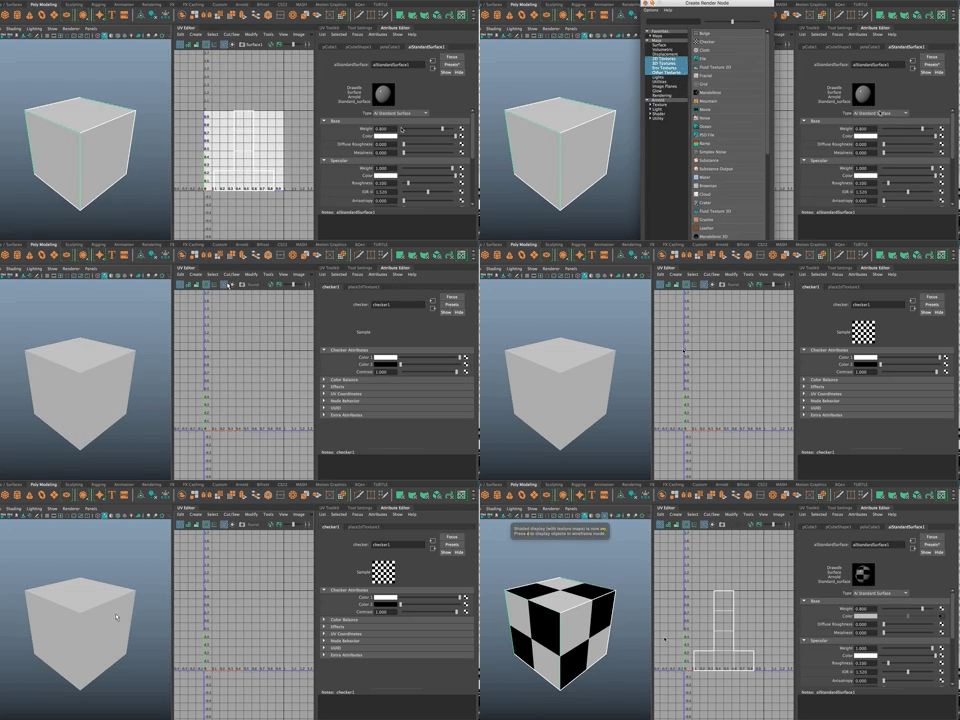
Hit the 6 key, to see the texture.
Hit 6 In the UV Editor, and you will see this:

Note that all the UV's are laid out in the upper right quadrant. This is called the 0 to 1 space and is the most important quadrant for doing simple UV Editing. When you get more advanced, you can use more of the space, but for this course, we'll stick with the upper right quadrant. What is happening is shown below.

The texture is mapped to the UV coordinates in the editor and applied back to the 3D model.
It is hard to see the UV map over the bold texture of the checkerboard. The 6 key is a toggle, so you can click the image view on or off by hitting the 6 key.
You can also see the UV's in blue to show any overlapping or reversed UV's or click one over to see UV's that are distorted (stretched shows as red and compressed shows as blue).
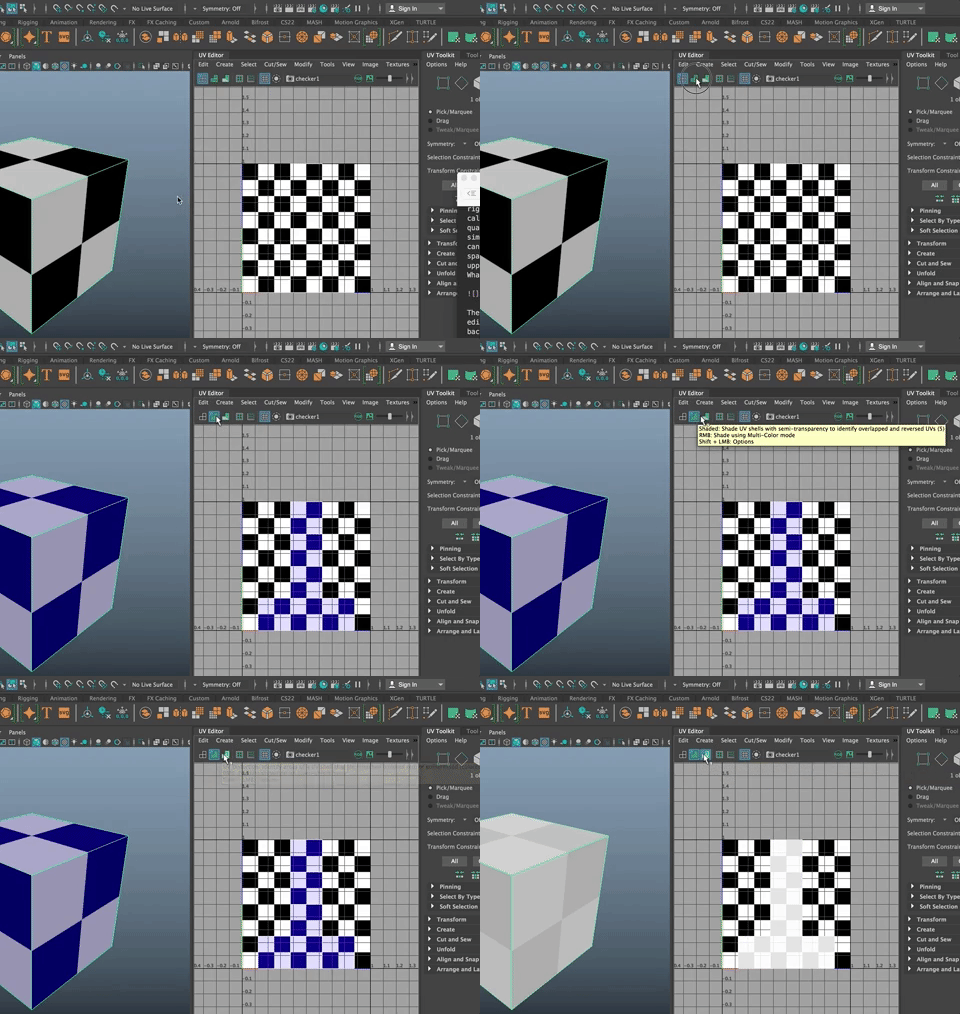
Because this lays out so well, all is ok, but for more complex shapes, these two options are a huge visual aid!
Create a spehere. Select it. See how it unwraps in the UV Editor.

Assign the same checkered lambert to the sphere. That the checkers are not square all across the sides of the sphere.

If you look at the sphere, you will see that the faces get compacted along the poles on the model. In the UV Editor, the UV's are laid out perfectly evenly. The even mapping onto a compressed space creates this distortion.
Try a cylinder.

Notice how the caps are laid out separately.
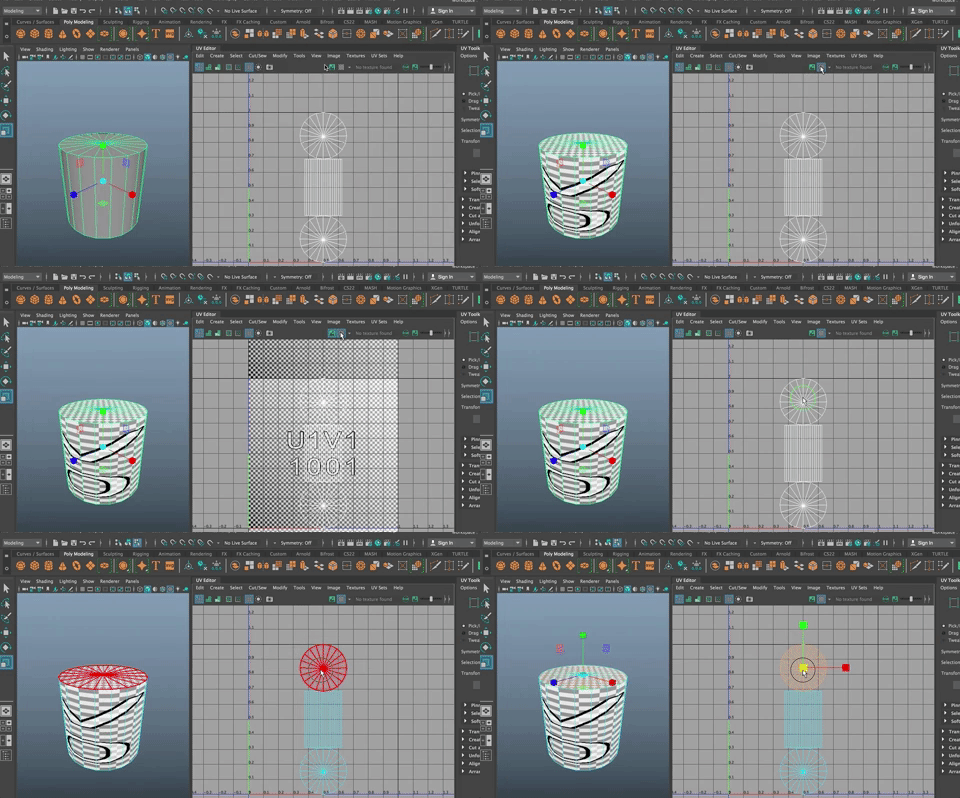
You can apply a checker texture right from the UV Editor.
In the UV Editor, Right click and choose UV Shell.**Select one of the caps.**
Hit the r key to bring up the scale tool.
If you scale the checkers get smaller and visa versa.
You can also move the UV Shell to another part of the UV Editor using the Move Tool.
The goal isto find a way to lay out the UV's onto the texture so that the texture is the same size (to avoid stretching in some parts) and to make them line up nicely to avoid having a texture seam at a spot that is too obvious in the shot.
As with sewing, there is always a seam, you just want to hide the seam on a shirt by having it under the arm and along the sides, and you want to match any patterns as much as you can and be sure the patterns are all facing in the same direction (if you had a flamingo pattern, you don't want the flamingos upside down in the back, for example).
UV Map a Table
Let's start with a scene file you can find on the Files to Download for Class folder on the google drive. This is a table built by someone named Shane Whit. I got it online for this demo.
The table is made up of a bunch of rectangles.
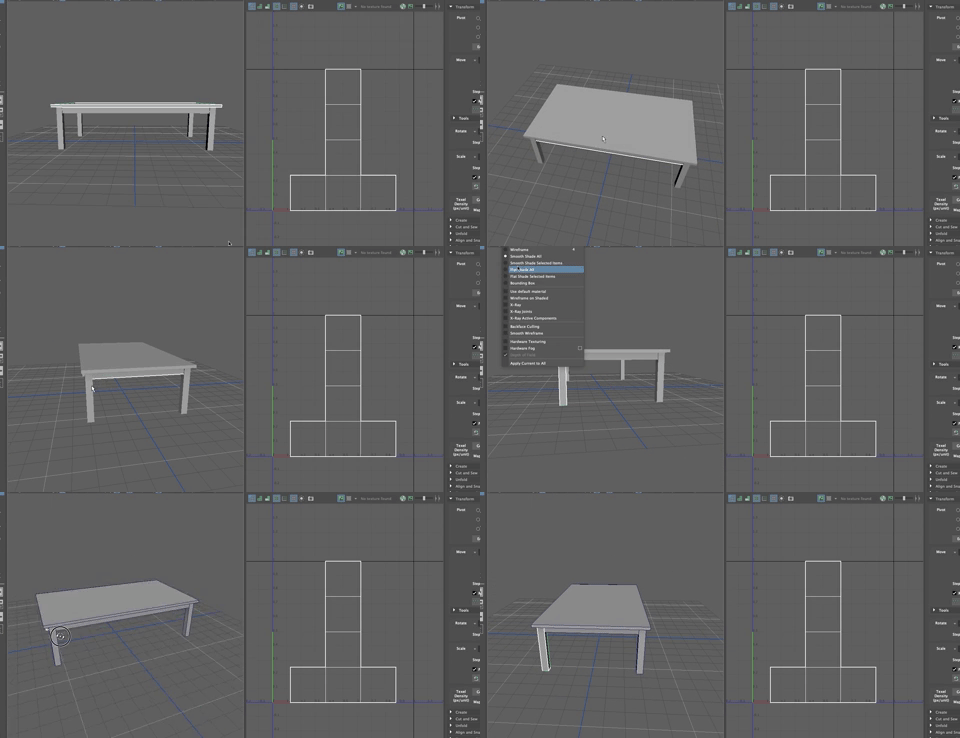
The UV Editor looks just like it did for the last exercise, but in fact, there are a bunch of cube UV's laying on top of each other
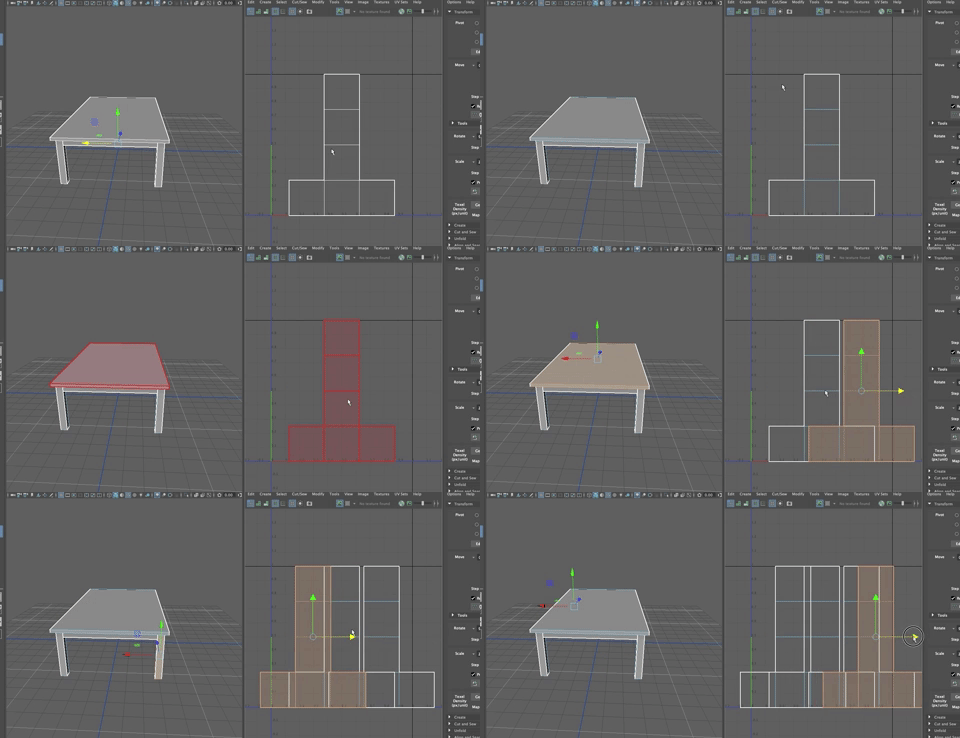
- Click on the checkerboard pattern in the UV Editor menu
- This puts a checker pattern onto the object to help see how an actual texture would map.
- You see that the checkerboard is meant to be squares of black and white.
- Notice that the checkerboard on the actual table object has rectangles and how distorted the UV's look around the sides and legs!
- We need to fix that!
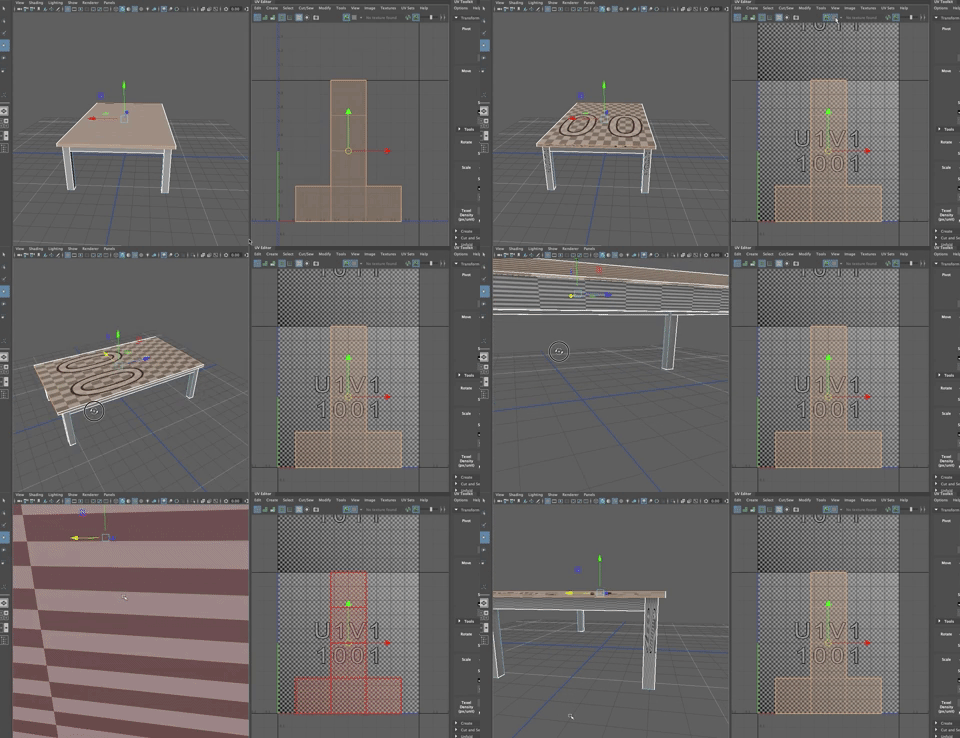
The letters on the texture are there to help make sure the UV's are lined up so the textures are facing in the right direction.
- Create an aiStandardSurface material
- turn up the base color to 1.0
- turn down the specular to 0
- rename it M_Wood
- Drag and drop the T_wood_D texture (T is for texture and D is for diffuse since we are adding the diffuse color, the color that shows when light bounces off it)
- Assign this material to the entire table
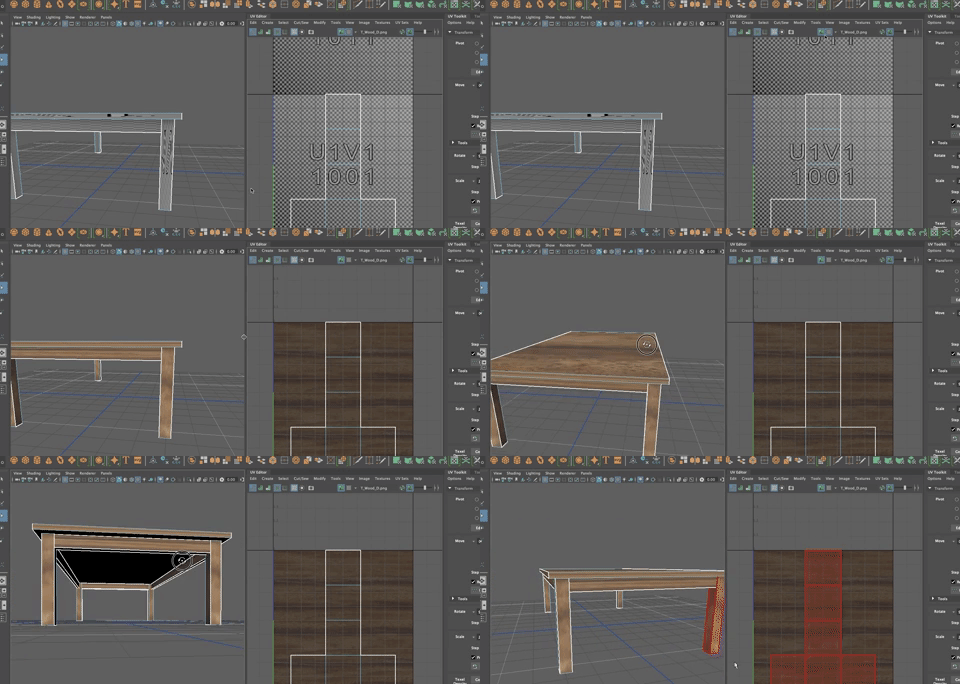
Even when you hit 6 you don't really see the wood grain. You need to turn off the checkerboard to see it clearly.
Notice that the wood texture looks really bad, as you would expect after seeing the checkerboard.
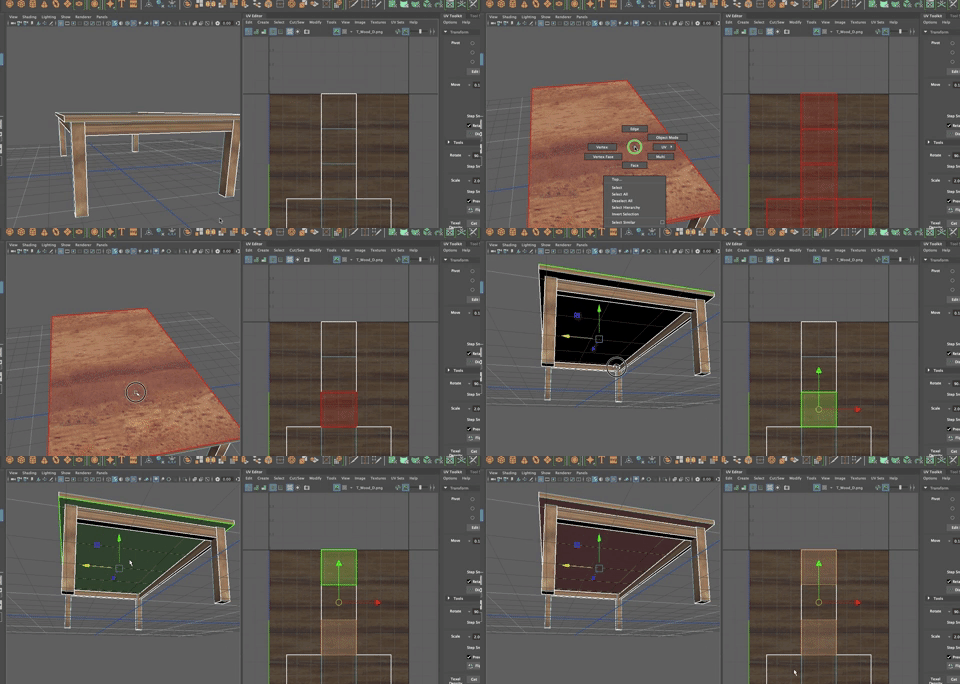
Let's fix it!
- In face mode, select the top and bottom face of the table top. Notice that the two corresponding UV squares are selected in the UV Editor
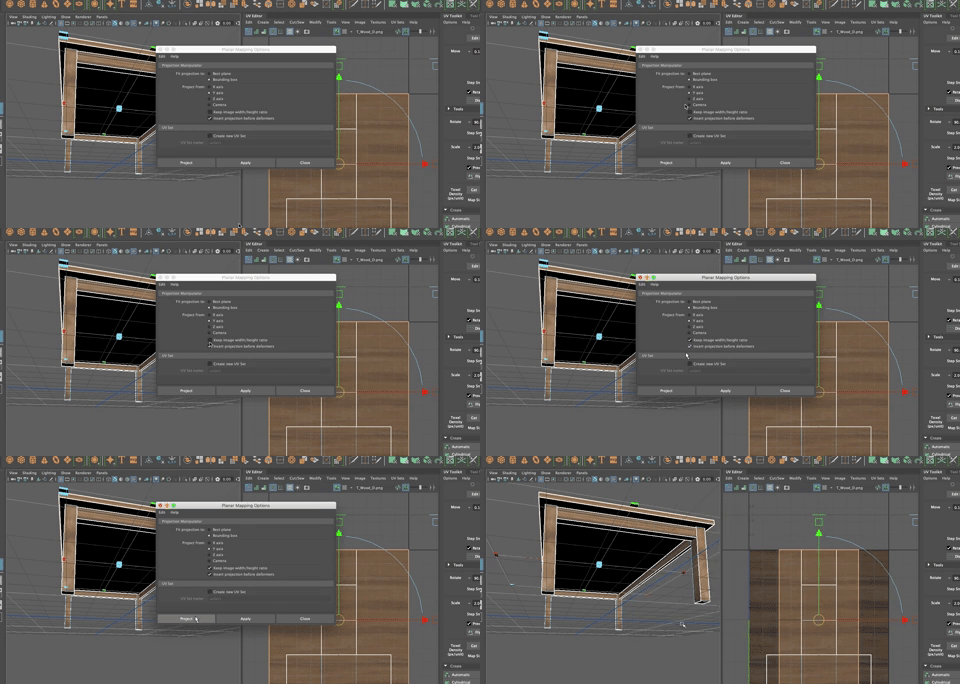
Planar Projection
Because the table is flat, a planar projection makes sense.
- In the UV Toolkit,
- Go to Create tab
- Shift click on Planar to open the Options Box
- The projection wants to happen from the Y axis, so choose that.
- Make sure the Keep Image width/height ratio is checked ON to alleviate distorion
- Hit Project
Now you have some big rectangles in the UV Editor. Select the UV Shells for the rectangles and move them out of the 01 Quadrant
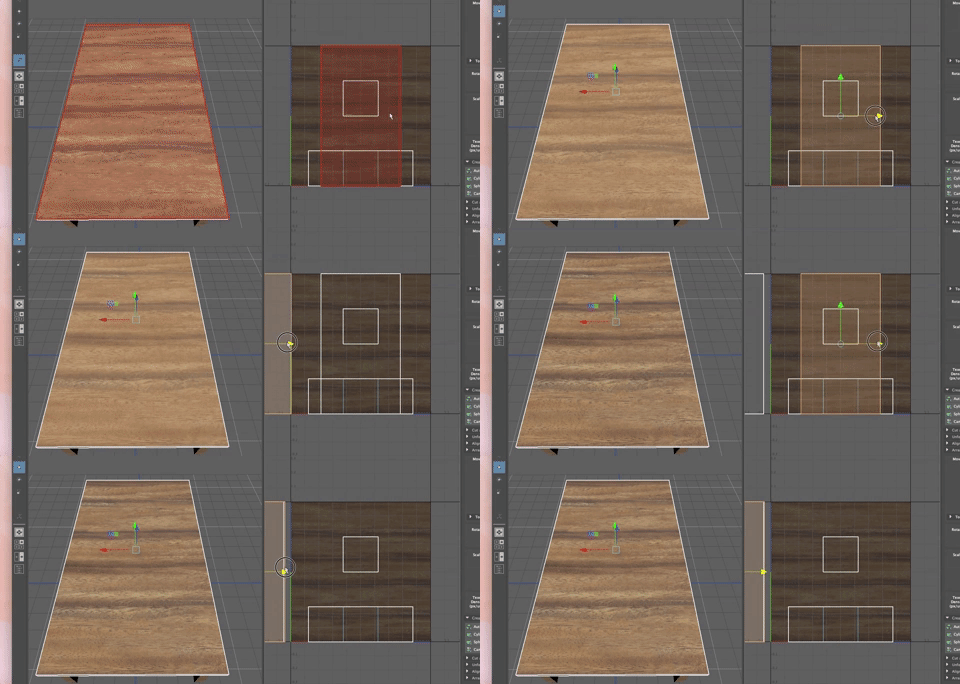
- Now select the faces of the table top that face the positive and negative x axis as shown
- Shift select the Planar option from the Create Menu
- Choose x-axis this time (all other settings are the same)
- Hit Project
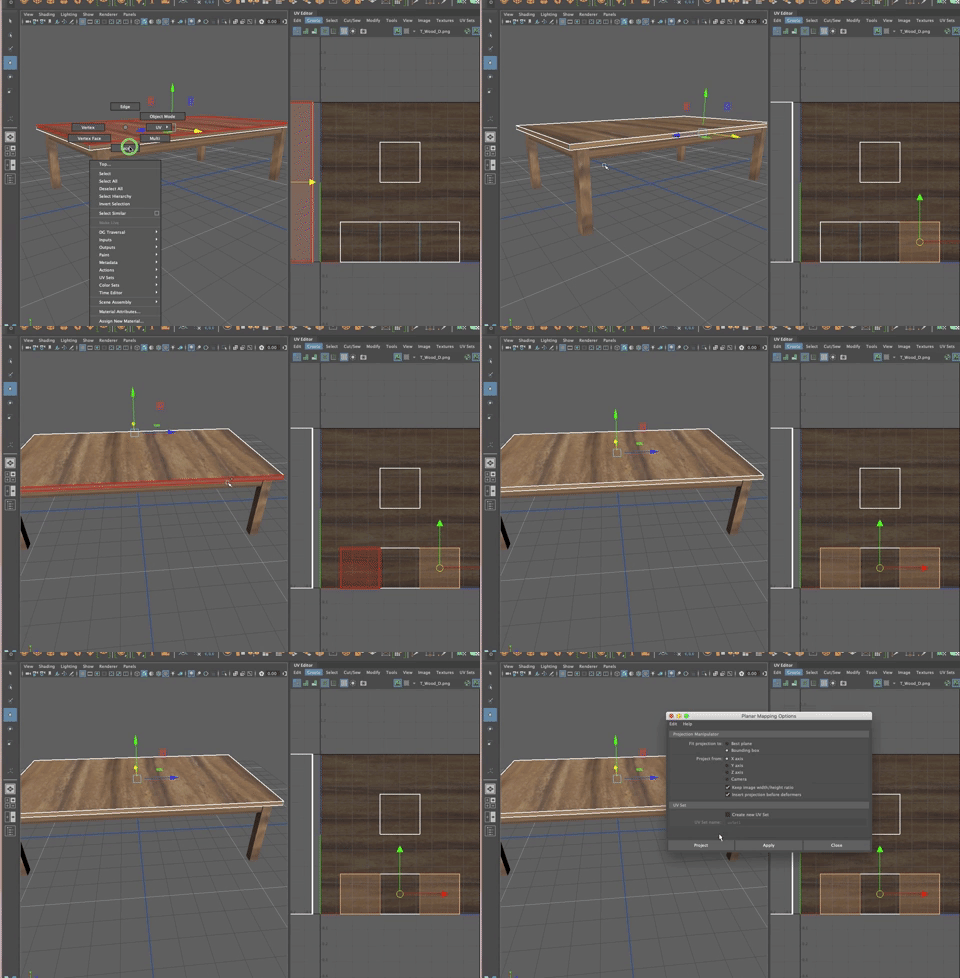
Now you have some long narrow rectangles in the UV Editor.
- Move those out of the way, too
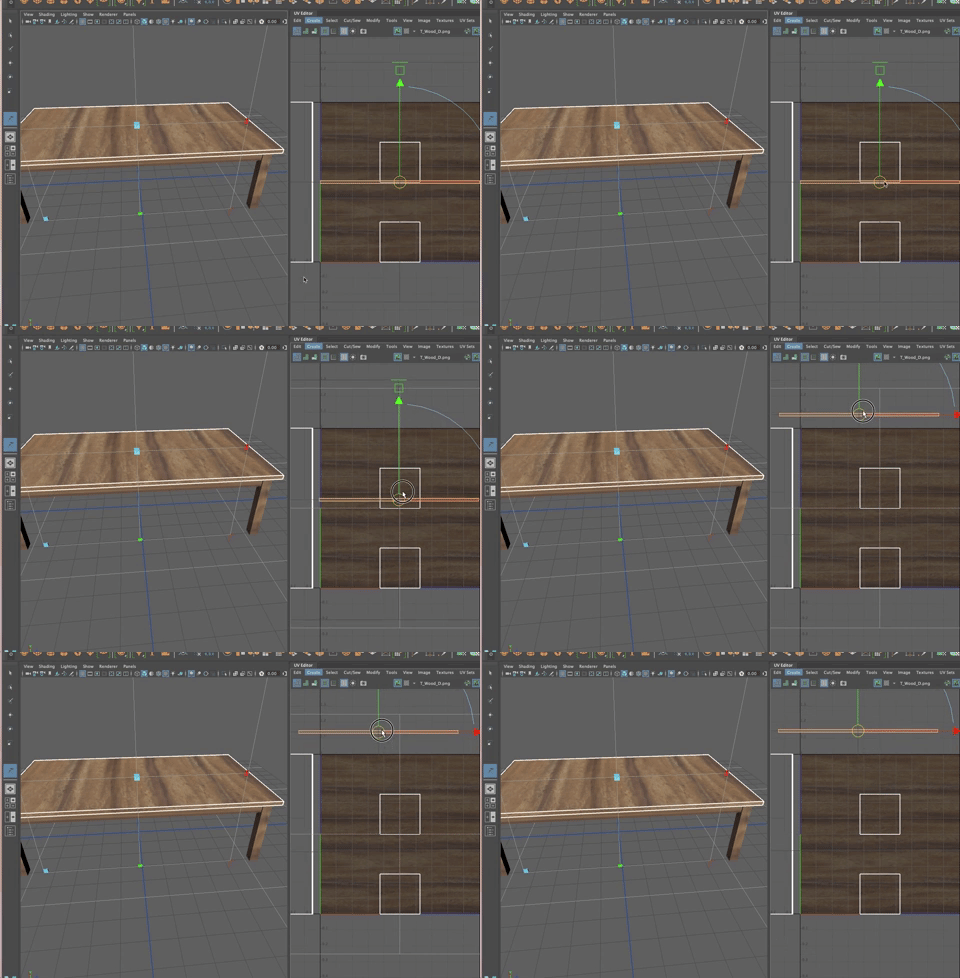
There are just two squares left in the UV Editor. These are the faces of the positive and negative z sides of the table top.
- Select the UV's in the UV Editor (you could also select them on the object, but this is simpler now that they the only UV's left)
- Planar map from the z axis
- The square UV's are now long and thin like the faces on the object.
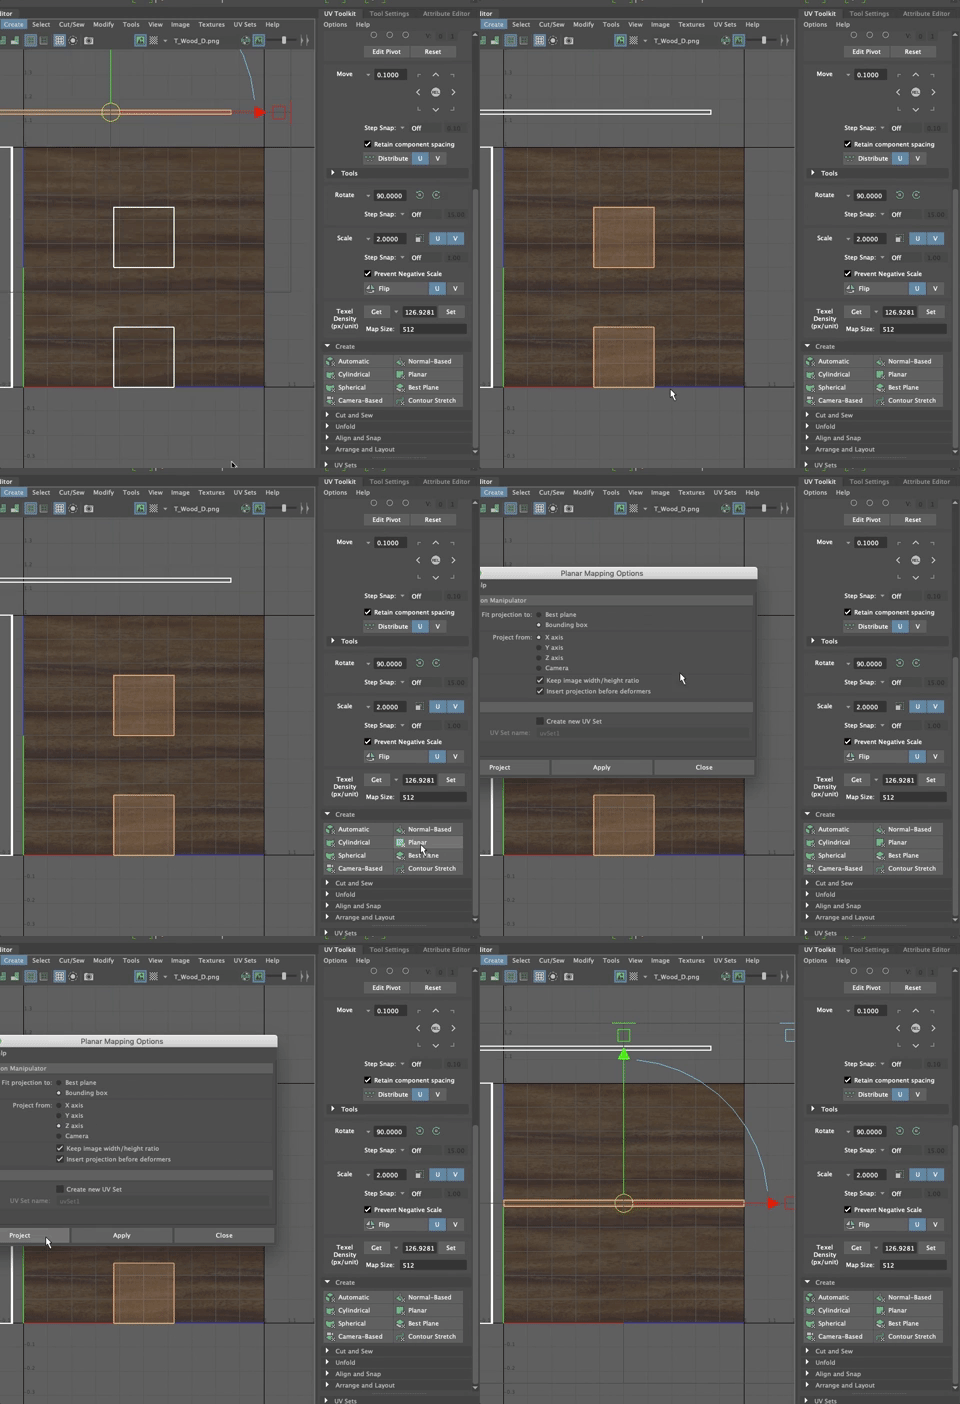
- Move those UV's out of the 0-1 space, too.
To see how the mapping is looking, turn off the texture view and turn on the checkerboard again as shown
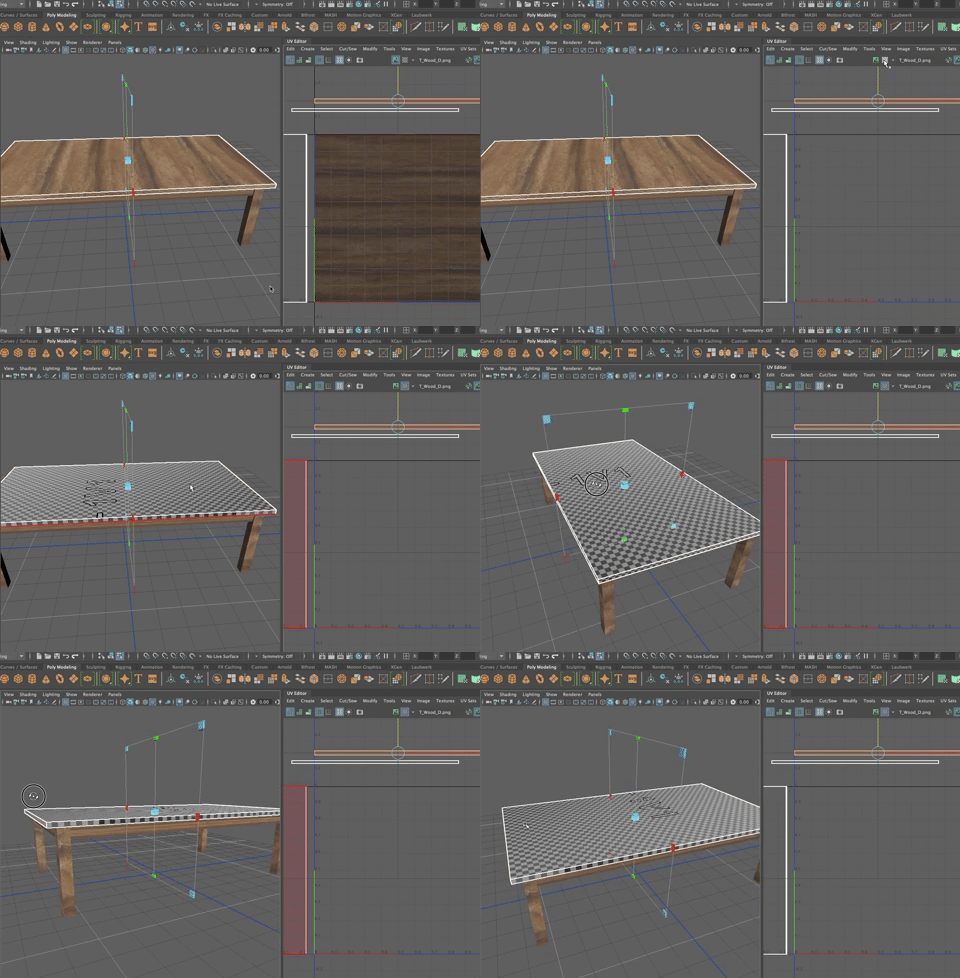
Notice how much better the mapping looks! Nice squares.
It still isn't quite right.
If you click on teh blue shaded squares at the top of the UV Editor, you will see that the shells are purple, this is because there are two shells stacked on top of each other (one for the top face and one for the face underneath the table top) Move them apart from each other and notice that they are different colors (red and blue)
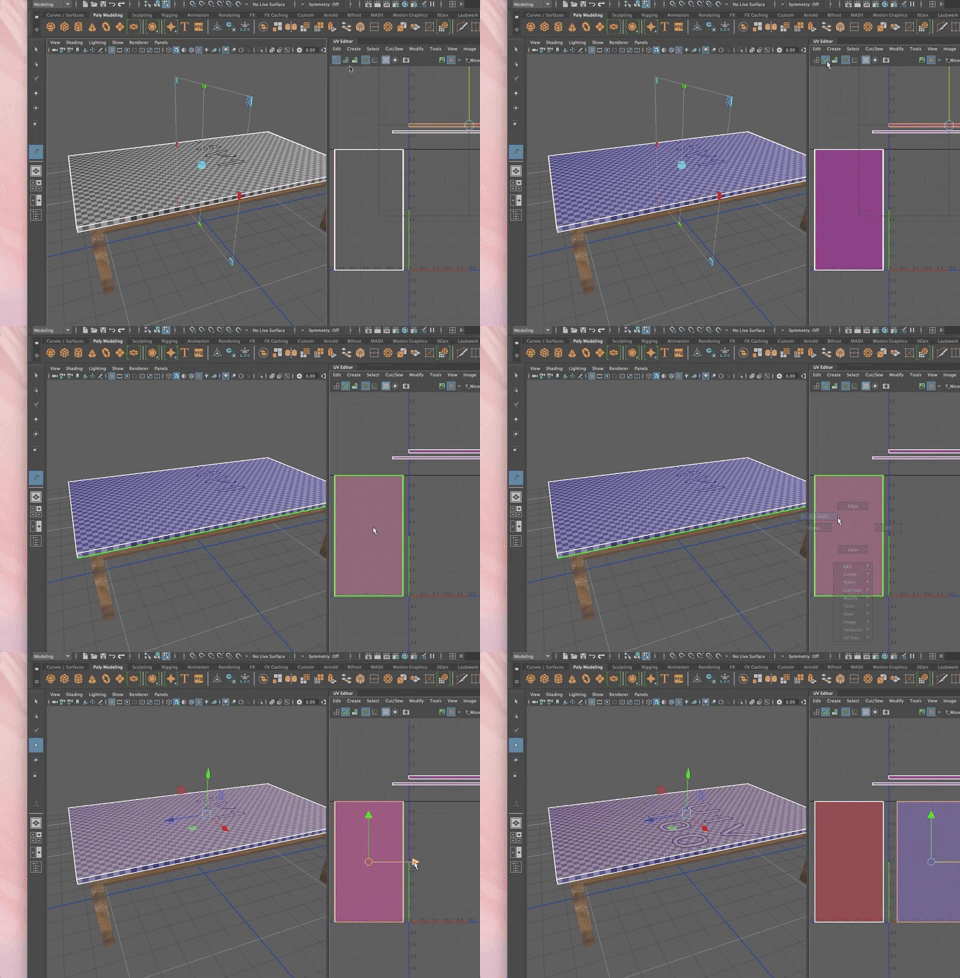
Do the same for the other faces so you have six rectangles in your UV Editor
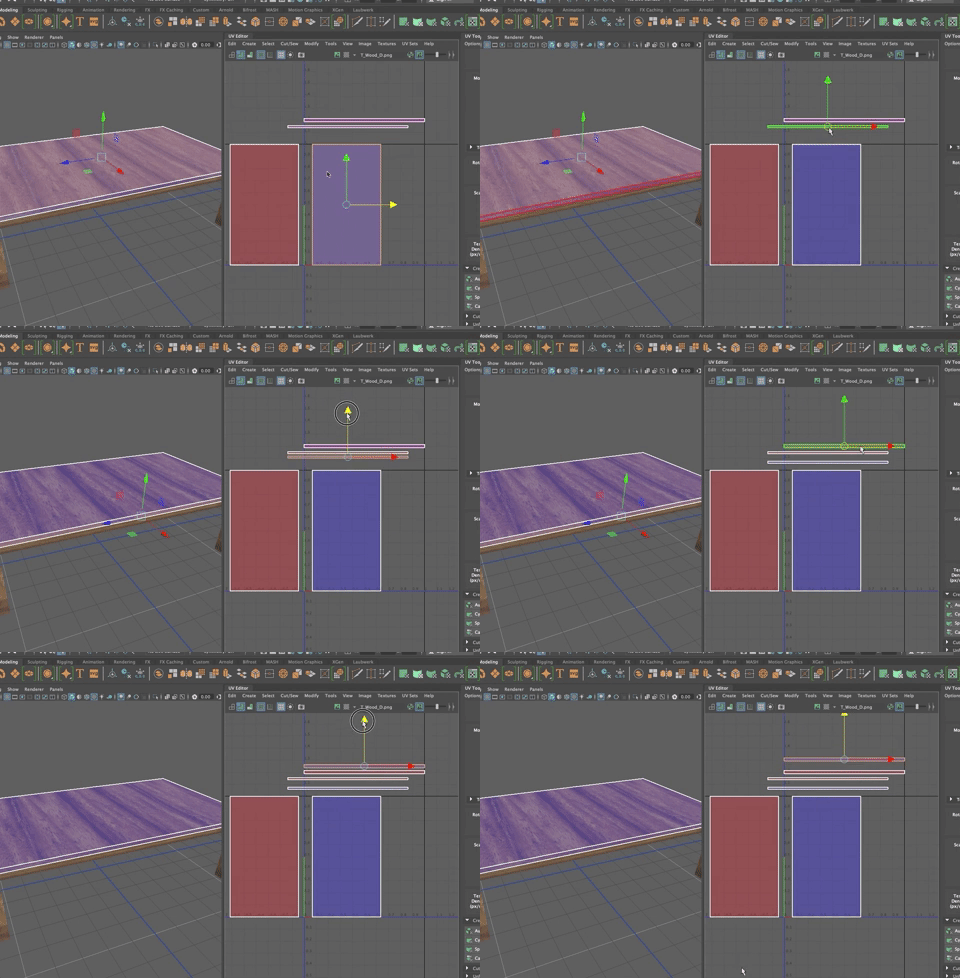
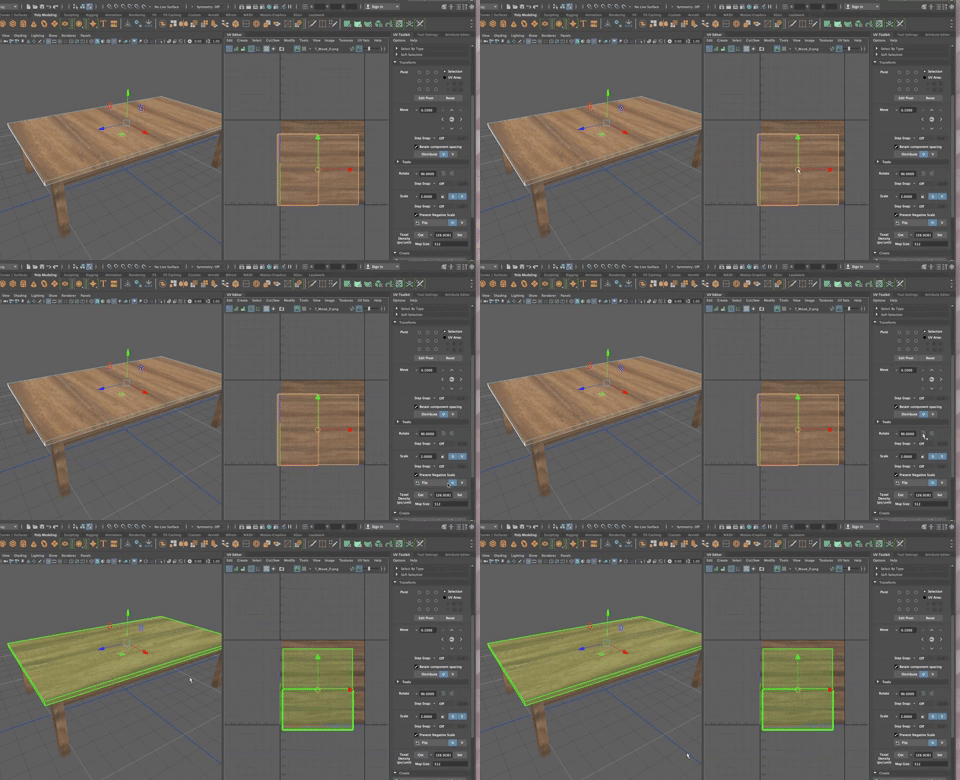
Blue means that the normals are facing in the correct direction. Select all the red shells and go to transform >flip on the U axis (horizontally)
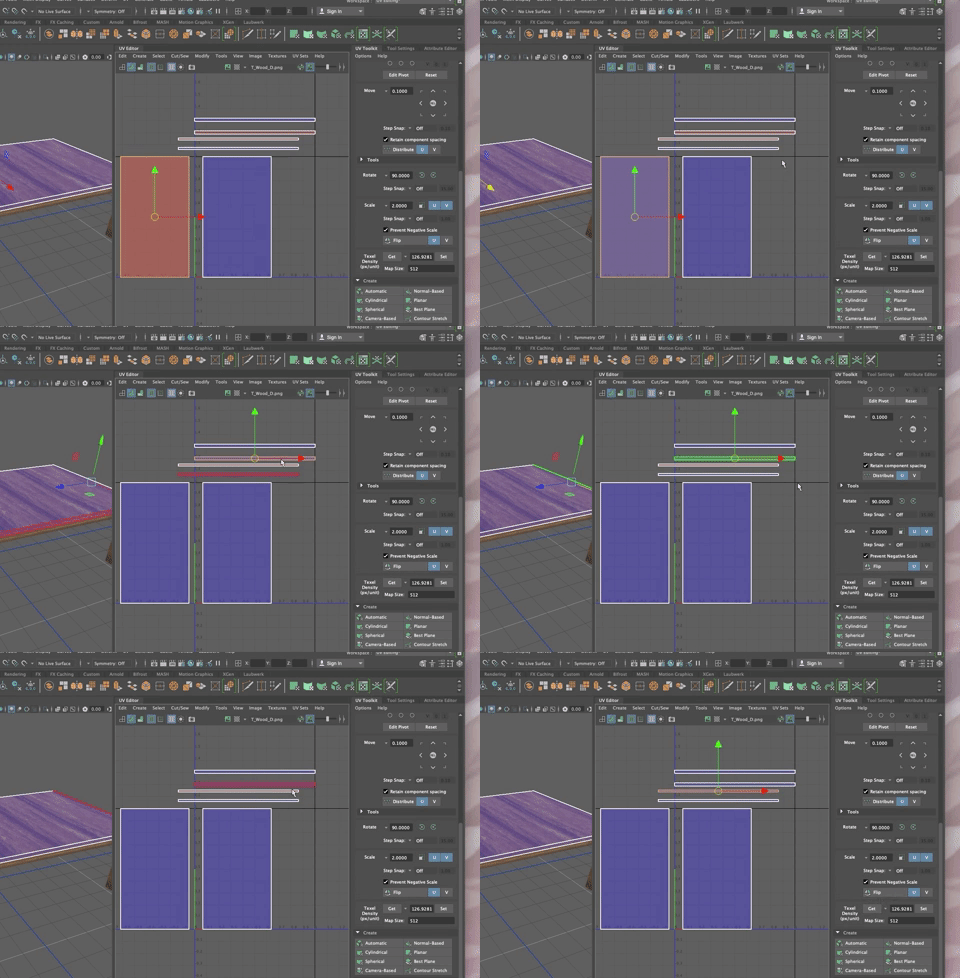
Now they are all facing as they shoudl be but the size is not right yet Notice that the face that is on the short side of the tabletop is too long.
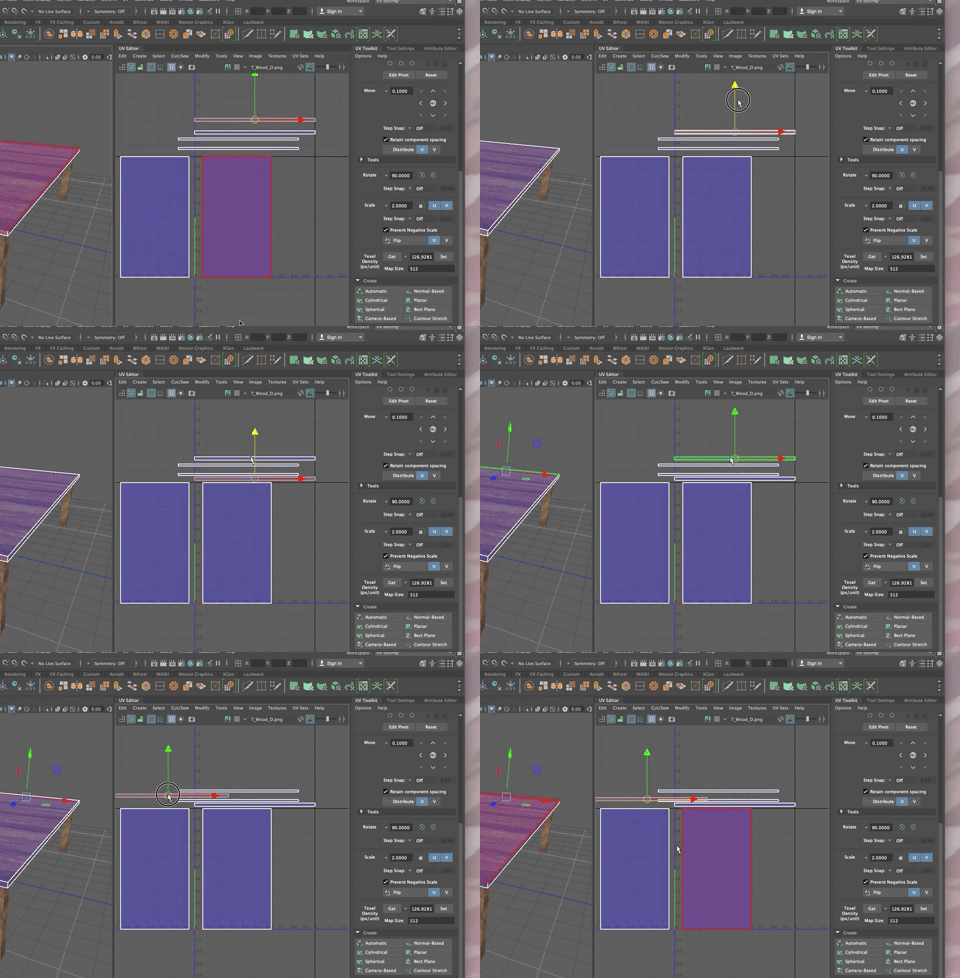
You can fix it with the Texel Density method from before, or you can use Layout. Try it.
- With all the UV Shells selected
- Go to the Arrange and Layout Tab
- Find Layout and SHIFT click on it to bring up the options box
- Choose Legacy mnode
- And Prescale WORLD
- Hit Layout UV's
Notice that all the uv's are back in the 0-1 quadrant and they are now scaled to each other properly.
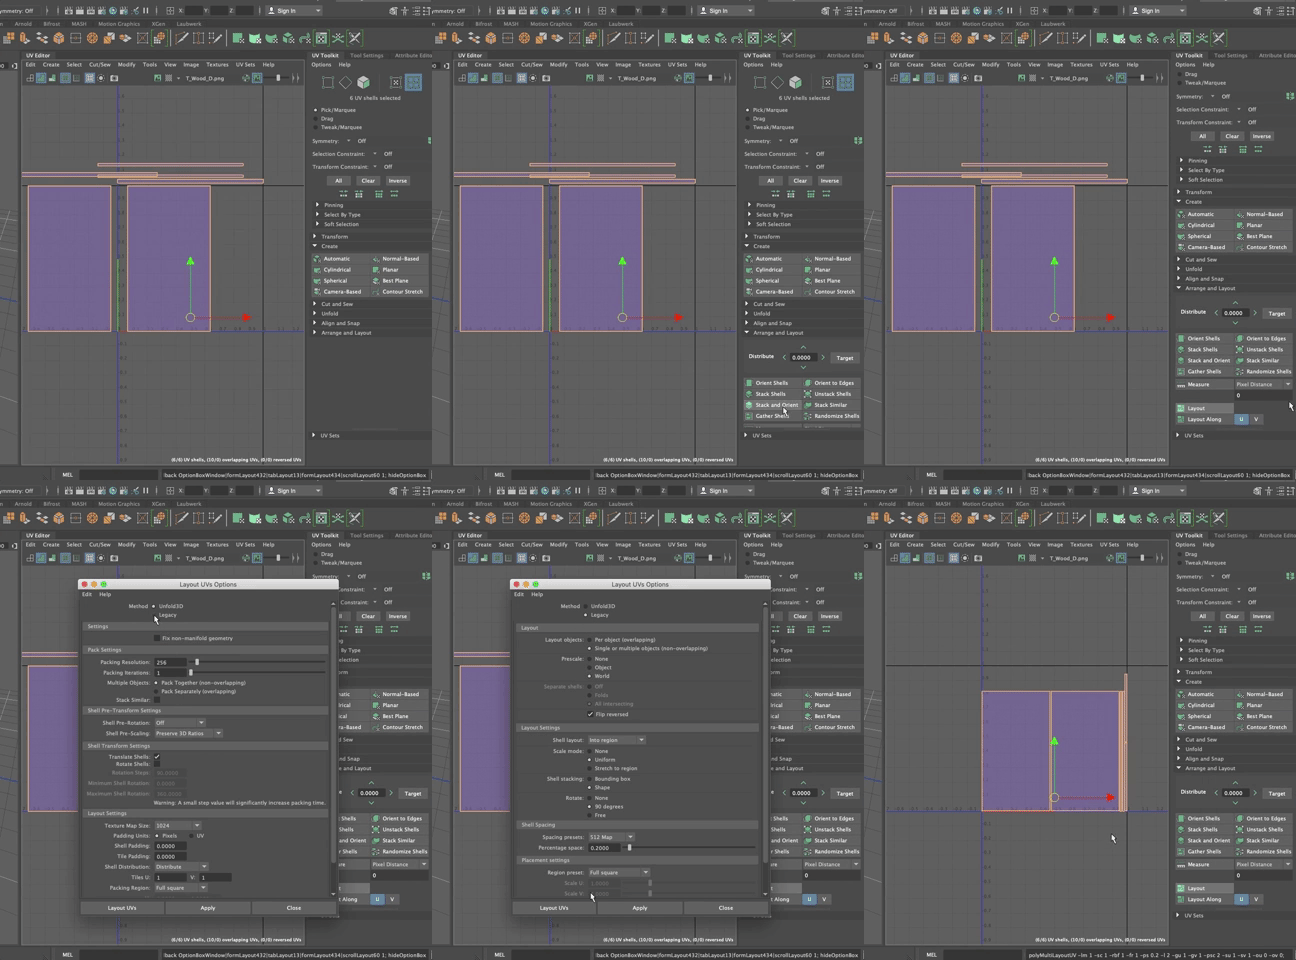
If your texture looks ok, you can stop here, but chances are the wood grain is too big or running the wrong way, and is not sitting correctly just yet on the edges of the table top.
Let's fix it.
To fix the way the side edges meet the top, so it looks like real wood and not a cheap laminate you have to stitch it together
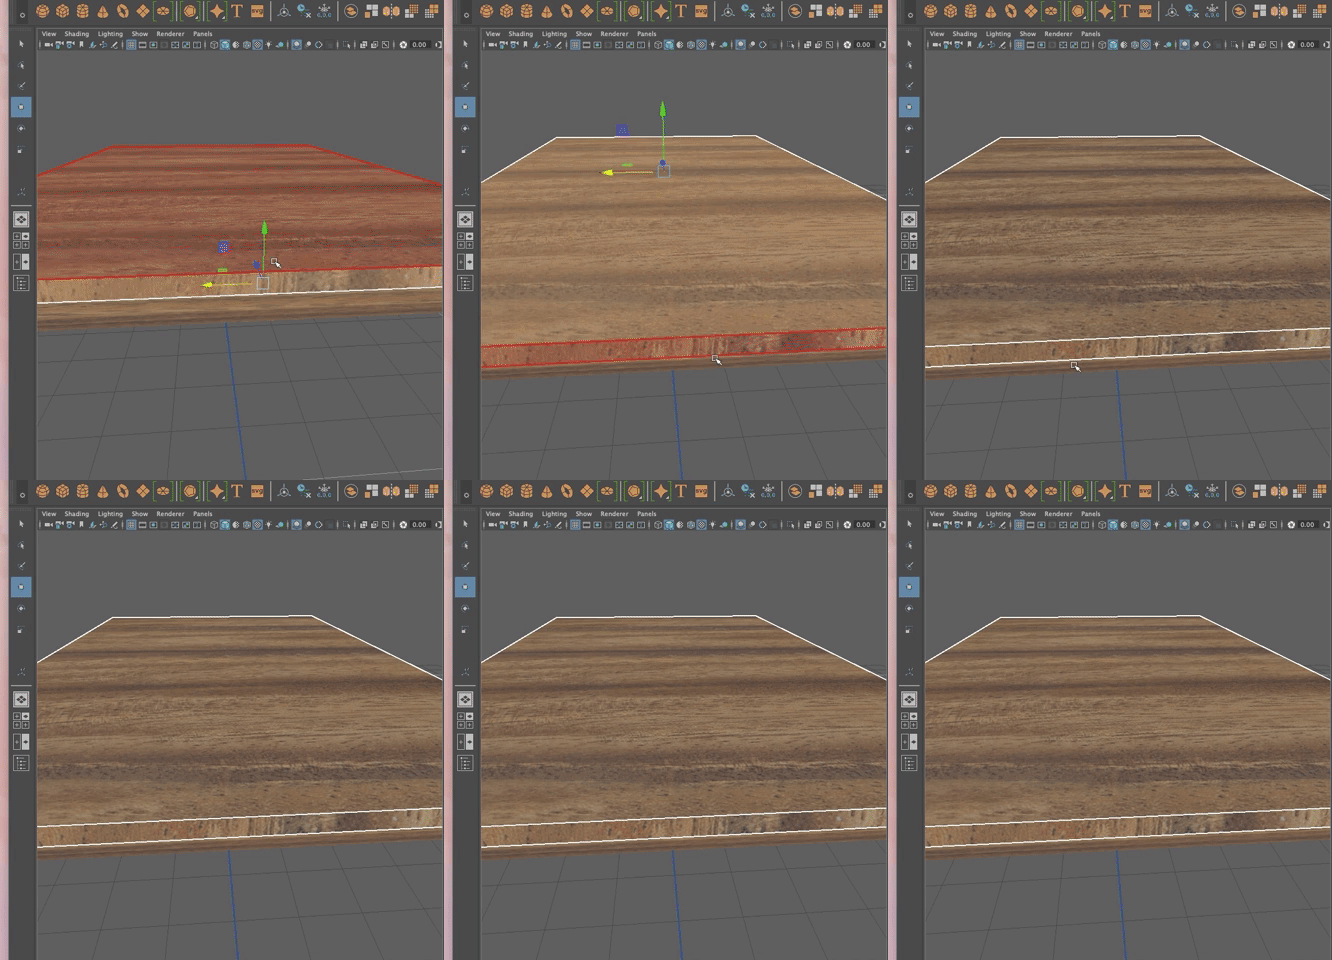
When stitching the uv's together, it is just like sewing a garment. There are always seams and you want to make sure they are in hard to see place, such as where the bottom face of the tabletop meets the edges, as opposed to where the top face of the table top meets the edges, if you follow.
OK. Let's do it.
- Select the top face on the object to find the top face uv's
- You can adjust how dark the texture shows up in the UV editor by moving the slider on the top right.
- Go into edge mode
- You see that when you mouse over an edge, it turns red and the corresponding edge on the object and on the other UV's are also red.
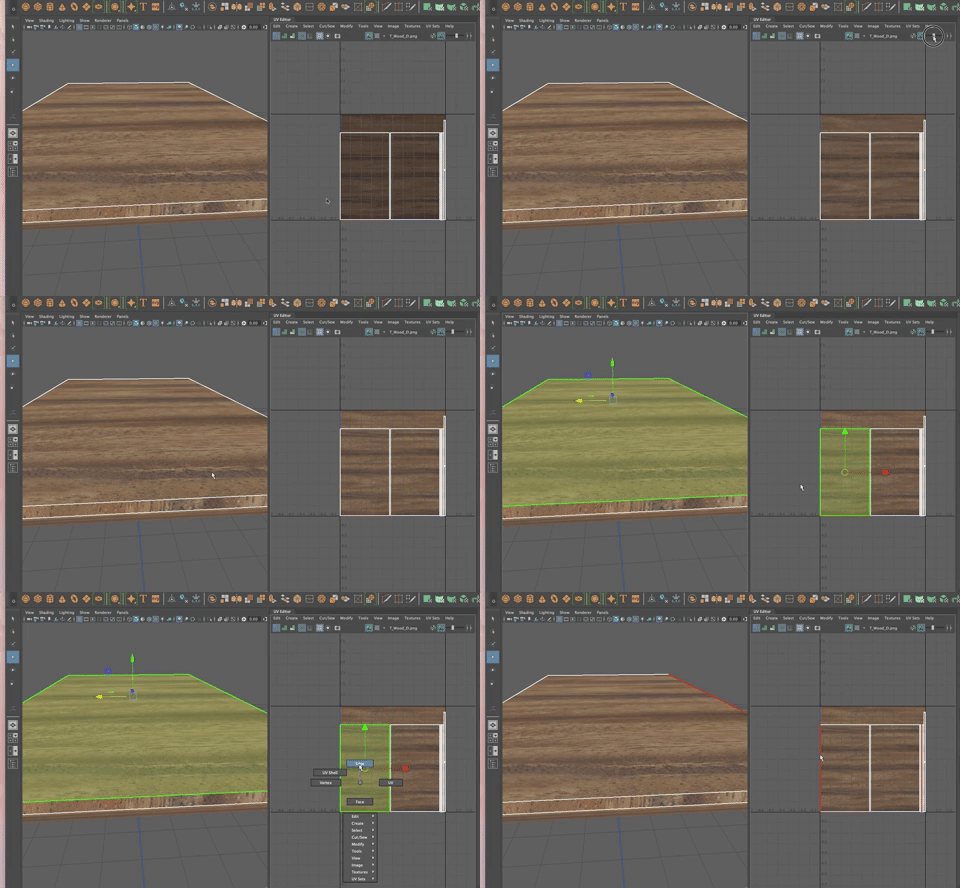
This makes it easy to know when edges we are going to stitch together.
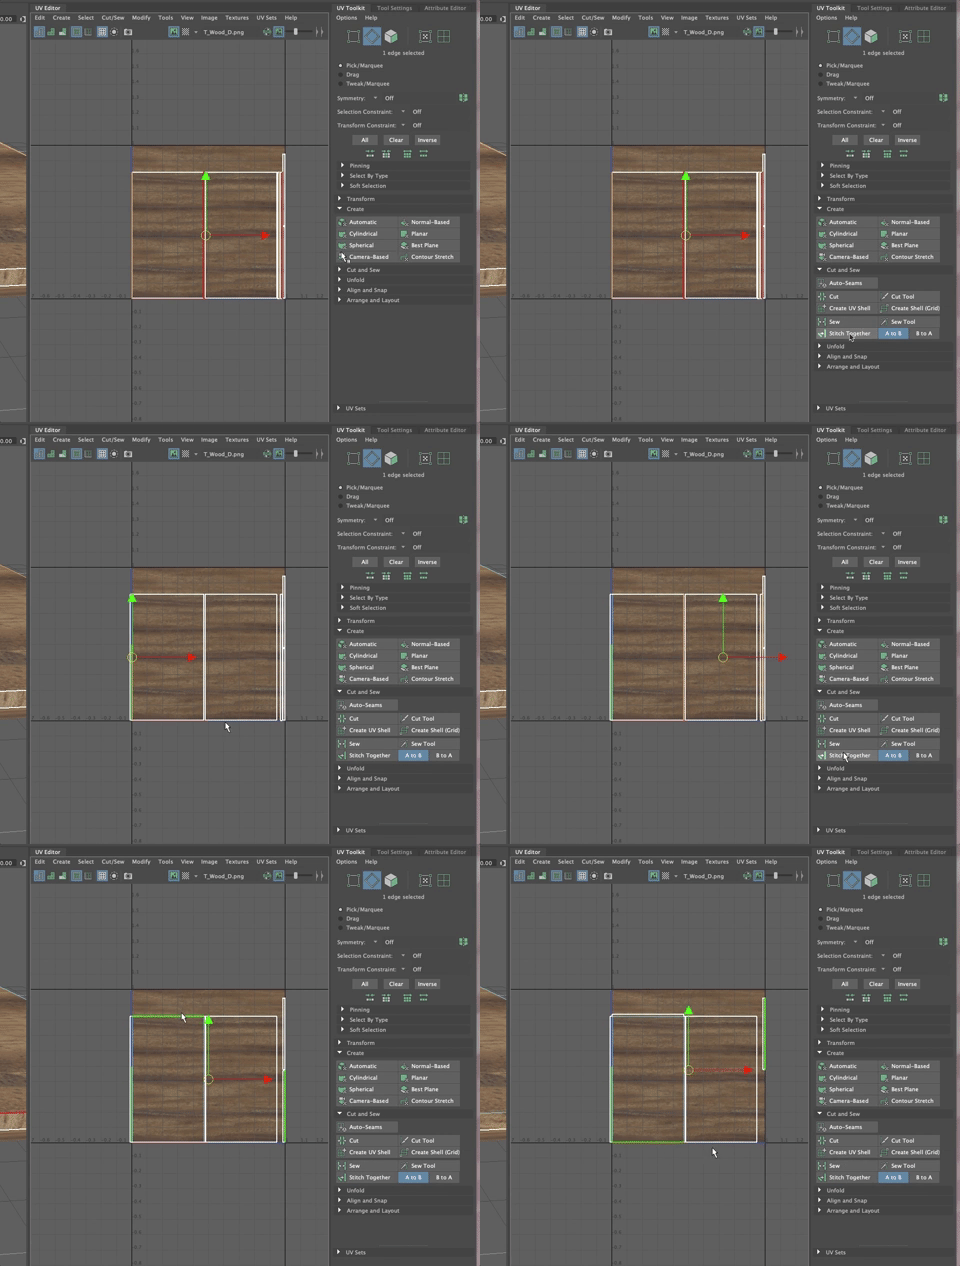
- Select a long edge on the top face UV
- The corresponding edge is also selected
- In the UV Toolkit, open the Cut and Sew tab
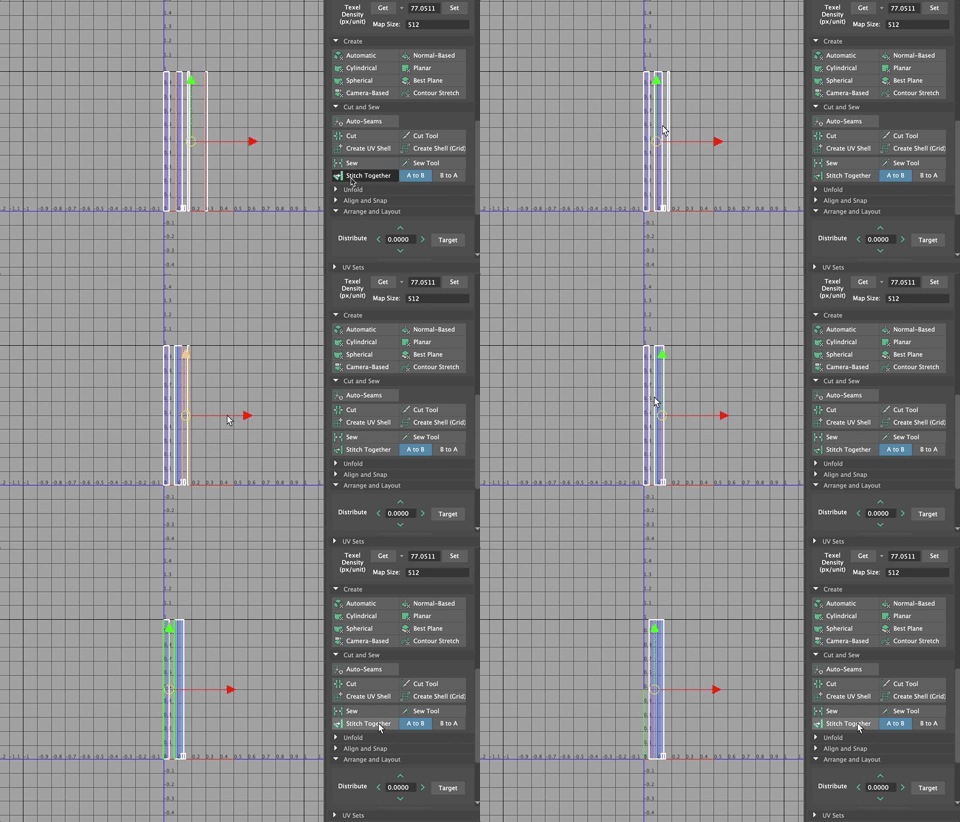
- Click on Stitch Together
- The face moves over and is connected to the other face.
- Keep going all around the top face UV.
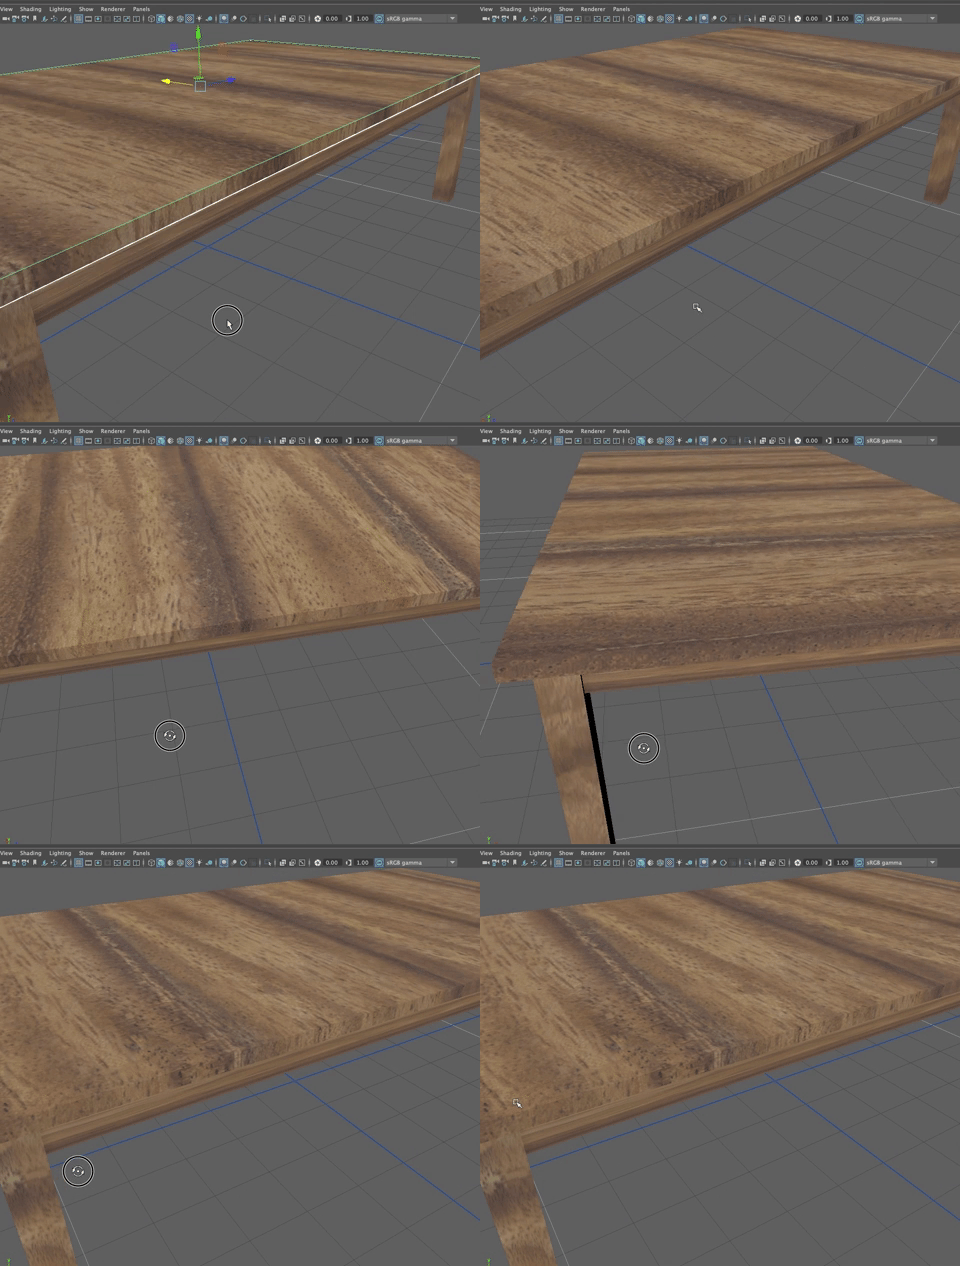
Looks at the table in the viewport and you will notice that the sides of the table now connect nicely with the top of the table! Nice.
We still, however, have more seems than needed.
- Now stitch the bottom of the table to rest. You may do better to move the top face shell over a bit as shown and then select the edge and stitch
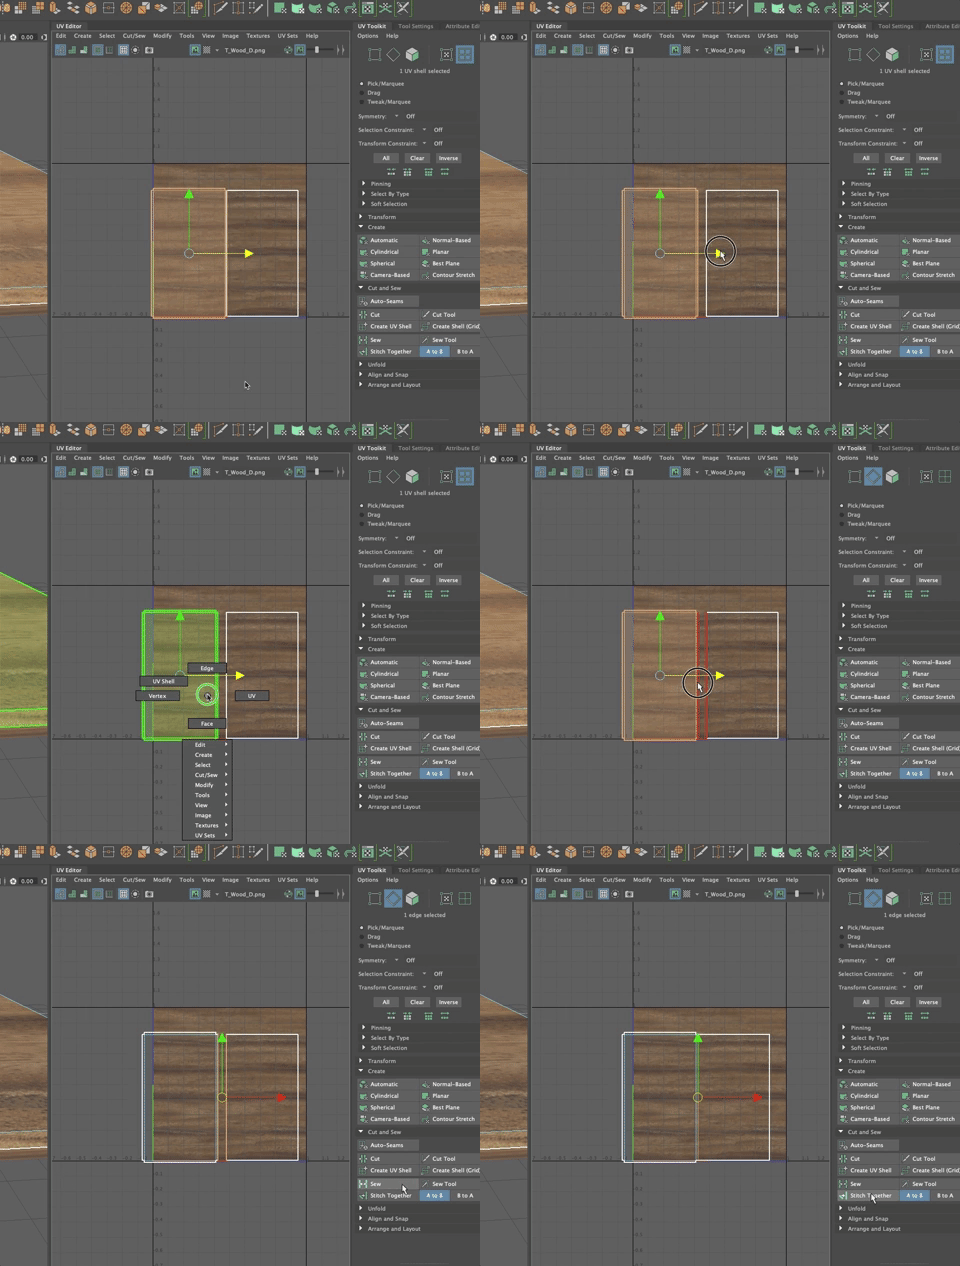
It is all one shell now!
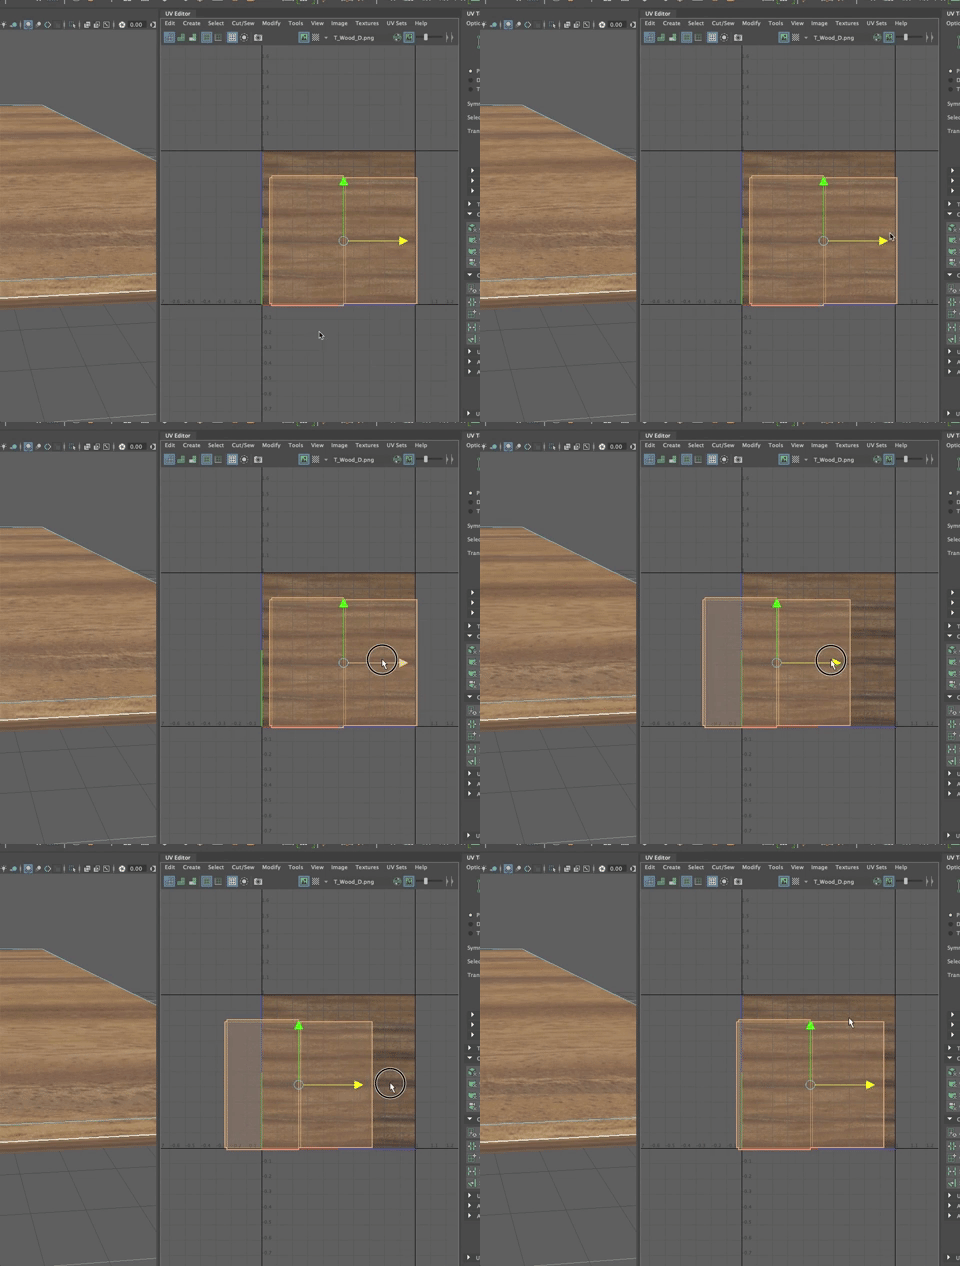
Now the texture wraps around the eges as they should. Well done!
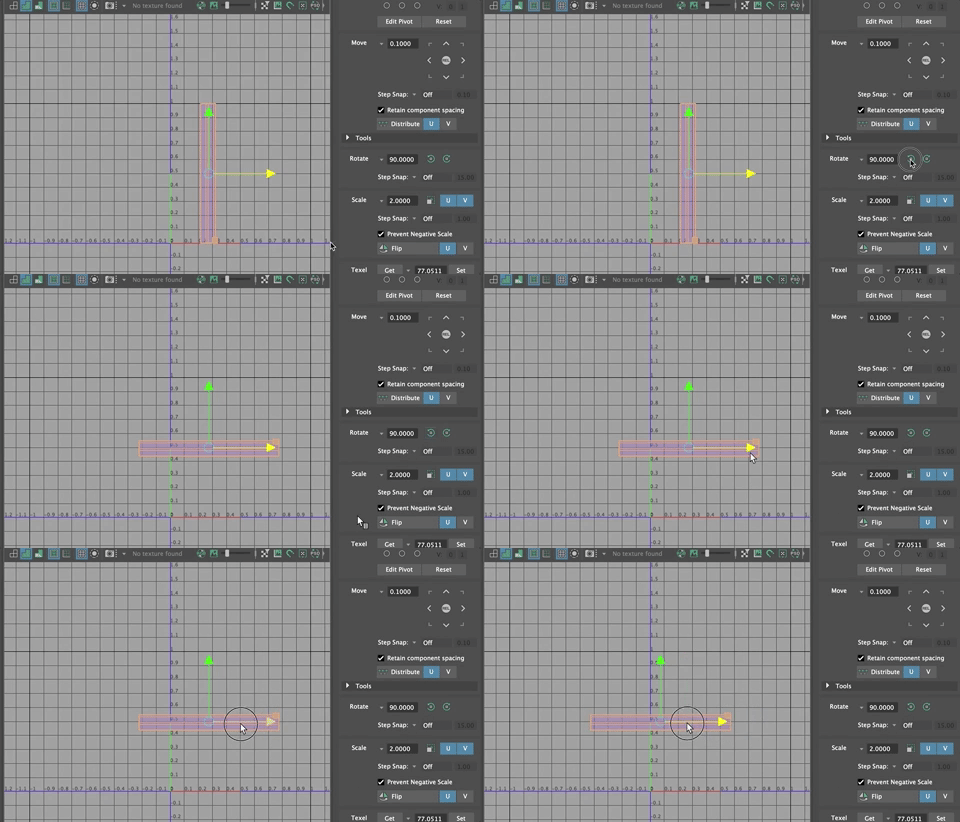
The wood grain should face the long way on the table. Select the UV Shell and go to Transform>Rotate
Finishing the table UV Mapping
We are actually almost there.
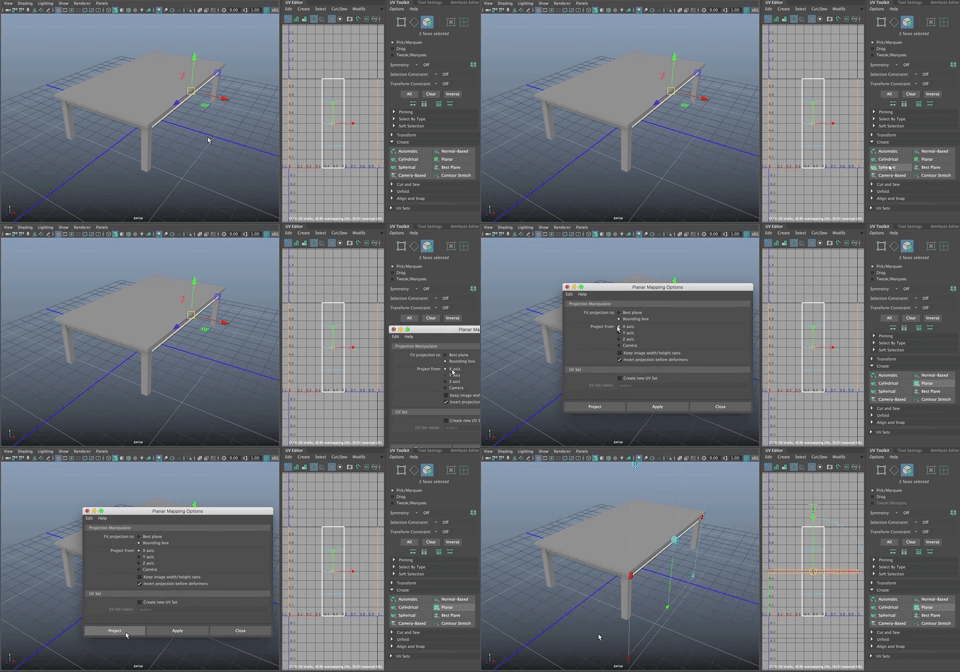
Let's start by UV Mapping the base of the table top, the four rectangles that hold the table top up.
- Select longSide1 from the outliner
- Select the face that is outward and the one that is inward. (Much easier to map two directions at once)
- In this case, we can see, when we activate the move tool, that the projection we want is from the x axis.
- In Create, Shift select Planar
- In the options box, be sure x-axis is selected and keep image width...
- Project
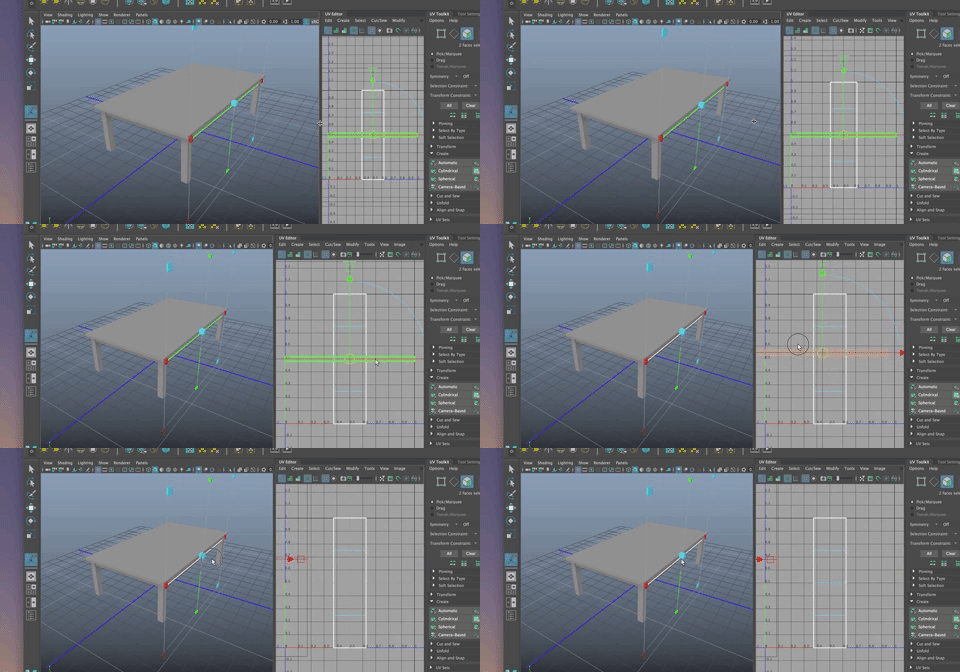
Move those UV shells out of the way
To get the top and bottom of this rectangle, you will notice they would be hard to select, so you can use the UV Editor as shown.
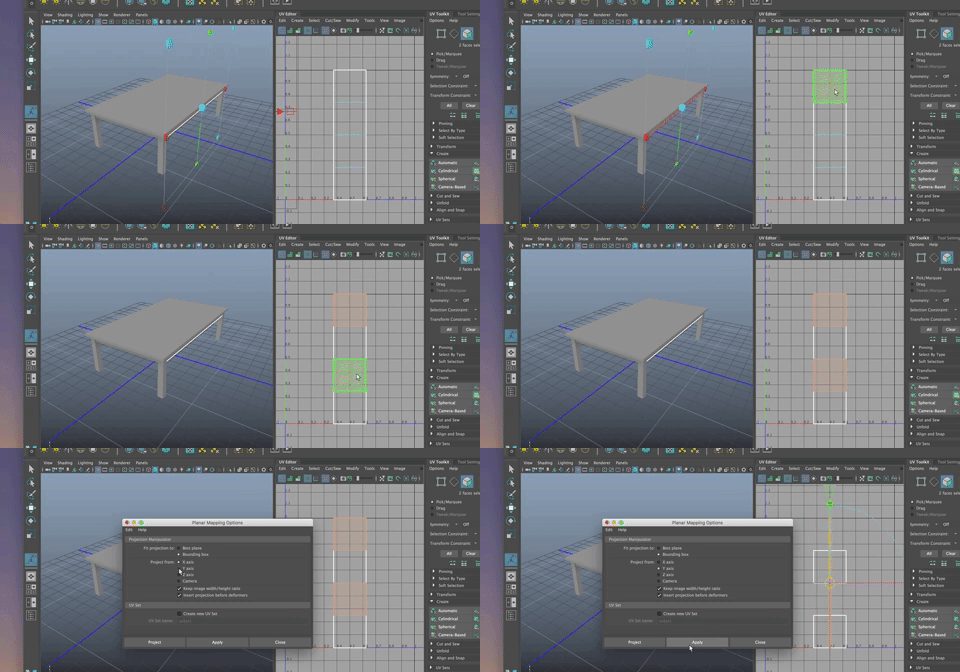
- Project from y this time
- Move those out of the way.
Finally, you have the ends of each side rectangle. These are hidden away but let's do them since this is a practice and it is good for learning. This time, we project from z
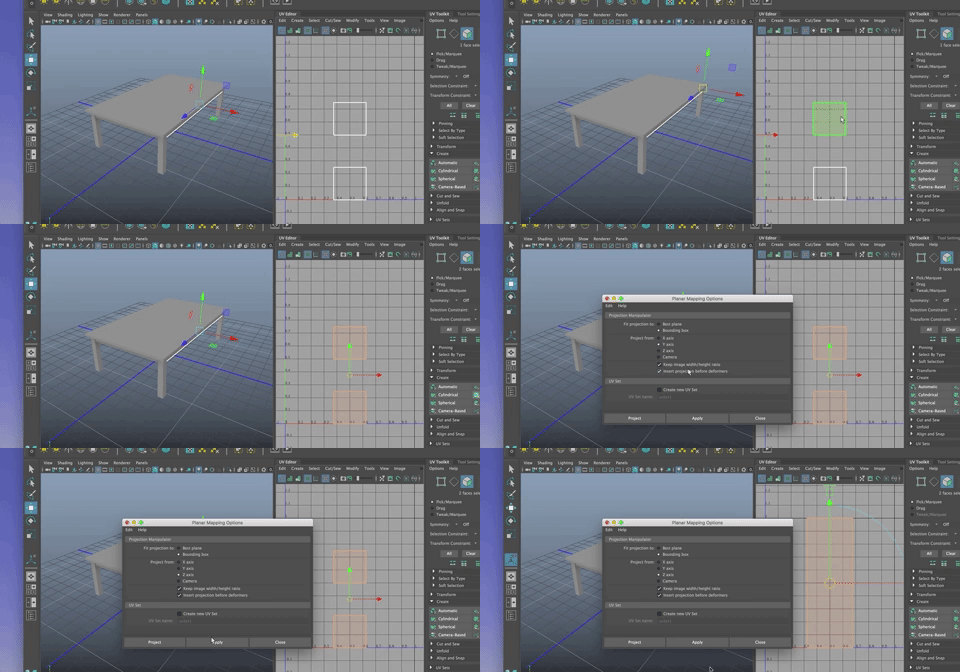
Now repeat what you did on the top faces.
- In UV Shell mode, separate the overlapping shells
- Click the blue shaded icon to see which are facing correctly
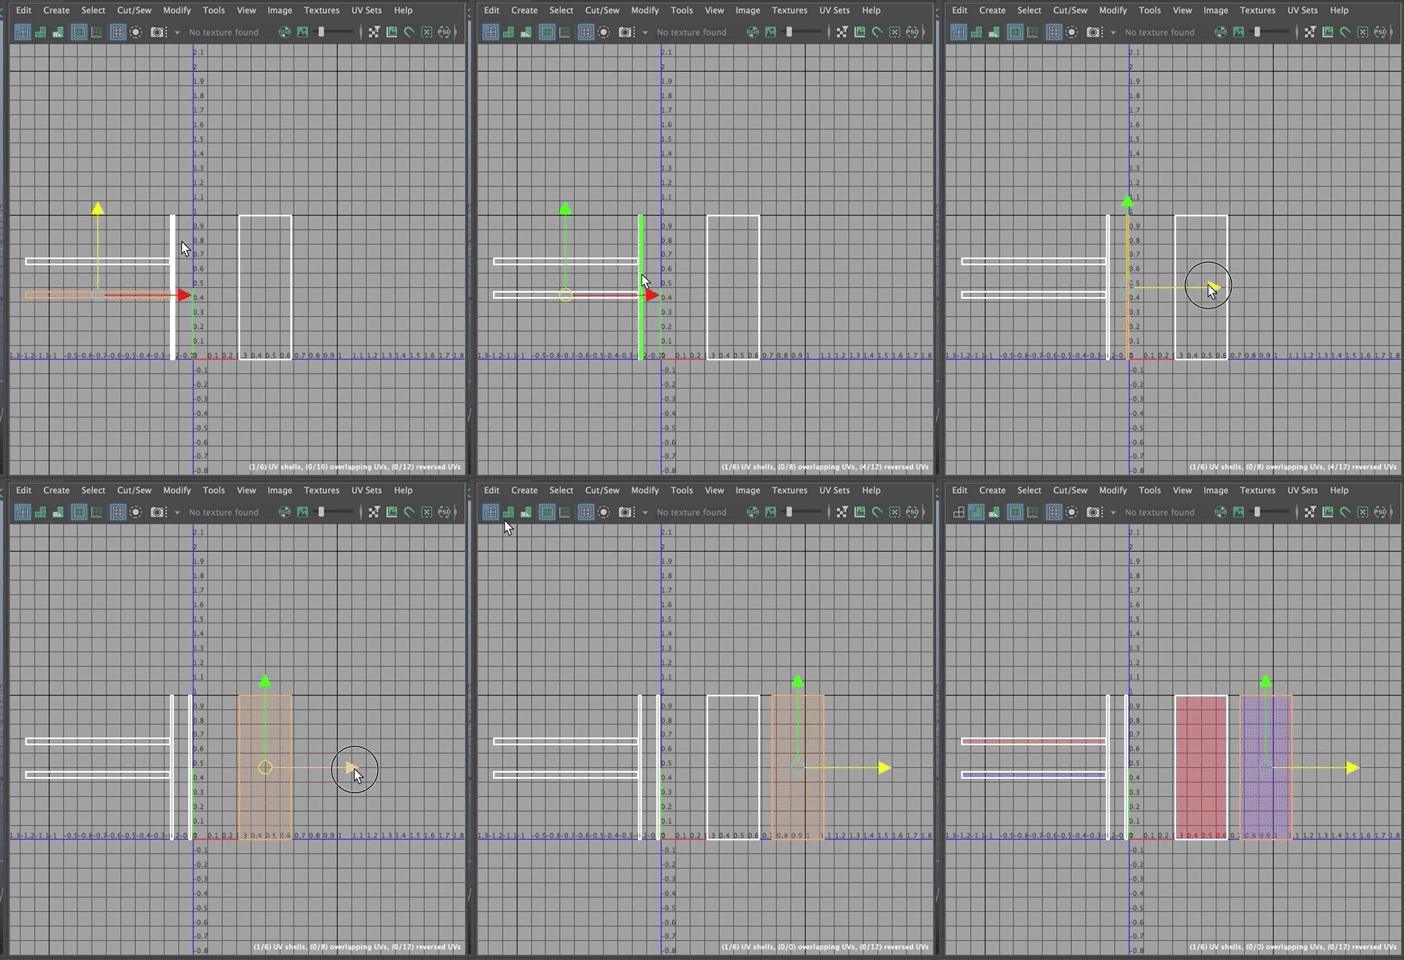
- Flip all the red shells so they are all blue.
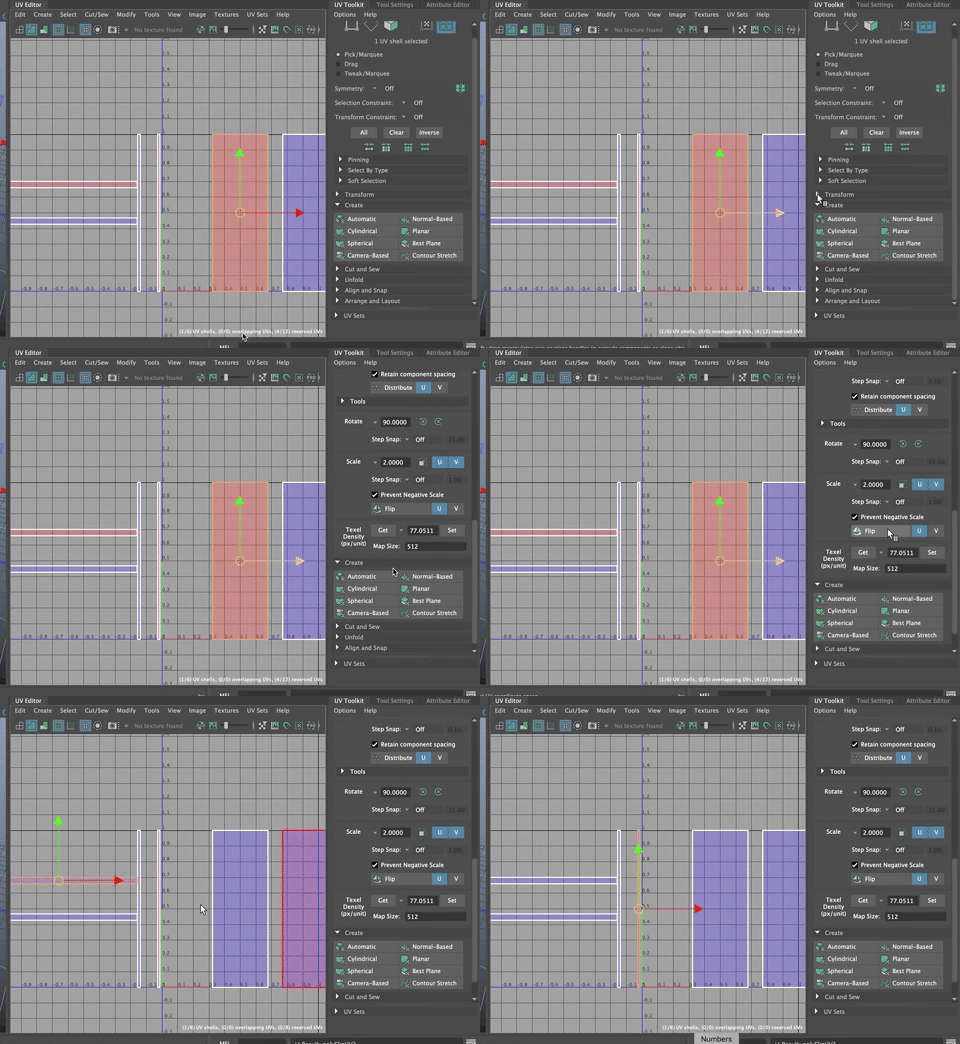
Now we need to scale them to each other.
- Select all the shells
- Go to Layout
- Make sure the settings are as they were before (Legacy/World
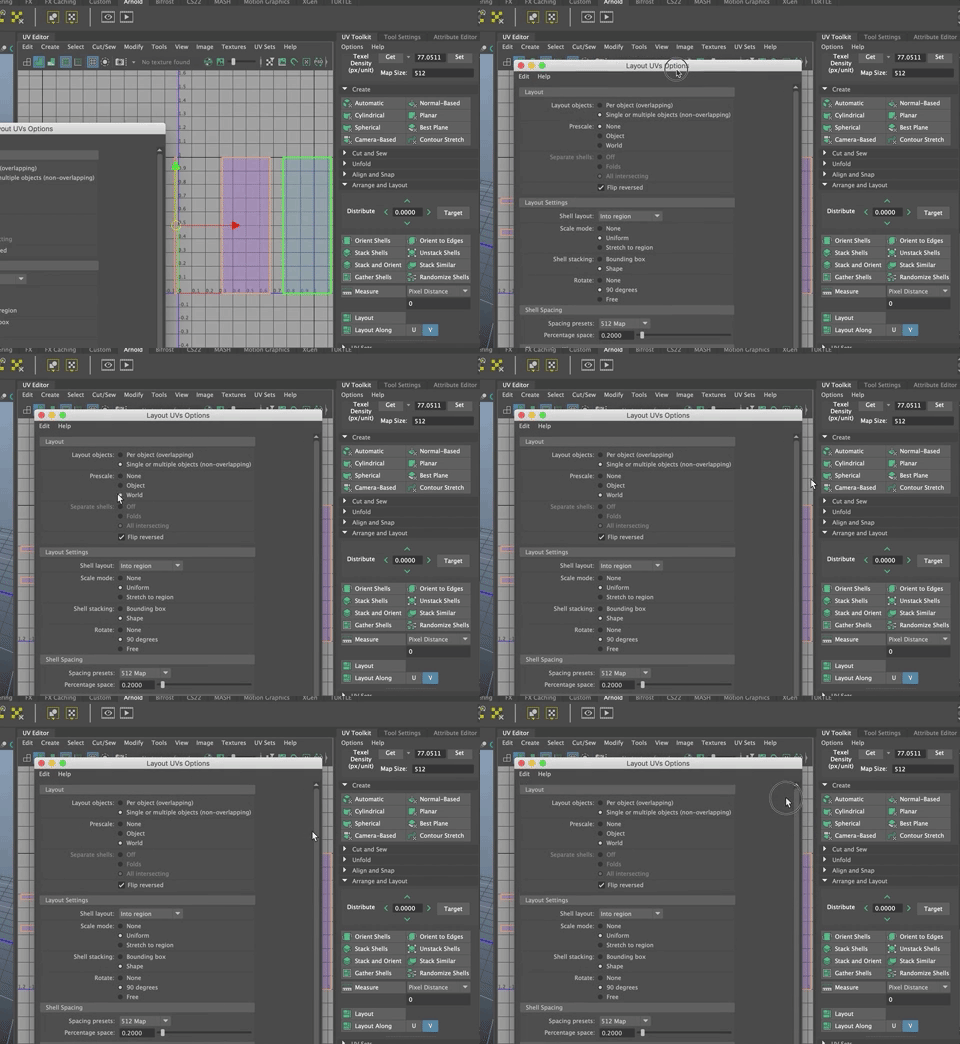
Now you stitch them together as before. I like to separate out the UV shells to make the edges easier to find. Stitch the edges that will show the most.
Make sure the UV's are running the direction you want them to (rotate the uv's as needed), and move this shell out of the way.
- Turn off blue shaded mode
Copying the UV's from one side to the other
Rather than going through this again on the other long side, you can simply copy the UV's from one object to another. This will come in quite handy.
- In Object Mode
- Select the longSide1 object
- Shift Select longSide2
NOTE: It is important to first select the object you are copying from and then the object(s) you are copying to.
- Go to Mesh>Transfer Attributes>Options Box
- Be sure UV Sets is set to All
- Hit Transfer or Apply
- Note: Hitting Apply keeps the options box open, which makes it handy for transfering these UV maps to the short sides.
- Go ahead and apply the UV's from the long side to one of the short sides.
You will notice that the rectangles on the short side are not quite square. We can fix that by scaling the UV Shell until the checker pattern looks like squares.
Now transfer the UV sets from one shortSide to the other as you did above.
Keep going for the legs.
- Select the front and back of a face and choose the proper planar projection
- Repeat for the other four sides as you did before.
- Flip UV's so they are all blue
- Lay them out
- Stitch them together
- Make sure the UV's are in the grain direction you desire (running up and down the table leg)
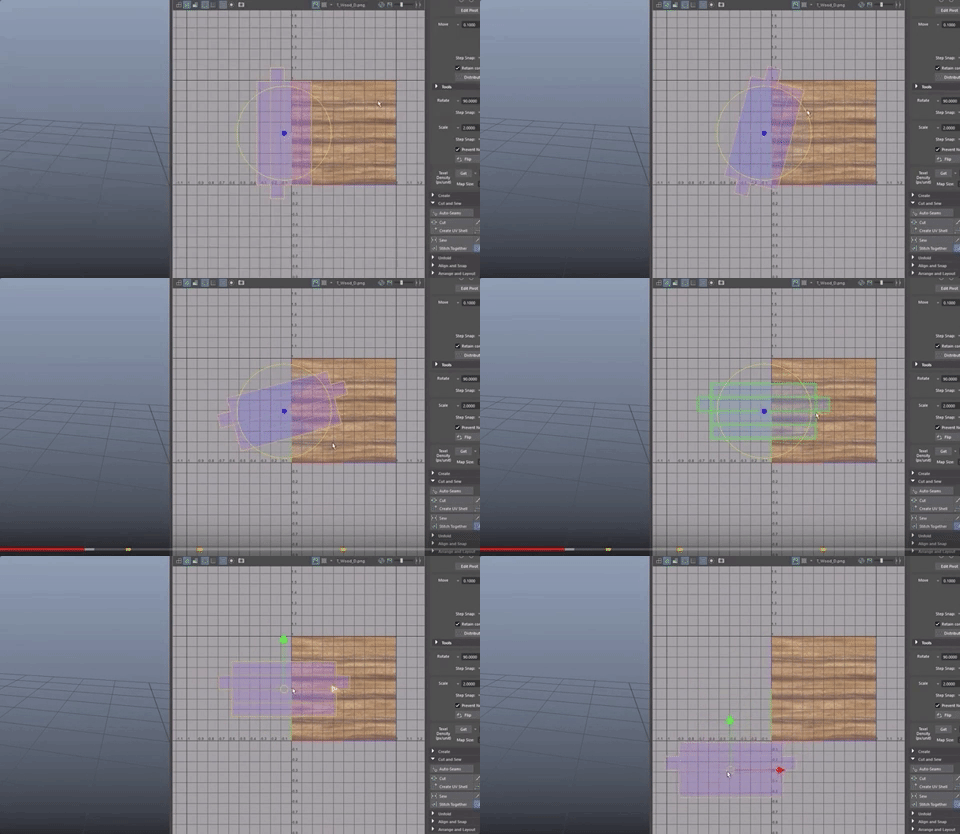
- Move the UV Shell out of the way

- Transfer the UV's from one leg to each of the others as before.
The only thing left to do is to put all the UV Shells into the 0-1 coordinate space.
- Shift select all the UV Shells
- Shift Click Layout and make sure Rotate is set to NONE so that the texture stays pointing as we set it up.
Click Apply.
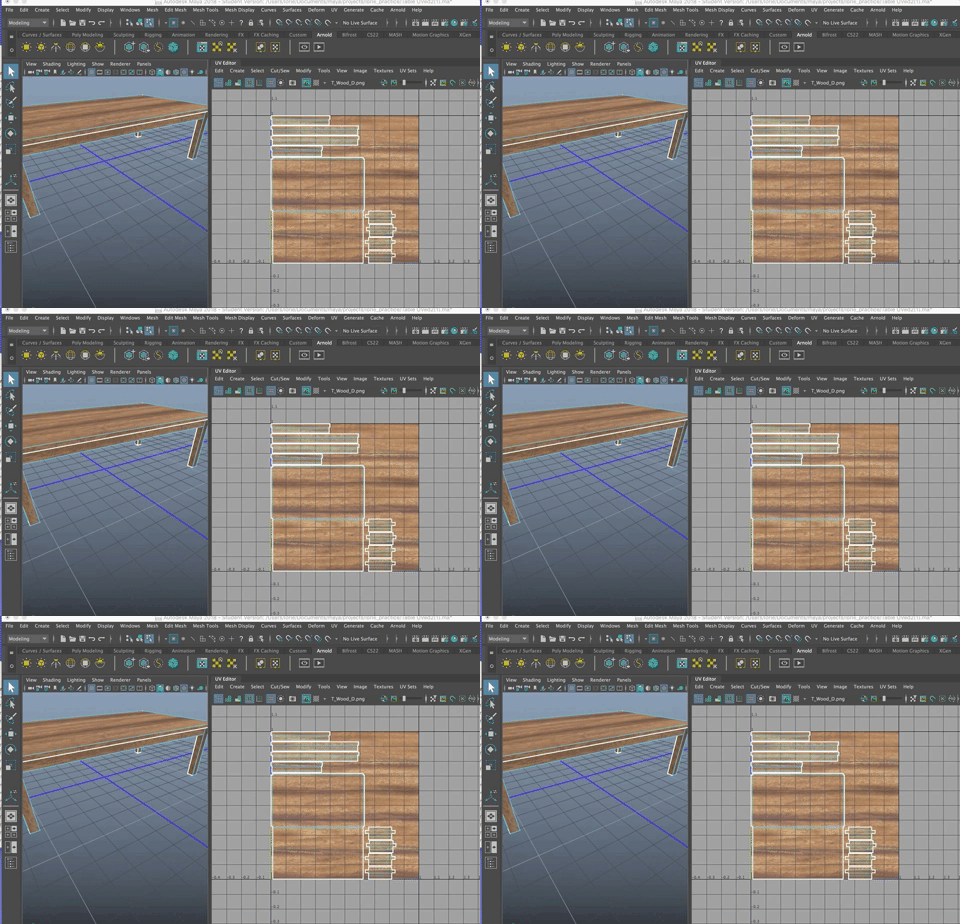
The UV"s should all be set up correctly, although the layout is sometimes "quirky" so you may need to move any overlapping UV Shells.
Make sure your viewport is set to Viewport 2.0 and that you have Screen Space Ambient Occlusion and Anti-Aliasing set to ON, as shown below

If you wanted to, you could then save a UV snapshot of and take the layout and go into Photoshop where you can edit your textures or paint them, so they are exactly placed on the table as you'd like. We will spend a small amount of time showing this process in a bit.
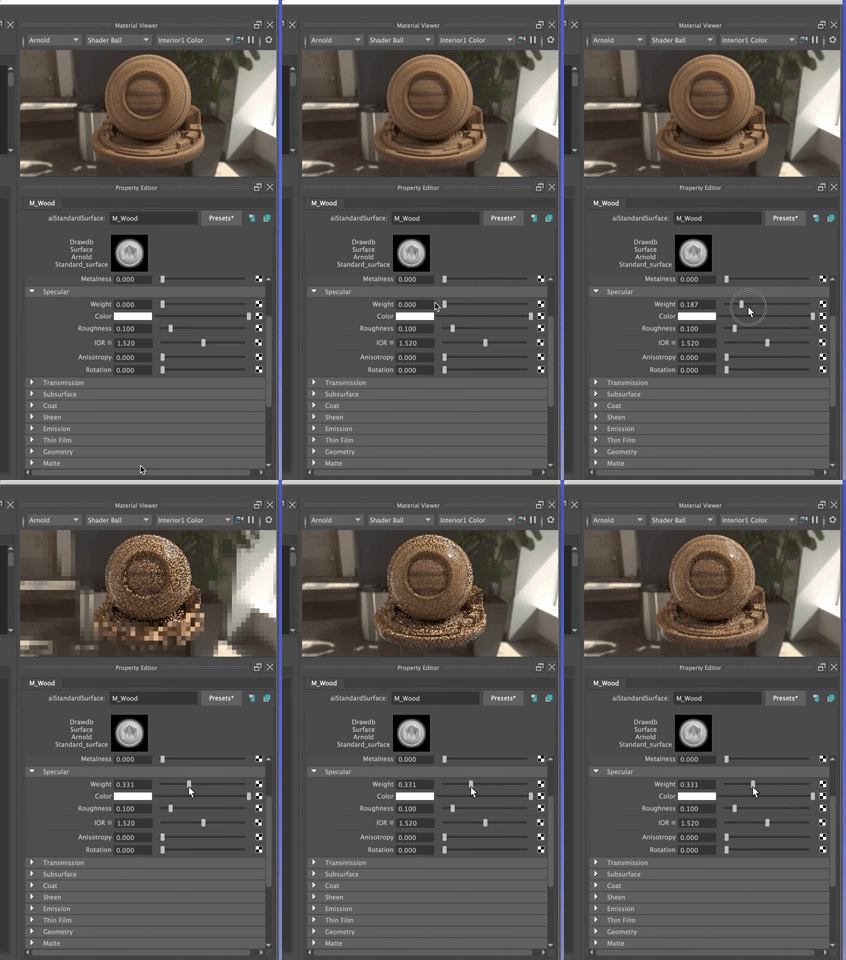
But you can make the table look better still, by adding some shine
- Turn up the specular weight
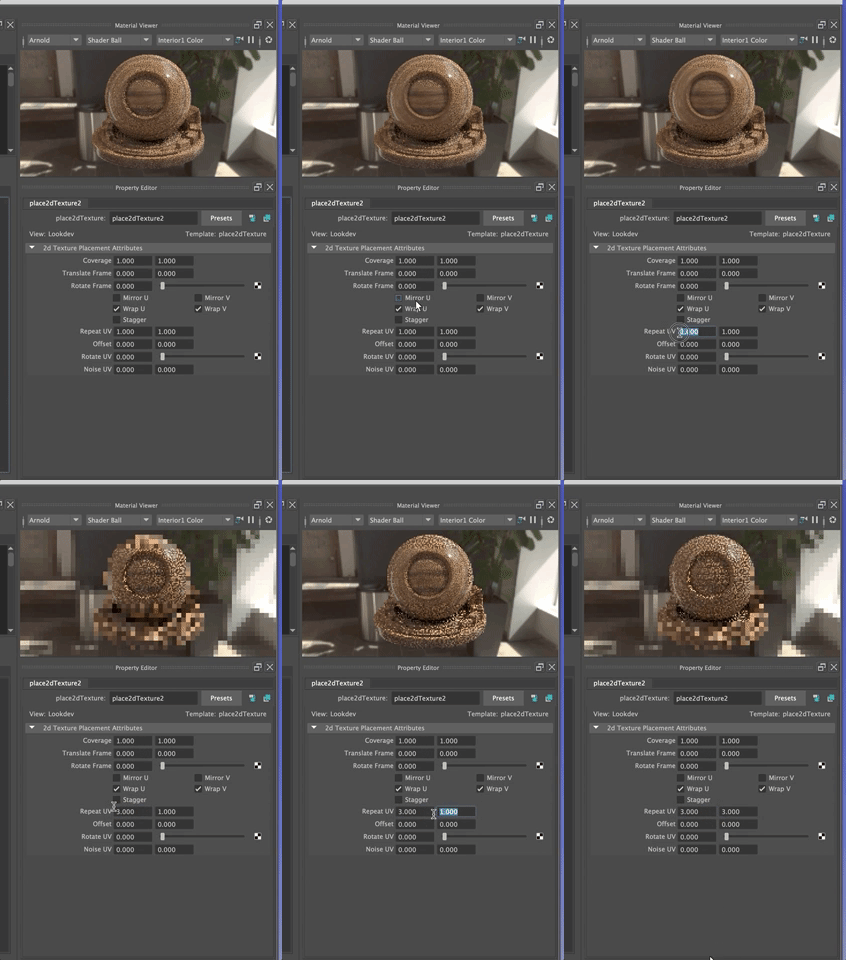
And fixing the scale by increasing the repeat UV in the Place 2d texture node
UnWrapping UV's
These were examples of objects that were simple (toy block) or made up of a set of individual simple objects grouped together (table). What if you have a more complex object? Maya 2018 has a cool new unwrap and 3D cut and sew tool.
Download the UVMappingTutorial.ma file(from the Google Drive>CS22 W19>Files to Download for Class>UVEditing).
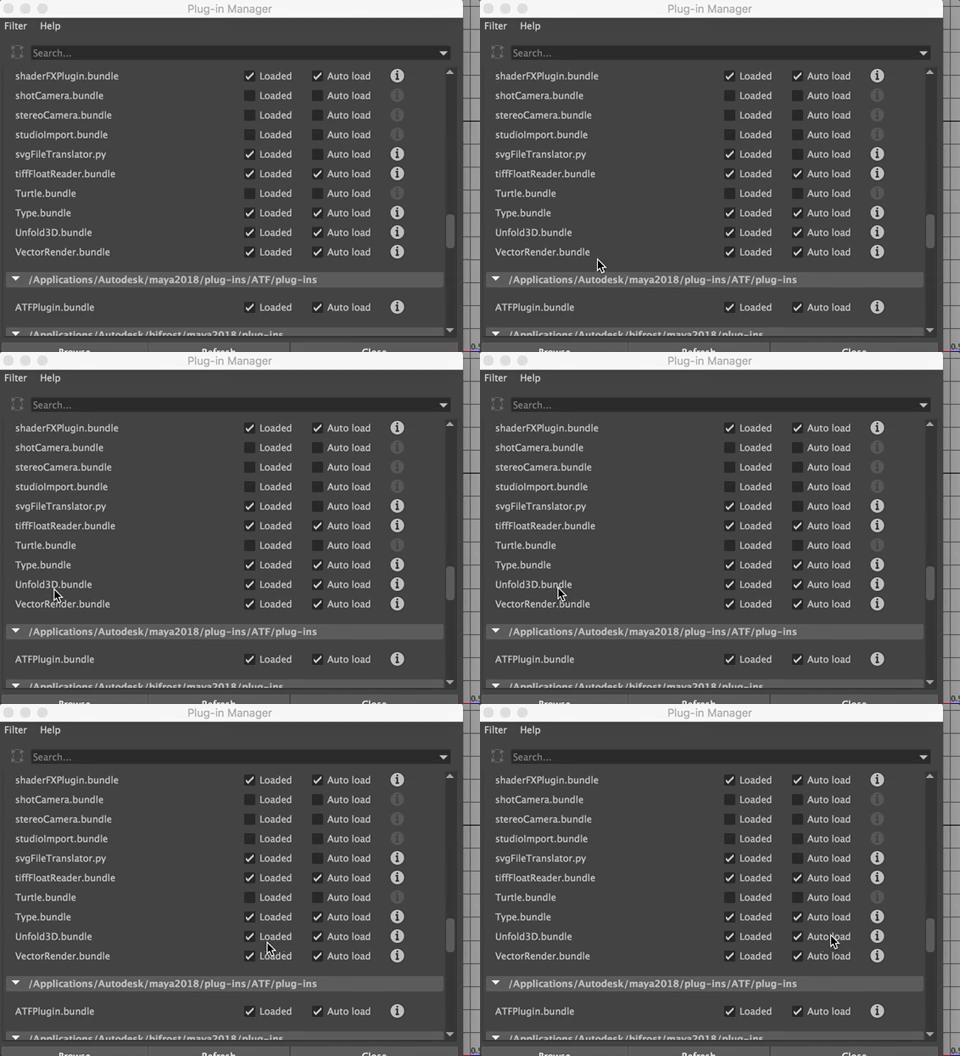
Make sure the UnWrap Plug In is loaded (Windows>Settings and Preferences>Plug In Manager>Unfold3d.bundle (load and autoload ON)
This is a simple cylindar that I extruded out to create some complexity for UV mapping.
I recommend you turn on Wireframe on Shaded in the ViewPort Shading menu.
There are tons of ways to unwrap a UV for texturing. Here is an easy method.
Click on the object and you will see that despite the complexity of the shape, the UV's still look like a standard cylindar. Turn on the checker view and dim it as shown below:
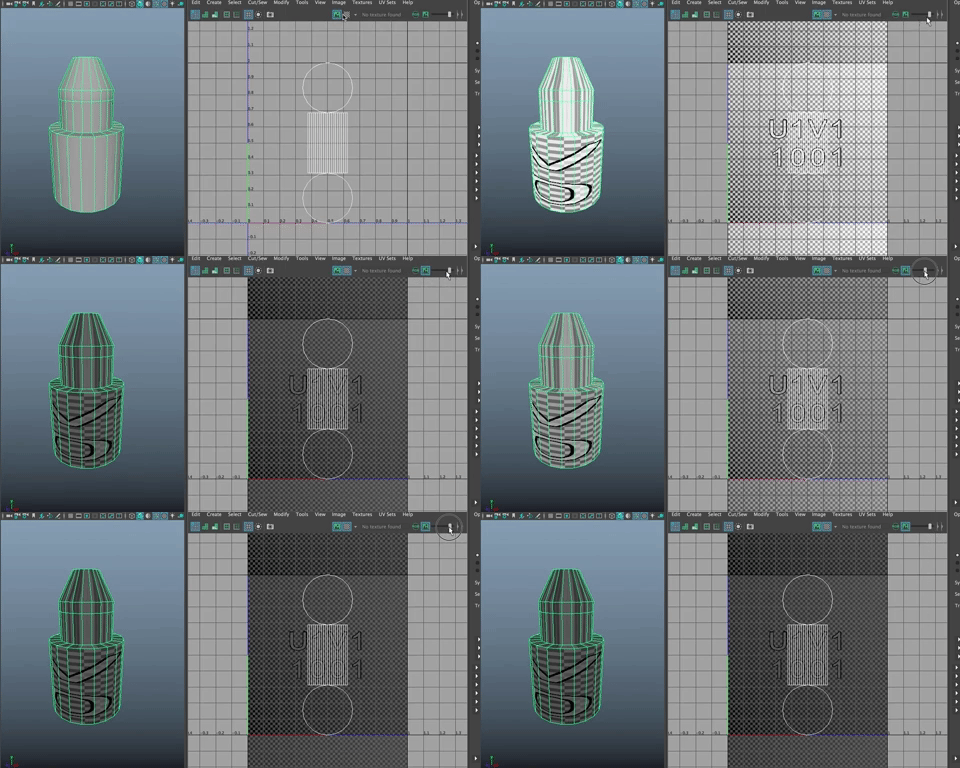
You want to see the extrusions in the UV Map. In the UV ToolKit, Open the Create Tab
Choose Camera Based.
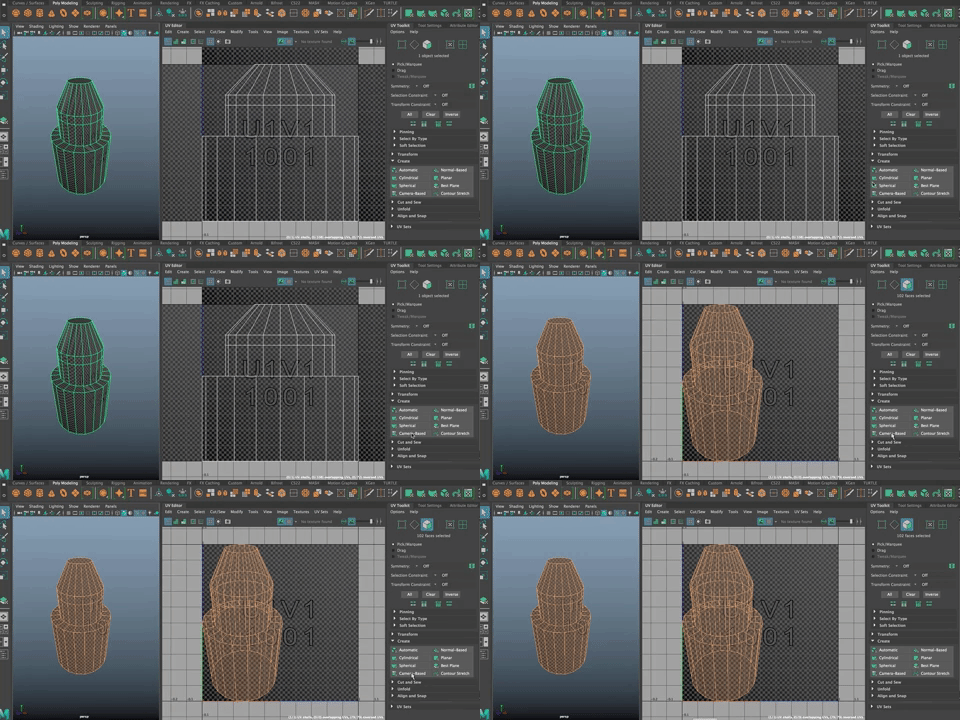
You may be prompted to choose a face on the object. Go ahead and choose one.
Maya2018 has a new 3D Cut and Sew Tool You can find it under the UV Menu in the Main Menu
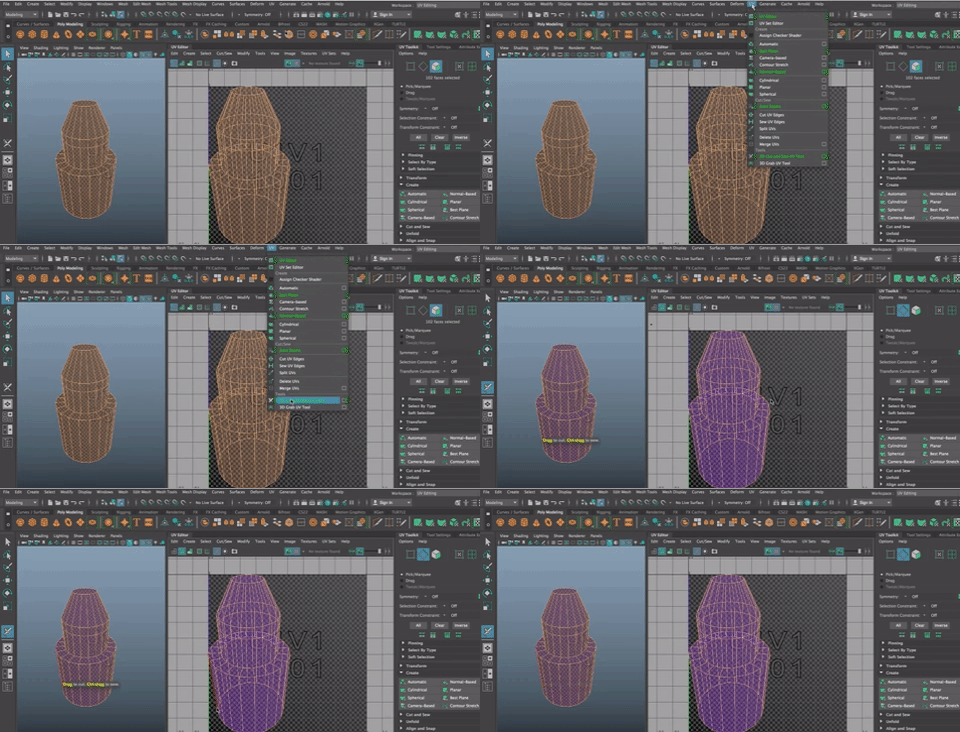
The object turns purple.
It is a good idea to add this tool to your custom shelf. (Command + Shift + click on Menu Item)
You can double click on an edge you want to separate to make a "pattern piece" to cut that edge.
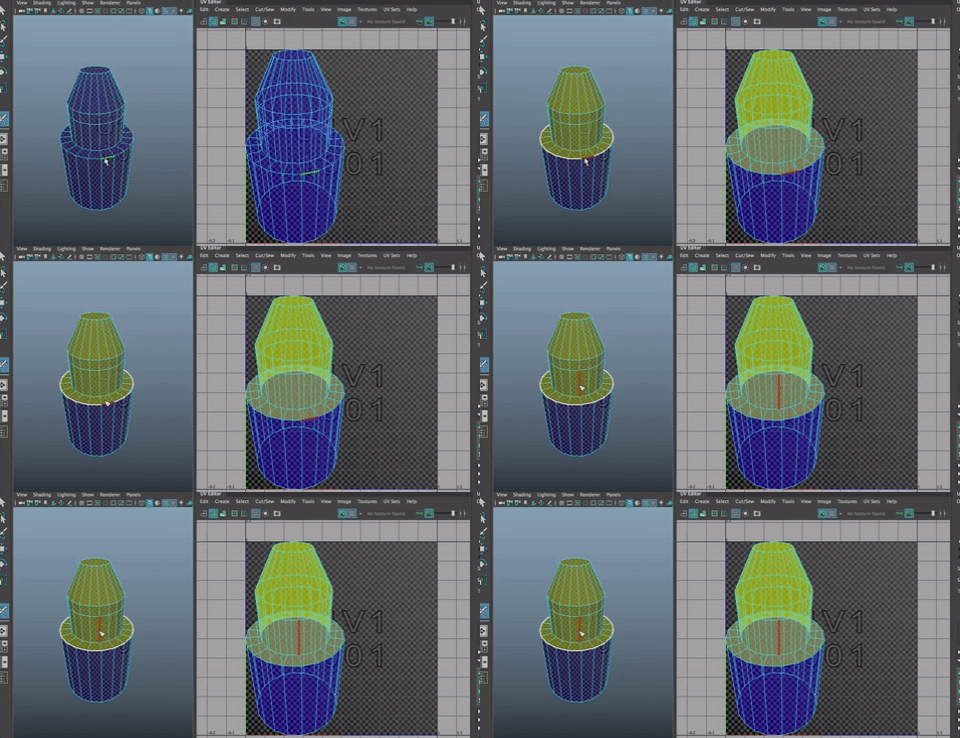
You can also hit the Tab key and it will automatically select entire edges so you don't have to double click.
Since I made this cylindar shape with 0 cap subdivisions, the bottom is an n-sided shape. To select that edge, you can't just double click, but you can use the tool and drag around the edge to cut it.
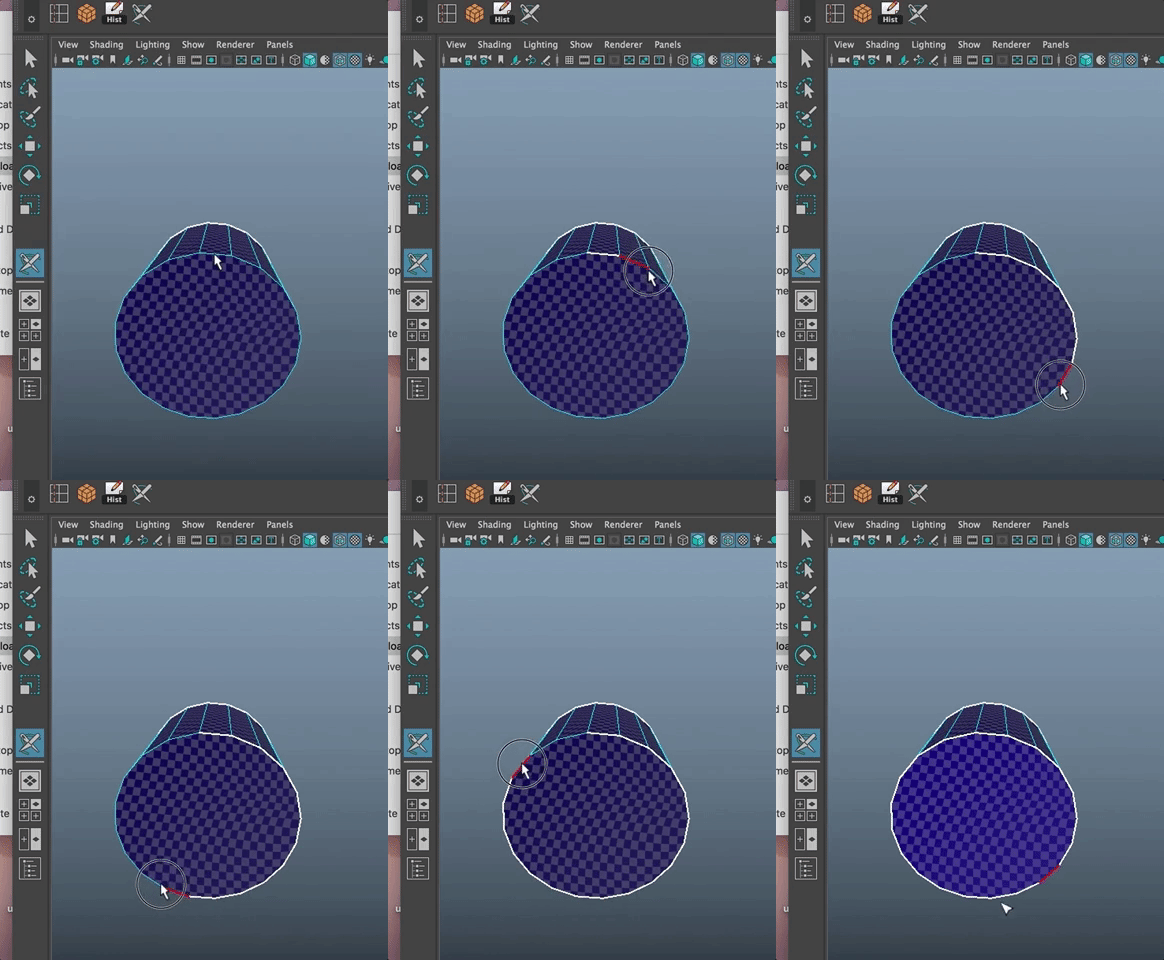
To undo a cut you have made, hit Control and select the edge and it magically heals.
Maya's Viewport helps you visualize the shells you are creating through color (also new).
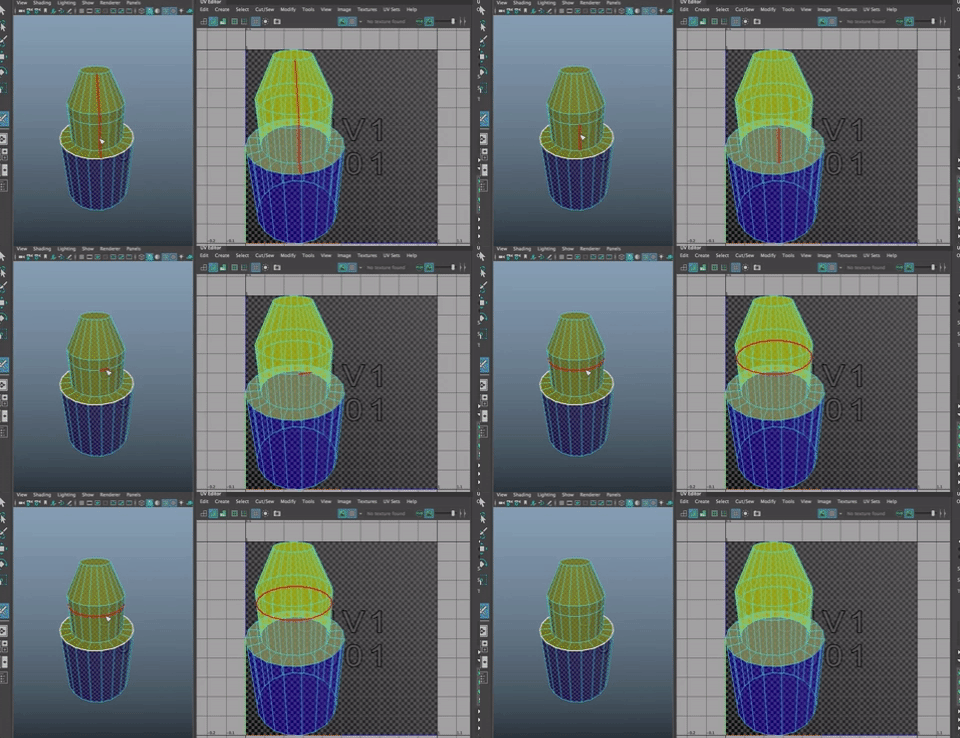
You will want to have cuts around all the horizontal edges where the shape changes.
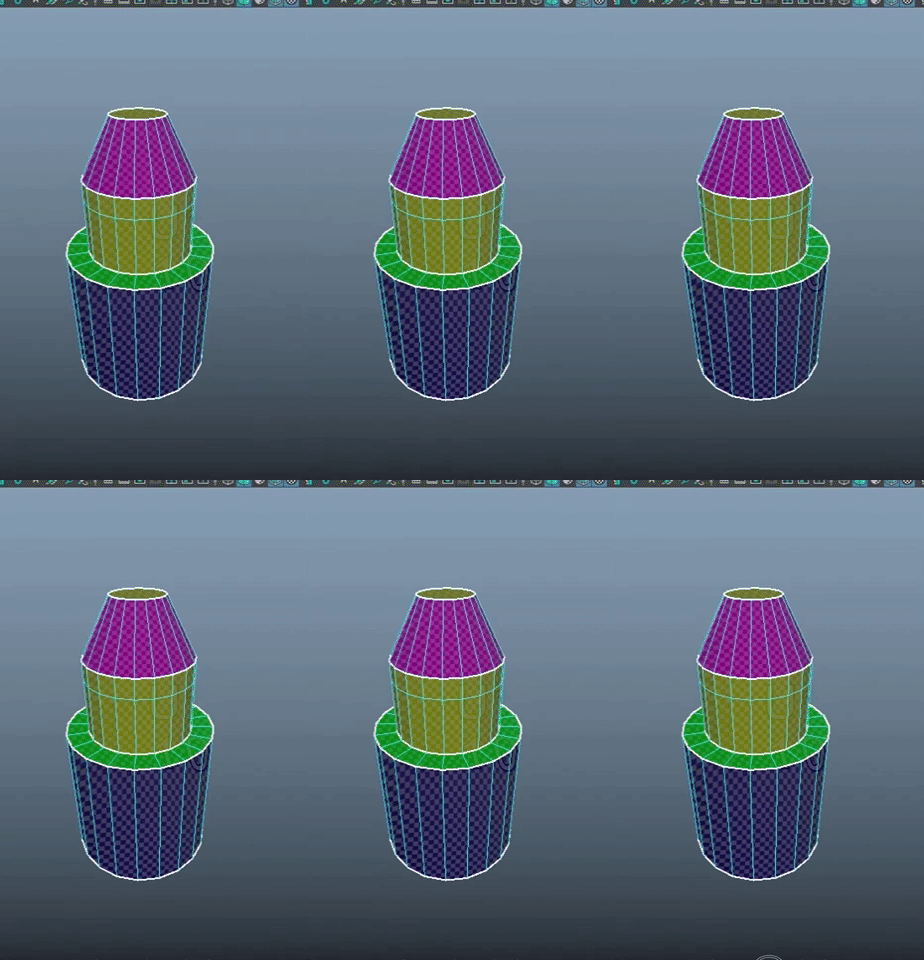
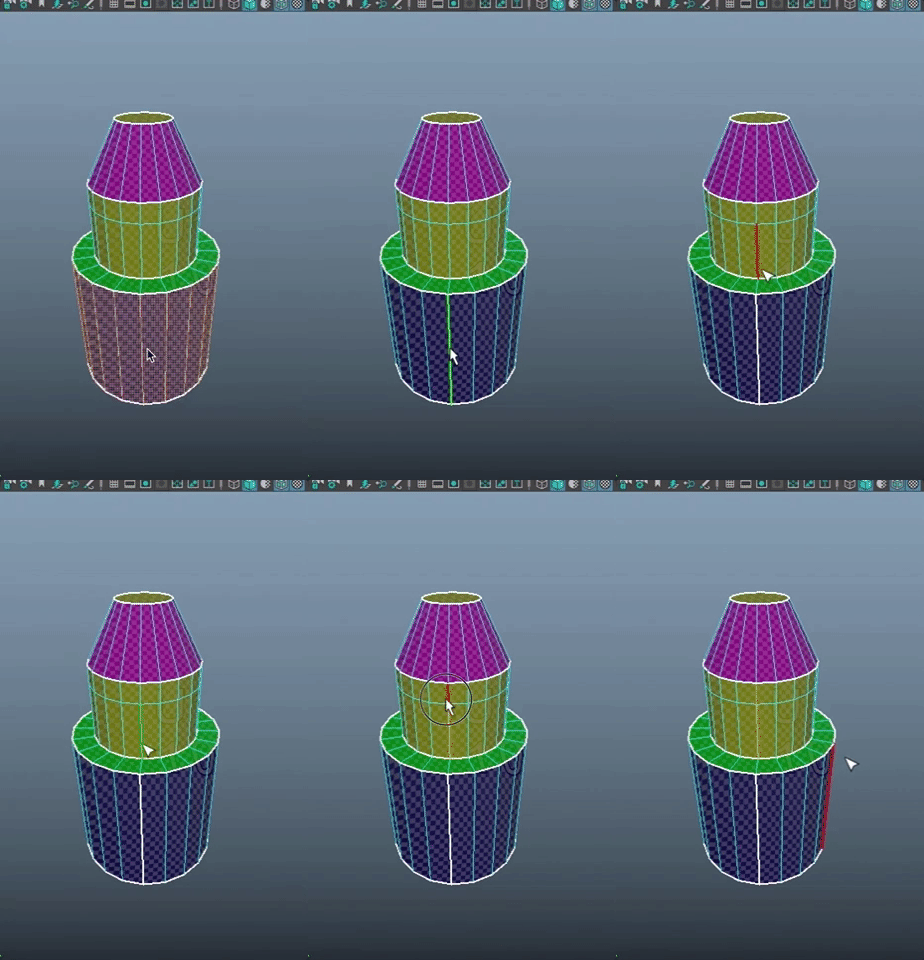
Because of the way Maya will unfold some of the other cylindrical shapes (making them donuts instead of rectangles) it is a good idea to create cut along the verical cylinders as shown. Easiest way to select them is to click the edge and hit "x" to cut them.
YOU DO NOT WANT TO CUT THE HORIZONTAL EDGE BETWEEN THE TWO VERTICAL EDGES.
While you are still in the tool, Right click and go to Component>UV Shell.
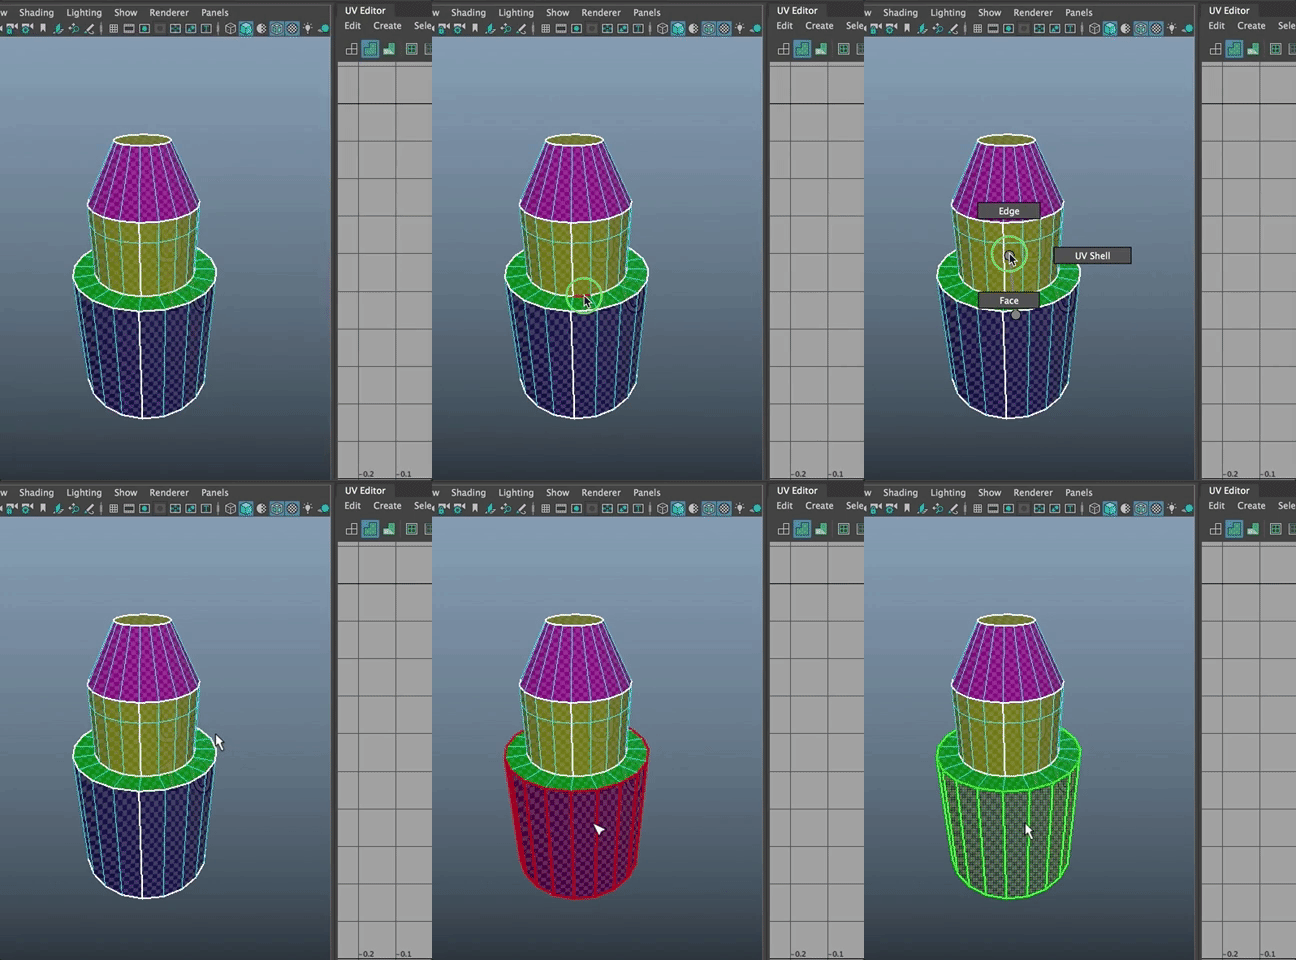
Select a shell and hit the d key to unwrap in the UV Editor.
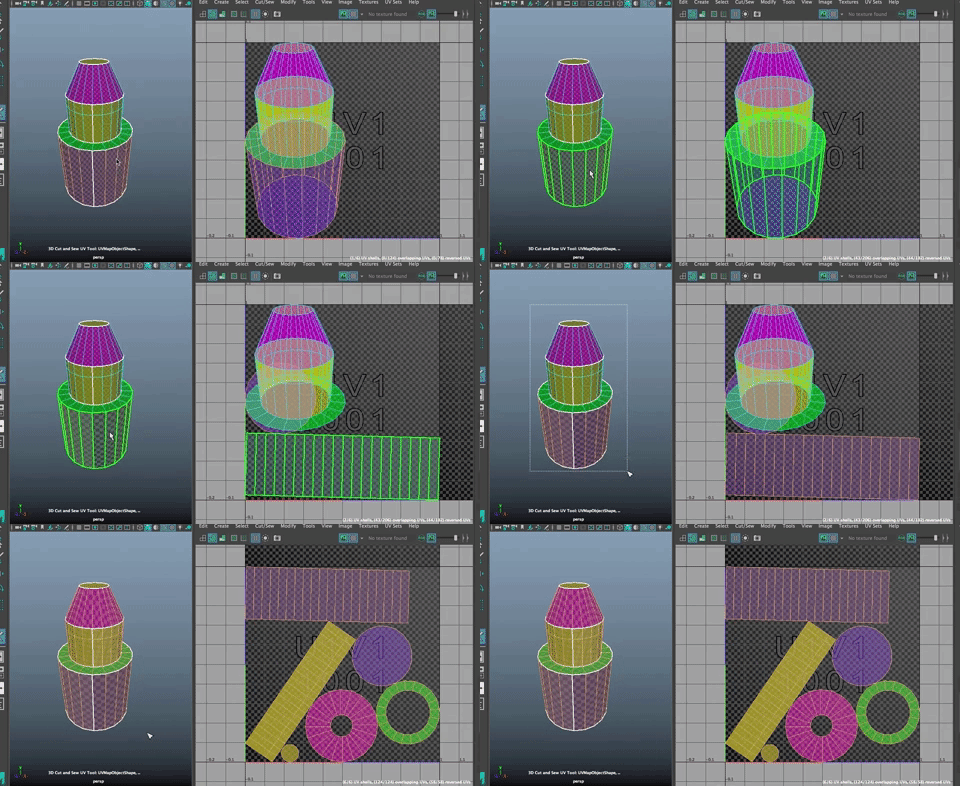
Select all and they all unwrap.
From here, you could, as with the table, apply a texure and layout the uv's so the texture is facing as it should. You can stitch together edges where you wouldn't want a seam, or take the entire thing into Photoshop to paint on the UV's and create a custom texture
Below are some more exercises to help you understand UV mapping. They are based on an older version of Maya, but would be good for you to go through to better understand how the UV's relate to the object, but you will find that the tools are not exactly located where they used to be.
Make a torus. Apply the same texture. You will notice that the checker pattern has lost its square-ness. If you had a flower texture, the flowers would be stretched out in the same way the cube squares are stretched.
In the UV editor, Right click and choose UV. Bring up the scale tool and scale in --U (the equivalent of --Y)

The checkers aren't perfect, but they start to square up a bit. If you are too close to the edge of the quadrant, scale the entire thing down a bit and then, if the map goes too close to the edge of the quadrant, scale the entire thing down a tiny bit to fit.
Another good way to scale UV's up or down to fill the 0 to 1 space is to select the object and, in the UV Editor Menu, go to Polygons>Normalize>Options Box and select Preserve Aspect Ratio. This keeps the scaling ratios the same but adjusts the overall size to fit the quadrant.
You could also move all the UV's in the UV Editor, to place the texture differently onto the object

Or rotate the UV's


These icons move the U's 45 degrees in either direction.

And these icons flip the UV's over to a mirror in U or V.
You can also make your UV's fit nicely into the 0 to 1 quadrant by going into the UV Editor Menu and going to Polygons>Layout>Options Box


This arranges your UV shells neatly into the 0 to 1 quadrant. This can be handy when you have a more complex UV layout.
Texture mapping complex shapes is basically the same thing, but you use projections to make the layouts as correct as possible from the beginning.

If you look in the UV Menu (in Modeling Module), Under Create, you will see several options---Automatic, Best Plane, Camera Based, Cylindrical, Planar, Spherical and a new projection type called Contour Stretch.
As a general rule of thumb, you want to use the projection Let's start with a planar projection type that best fits the shape of your object. In most cases, you will break your object in to parts with a similar shape in order to get the best projection method. Most objects require multiple projections.
Many find the Automatic projection mapping to be a happy and easy way to go, but let's start with the basics, first.
Planar Mapping.
Create a cube. Assign the checkerboard lambert texture to it. The checkerboard looks perfect.
But as soon as you get the scale tool and stretch the object, the textures get wonky.

If you are looking at your UV Texture editor, you will see that while the shape has changed, the UV layout has not. They don't sync. That is why the texture is being improperly applied to this simple object.

In this case, you could select the UV's shown:
And then simply scale the UV's to get back the square checkers.

But if you don't have UV"s set yet, or if the shape is even more complex, or there are different textures on each side, you'd want to use a planar mapping.
In the UV Editor, go to Polygons>Delete UV's to erase the current UV mapping.

In UV>Planar>Options

You can project from a variety of axis or from the camera view.
Choose Keep Image with width/height ratio in order to keep the scaling ratio correct.

For the first mapping, let's project from the Z axis to get that front face. Hit Apply.

This is a standard projection manipulator. The blue cubes in the corner change the scale uniformly. The red ones scale out, the green are up and down.

you hit the red T you get a master manipulator that allows you to scale, move and rotate the projection.

Click the blue circle to bring up the other rotate tools. You can flip the direction of the projection, scale and move the center of the projection.

Scale until you get the UV layout looking correct as shown above.
You'll also notice that two sides look good the faces on the top and bottom are incorrect.
You don't just do projection mapping on a whole object, you generally do it on select faces.
Choose the top and bottom faces on the object. Go to UV>Planar>Option Box
This time project from the Y axis. Now four sides look good. You just have to do the ends. Select them. Create a Planar Mapping from the X axis.

If you look in the Channel box, in the polyPlanar Proj1 node, you'll see that the Projections Height and Width should be the same (or close to it). And the Scale of the Object itself, if your mapping is correct, will match. In my case they are all 4.257

polyPlanarProj2 should have the same Projections Width because you didn't adjust it.
If you look at polyPlanarProj3, the Projection Width and Height is 1. If you look at the UV Editor, you can see why this is. The edge faces are filling the entire quadrant!
Scale the projection width and height to the same values as the others.

The edges are now to scale with the sides of the cube and the checker pattern is correctly scaled.
Right click in the quadrant of the UV editor and select Shell. Then hit w to bring in the move tool and move each UV shell to see all six.

This allows you to see all the projection maps you made.
An even better way to see if your texture mapping is correct is to use one of the numbered textures for that purpose. I put two textures you can use in the UV Texture Editing Folder on Canvas.

The advantage to these textures is that you can tell if the textures are flipped or not.
Some sides are good, but the others are flipped, with backwards numbers because when we did the projections they went straight through instead of being mirrored.
This is easy to fix. Select one face with backwards numbers. It also selects the associated UV map. Select the Flip Selected UV's in U direction icon.

You will see that the numbers are now correct. Flip the UV's on any face that is incorrect, ending with all the numbers face up in Y and flipped correctly.

You will remember in the generic cube UV layout, all the edges were connected nicely so they would wrap around the cube with continuity around all the edges.
That isn't happening on our new cube shape.
You will notice in your cube and UV Editor, that everything is actually connected. What I mean is, if you select an edge in the UV Editor and then go to Select>Convert to UV's

You will see that there are actually four UV's for that one edge. You'll also see that there are two vertices selected on the polygon object. Those four UV's map to those two verts.
And if you select a single vertex on the cube, you will see three corresponding UV's in the UV Editor

You will also see that if you select an edge in the UV editor you are actually selecting two edges. You can merge the edges back together again.
UV Texture mapping basically involves taking your shape apart and then putting it back together again. See why it can be tedious?
There are tools to help. The main tools in the UV Toolbox are:
Pinch UV Tool

Cut UV Tool - separates UV's
The Grab UV Tool

Sew UV Tool, to sew edges together
Pin UV Tool, to keep a UV locked in place
Smear UV Tool, to smudge the UV's in the direction of your mouse stroke
But the best way to work is with the keyboard shortcuts (hotkeys). If you select an edge on your object, it selects two edges in the UV editor. Shift Right Click in the UV Editor and Choose Move and Sew.
This moves the UV shells together and combines the edges. Select another edge along the cube, do the same.
Keep going until all the long faces of the cube are connected. Then choose one edge along two caps and do the same.

Now if you right click in the UV Editor and choose Shell (or go to the Menu and Choose Select>Select Shell, get the move tool, and you will see that as you move the UV shell around, you are moving the location of the textures on the object, but they are all connected together and wrapping around the corners as they should be.

Select the shell and go to Polygons>Normalize. Your UV's fit nicely into the quadrant (you may want to Go back to UV mode, marquee select the UV map, and scale it down just a hair to get the edges off the axis.
You can move the map to make the corners of the cube align better to the corners of the pattern.
Now, whatever texture map you apply to this object (a normal map, a reflection map, transparency, or bump), it will line up correctly with the object, without distortion.
Be sure to delete the history. Save. And then Freeze the Transformations.
This is the basic pipeline for doing all UV texture mapping. Next, we'll look at how to do more complex shapes. It is just the same, you'll just use multiple projection types.
First, let's look at Automatic Projection. Open the Option Box.
Automatic Projection mapping creates several planar maps around your object, guessing at the correct orientation for each. You can select the number of planar projections, and optimize for less distortion or fewer pieces to stitch together,
You use 6 projections almost every time. In fact, all the defaluts are pretty good. Hit Apply.

You have a manipulator that allows you to move all the axis at once to line up with the object correctly.
You will also see that the scale is the same as what we had done before.
Then use the Move and Sew Tool to stitch it all together. Be sure to use MOVE and SEW so they keep their proportions.

The flip the UV's using the 45 degree flip tool and set the Normalize to make sure it is fitting correctly, and scale a tiny bit.
Here is a tutorial with tips for UV layout:
http://www.paulhpaulino.com/6-tips-to-improve-your-uv-mapping-workflow/
UV Map a Table
Let's start with a scene file you can find on the Files to Download for Class folder on the google drive. This is a table built by someone named Shane Whit. I got it online for this demo.
The table is made up of a bunch of rectangles.

The UV Editor looks just like it did for the last exercise, but in fact, there are a bunch of cube UV's laying on top of each other

- Click on the checkerboard pattern in the UV Editor menu
- This puts a checker pattern onto the object to help see how an actual texture would map.
- You see that the checkerboard is meant to be squares of black and white.
- Notice that the checkerboard on the actual table object has rectangles and how distorted the UV's look around the sides and legs!
- We need to fix that!

The letters on the texture are there to help make sure the UV's are lined up so the textures are facing in the right direction.
- Create an aiStandardSurface material
- turn up the base color to 1.0
- turn down the specular to 0
- rename it M_Wood
- Drag and drop the T_wood_D texture (T is for texture and D is for diffuse since we are adding the diffuse color, the color that shows when light bounces off it)
- Assign this material to the entire table

Even when you hit 6 you don't really see the wood grain. You need to turn off the checkerboard to see it clearly.
Notice that the wood texture looks really bad, as you would expect after seeing the checkerboard.

Let's fix it!
- In face mode, select the top and bottom face of the table top. Notice that the two corresponding UV squares are selected in the UV Editor

Planar Projection
Because the table is flat, a planar projection makes sense.
- In the UV Toolkit,
- Go to Create tab
- Shift click on Planar to open the Options Box
- The projection wants to happen from the Y axis, so choose that.
- Make sure the Keep Image width/height ratio is checked ON to alleviate distorion
- Hit Project

Now you have some big rectangles in the UV Editor. Select the UV Shells for the rectangles and move them out of the 01 Quadrant

- Now select the faces of the table top that face the positive and negative x axis as shown
- Shift select the Planar option from the Create Menu
- Choose x-axis this time (all other settings are the same)
- Hit Project

Now you have some long narrow rectangles in the UV Editor.
- Move those out of the way, too

There are just two squares left in the UV Editor. These are the faces of the positive and negative z sides of the table top.
- Select the UV's in the UV Editor (you could also select them on the object, but this is simpler now that they the only UV's left)
- Planar map from the z axis
- The square UV's are now long and thin like the faces on the object.

- Move those UV's out of the 0-1 space, too.
To see how the mapping is looking, turn off the texture view and turn on the checkerboard again as shown

Notice how much better the mapping looks! Nice squares.
It still isn't quite right.
If you click on teh blue shaded squares at the top of the UV Editor, you will see that the shells are purple, this is because there are two shells stacked on top of each other (one for the top face and one for the face underneath the table top) Move them apart from each other and notice that they are different colors (red and blue)

Do the same for the other faces so you have six rectangles in your UV Editor

Blue means that the normals are facing in the correct direction. Select all the red shells and go to transform >flip on the U axis (horizontally)

Now they are all facing as they shoudl be but the size is not right yet Notice that the face that is on the short side of the tabletop is too long.

You can fix it with the Texel Density method from before, or you can use Layout. Try it.
- With all the UV Shells selected
- Go to the Arrange and Layout Tab
- Find Layout and SHIFT click on it to bring up the options box
- Choose Legacy mnode
- And Prescale WORLD
- Hit Layout UV's
Notice that all the uv's are back in the 0-1 quadrant and they are now scaled to each other properly.

If your texture looks ok, you can stop here, but chances are the wood grain is too big or running the wrong way, and is not sitting correctly just yet on the edges of the table top.
Let's fix it.
To fix the way the side edges meet the top, so it looks like real wood and not a cheap laminate you have to stitch it together

When stitching the uv's together, it is just like sewing a garment. There are always seams and you want to make sure they are in hard to see place, such as where the bottom face of the tabletop meets the edges, as opposed to where the top face of the table top meets the edges, if you follow.
OK. Let's do it.
- Select the top face on the object to find the top face uv's
- You can adjust how dark the texture shows up in the UV editor by moving the slider on the top right.
- Go into edge mode
- You see that when you mouse over an edge, it turns red and the corresponding edge on the object and on the other UV's are also red.

This makes it easy to know when edges we are going to stitch together.
- Select a long edge on the top face UV
- The corresponding edge is also selected
- In the UV Toolkit, open the Cut and Sew tab
- Click on Stitch Together
- The face moves over and is connected to the other face.
- Keep going all around the top face UV.

Looks at the table in the viewport and you will notice that the sides of the table now connect nicely with the top of the table! Nice.
We still, however, have more seems than needed.
- Now stitch the bottom of the table to rest. You may do better to move the top face shell over a bit as shown and then select the edge and stitch

It is all one shell now!

Now the texture wraps around the eges as they should. Well done!

The wood grain should face the long way on the table. Select the UV Shell and go to Transform>Rotate

Finishing the table UV Mapping
We are actually almost there.
Let's start by UV Mapping the base of the table top, the four rectangles that hold the table top up.
- Select longSide1 from the outliner
- Select the face that is outward and the one that is inward. (Much easier to map two directions at once)
- In this case, we can see, when we activate the move tool, that the projection we want is from the x axis.
- In Create, Shift select Planar
- In the options box, be sure x-axis is selected and keep image width...
- Project

Move those UV shells out of the way

To get the top and bottom of this rectangle, you will notice they would be hard to select, so you can use the UV Editor as shown.

- Project from y this time
- Move those out of the way.
Finally, you have the ends of each side rectangle. These are hidden away but let's do them since this is a practice and it is good for learning. This time, we project from z

Now repeat what you did on the top faces.
- In UV Shell mode, separate the overlapping shells
- Click the blue shaded icon to see which are facing correctly

- Flip all the red shells so they are all blue.

Now we need to scale them to each other.
- Select all the shells
- Go to Layout
- Make sure the settings are as they were before (Legacy/World

Now you stitch them together as before. I like to separate out the UV shells to make the edges easier to find. Stitch the edges that will show the most.

Make sure the UV's are running the direction you want them to (rotate the uv's as needed), and move this shell out of the way.

- Turn off blue shaded mode
Copying the UV's from one side to the other
Rather than going through this again on the other long side, you can simply copy the UV's from one object to another. This will come in quite handy.
- In Object Mode
- Select the longSide1 object
- Shift Select longSide2
NOTE: It is important to first select the object you are copying from and then the object(s) you are copying to.
- Go to Mesh>Transfer Attributes>Options Box
- Be sure UV Sets is set to All
- Hit Transfer or Apply
- Note: Hitting Apply keeps the options box open, which makes it handy for transfering these UV maps to the short sides.
- Go ahead and apply the UV's from the long side to one of the short sides.
You will notice that the rectangles on the short side are not quite square. We can fix that by scaling the UV Shell until the checker pattern looks like squares.
Now transfer the UV sets from one shortSide to the other as you did above.
Keep going for the legs.
- Select the front and back of a face and choose the proper planar projection
- Repeat for the other four sides as you did before.
- Flip UV's so they are all blue
- Lay them out
- Stitch them together
- Make sure the UV's are in the grain direction you desire (running up and down the table leg)
- Move the UV Shell out of the way

- Transfer the UV's from one leg to each of the others as before.
The only thing left to do is to put all the UV Shells into the 0-1 coordinate space.
- Shift select all the UV Shells
- Shift Click Layout and make sure Rotate is set to NONE so that the texture stays pointing as we set it up.

Click Apply.

The UV"s should all be set up correctly, although the layout is sometimes "quirky" so you may need to move any overlapping UV Shells.
Make sure your viewport is set to Viewport 2.0 and that you have Screen Space Ambient Occlusion and Anti-Aliasing set to ON, as shown below

If you wanted to, you could then save a UV snapshot of and take the layout and go into Photoshop where you can edit your textures or paint them, so they are exactly placed on the table as you'd like. We will spend a small amount of time showing this process in a bit.
But you can make the table look better still, by adding some shine
- Turn up the specular weight

And fixing the scale by increasing the repeat UV in the Place 2d texture node

UnWrapping UV's
These were examples of objects that were simple (toy block) or made up of a set of individual simple objects grouped together (table). What if you have a more complex object? Maya 2018 has a cool new unwrap and 3D cut and sew tool.
Download the UVMappingTutorial.ma file(from the Google Drive>CS22 W19>Files to Download for Class>UVEditing).
Make sure the UnWrap Plug In is loaded (Windows>Settings and Preferences>Plug In Manager>Unfold3d.bundle (load and autoload ON)

This is a simple cylindar that I extruded out to create some complexity for UV mapping.
- I recommend you turn on Wireframe on Shaded (in the ViewPort Shading menu).
There are tons of ways to unwrap a UV for texturing. Here is an easy method.
Click on the object itself in the ViewPort. If you look at the UV Editor, you will see that despite the complexity of the shape, the UV's still look like a standard cylindar. Turn on the checker view and dim it as shown below:

You want to see the extrusions in the UV Editor, not just the original primitive shape.
In the UV ToolKit, Open the Create Tab
Choose Camera Based.

You may be prompted to choose a face on the object. Go ahead and choose one.
3D Cut and Sew Tool
In the Viewport, Go into Edge Mode.
Choose the 3D Cut and Sew UV Tool (UV>3d cut and sew UV Tool in the Main Menu)

The object turns purple.
You can double click on an edge you want to separate to make a "pattern piece" to cut that edge.

You can also hit the Tab key and it will automatically select entire edges so you don't have to double click.

Since I made this cylindar shape with 0 cap subdivisions, the bottom is an n-sided shape. To select that edge, you can't just double click, but you can use the tool and drag around the edge to cut it.

To undo a cut you have made, hit Control and select the edge and it magically heals.
Maya's Viewport helps you visualize the shells you are creating through color (also new).
You will want to have cuts around all the horizontal edges where the shape changes.

Because of the way Maya will unfold some of the other cylindrical shapes (making them donuts instead of rectangles) it is a good idea to create cut along the verical cylinders as shown. Easiest way to select them is to click the edge and hit "x" to cut them.
YOU DO NOT WANT TO CUT THE HORIZONTAL EDGE BETWEEN THE TWO VERTICAL EDGES.

While you are still in the tool, Right click and go to Component>UV Shell.

Select a shell and hit the d key to unwrap in the UV Editor.

Select all and they all unwrap.
From here, you could, as with the table, apply a texure and layout the uv's so the texture is facing as it should. You take the entire thing into Photoshop to paint on the UV's and create a custom texture