Tutorial: Rendering and Ambient Occlusion Pass
You have set your lights, assigned materials, added textures, and now you are nearly finished. Here are a few tips for the final touches and rendering.
CS22/122 - Loeb
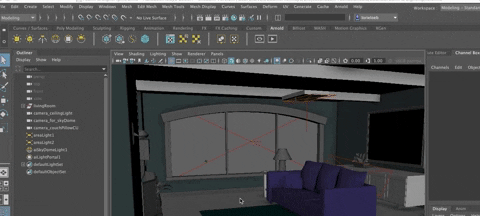
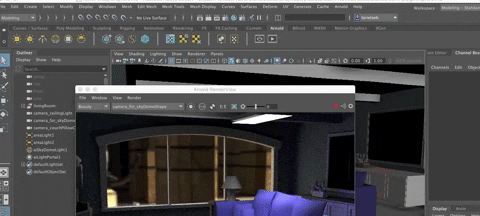
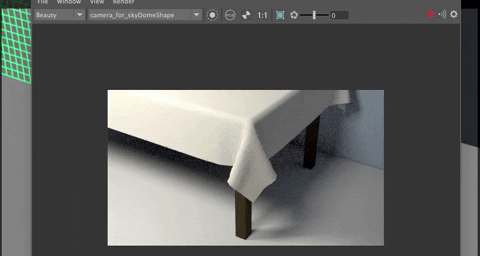
Arnold Render View
You can open the Arnold Render View by clicking on the Play Button in the Arnold Tab or going to Arnold>Render
As you make changes or add textures, if things aren't updating, you can use the Render>Refresh Render menu in the Arnold RenderView or the Update Full Scene (Command +u).

Use a render region if you are setting up lights or making adjustments that will take a long time to render.
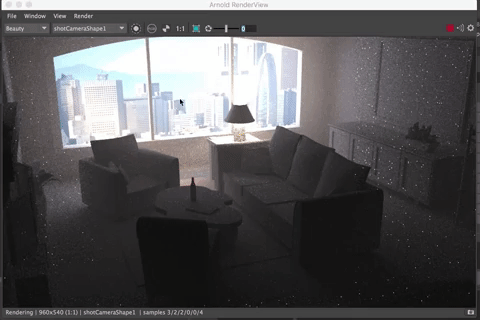
Save the image (click on small camera in lower right corner) in order to save a snapshot so you can compare the results of your setting changes.

Render Settings
The Render Settngs window is where you set up the attributes for the render. Go to the Render Settings Icon or to Windows>Rendering Editors>Render Settings
So far, you kept the render settings low in order to reduce render time while you were working. Now that you are ready to render your more finished scene, you need to increase them.
Remember: changing values by even one digit can increase render times exponentially.
Also, the render settings need to be increased if your room is huge, and can be lower if it is smaller.
Here are some suggested settings:
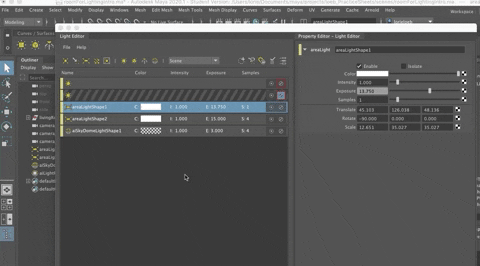
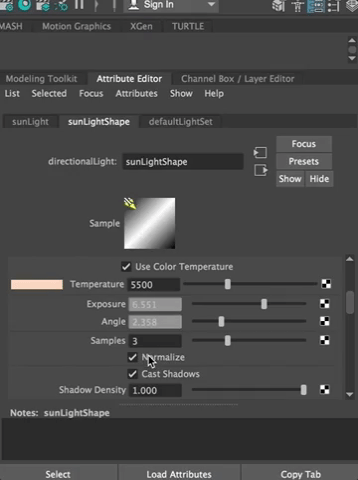
In the Light Attribute Editor
In the attribute Editor for each light, turn the Samples Attribute up to a value of between 5 and 12, depending on the size of your room.
You can see all the values by opening the Light Editor (Windows>Rendering Editors>Light Editor
Then select the light and change the number of samples in the Property Editor on the Right of the Light Editor.
If you are using volume lighting for God Rays or Fog, you can increase the Volume Sampling setting, too.
If you aren't using an volumes, turn this number to 0 in the Attribute Editor to decrease render time.
Render Settings
You will want to render out at a higher resolution, too. Open the Render Settings Window.
Make sure you have the Arnold Renderer Selected in the Render Using Drop Down.
 )
)
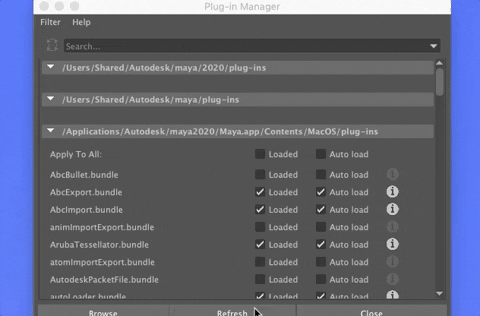
If you don't see the Arnold Option, go to Windows>Settings and Preferences>Plug In Manager
In the Plug In Manager Window, scroll down to the Applications/Audodesk/Arnold/mtoa/2020/plugins tab and make sure mtoa.bundle is Checked ON for Loaded and Autoload
In the Commons Tab:
Name your file (default is just to use the scene name)
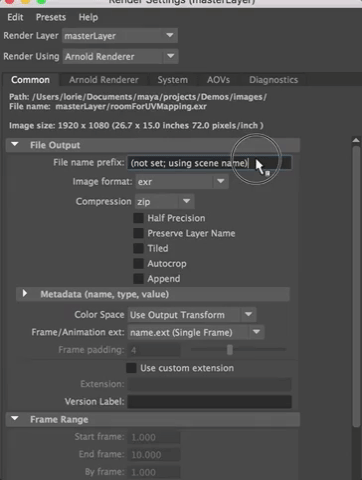
Set your Render Camera to the camera you want to render from.
Set the Output either tiff, png, or exr
Set the Image Size to HD540 (if that is how you set up your shot) or HD1080 if you have a lot of time for rendering!

In the Arnold Renderer Tab:

Try keeping your render settings in the default. If you don't like the results, increase the number of samples for the LIGHTT First
If you still need to increase the quality, increase the settings as below, depending on the size of your image and the materials you are using:
- Camera Anti Aliasing to between 3 and 5
- Diffuse to around 3
- Specular to arund 3, more if you have a lot of shiny objects but this will increase render times quite a bit.
- If you have Transmission (glass) or Sub Surface Scattering (SSS) turn those values up to 3. Keep this number low if you don't have a lot of transmissive materials.
- Turn off volumetric samples if you don't have god rays
You will render each image twice. Once for the Ambient Occlusion pass and once for the Master pass, and use the Multiply Layers function to combine them in Photoshop.**

You can render your image out in a few ways, but the simplest is to use the File>Save Multi-Layer EXR in the Arnold Render View.
Name your image. The .exr image will be in your Images folder for the project (again - critical that your project is set up correctly)
Another way to render, that ensures you use all the settings in your render settings: In the Render Module, go to Render>Render Current Frame. This will use all the render settings and use the Maya Render View window.
About EXR Format:
"A file with the EXR file extension is an OpenEXR Bitmap file. It's an open source HDR (high-dynamic-range imaging) image file format created by the Industrial Light & Magic visual effects company.
EXR files are used by various photo editing, visual effects, and animation programs because they can store high quality images, can be comprised of lossless or lossy compression, support multiple layers, and hold a high luminance range and color."
More information on this format can be seen at the official OpenEXR website.
Smooth Mesh subdivisions at Render Time (LOD)
You could smooth the entire surface (Mesh>Smooth) but that can slow down your computer quite a bit. Arnold can do a Smooth Mesh during Render to save some memory on your computer. It is pretty smart and can tell how far away the object is from the camera to smooth as much as needed for a particular camera view (Level of Detail or LOD).
If you have something like a tablecloth or comforter that you made in n-cloth and you want the folds to look right, this is a great way to go. Super complex geometry in a huge scene would be another good use for this method.
Here we will use it to make some folds look better.
You can see this in my example below.
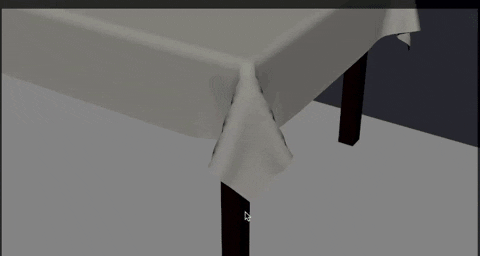
It looks bad in the render
Choose your object and give it a NEW Material. The aiUtility shader helps you analyze how the smoothing will best be applied during render time.
Choose the Arnold Shader> aiUtility
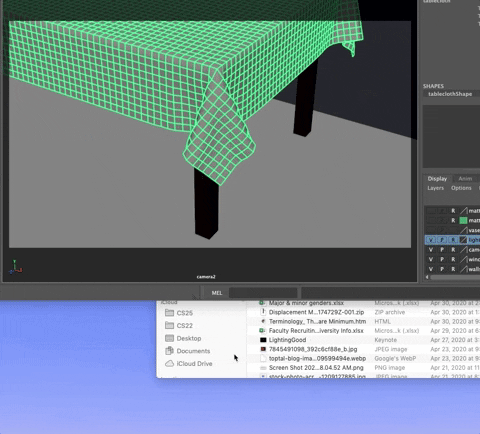
Once that is applied, open the Attribute Editor for the aiUtility and under Utility Attributes, choose
Shade Mode: Lambert color Mode: Polygon Wireframe
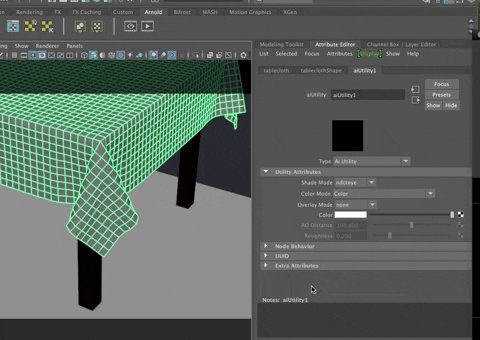
(Note: The utility shader is great to see all kinds of things about your object--the surface normals, for example. Here we just want to use it to see the way the quads are going to be redistributed for rendering a smoothed version.
Smoothing
With the object selected, Go to the Attribute Editor and the obect's shape node.
Scroll down to the Arnold Tab
And then to the Subdivisions Tab
Change the Type to CatClark
Change the Iterations to 2 (to smooth 2X)
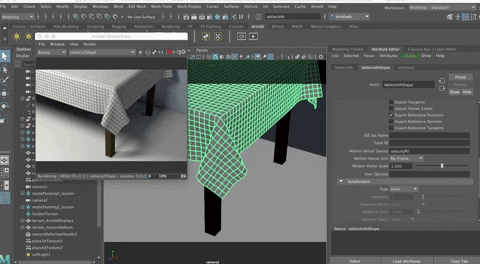
For Adaptive Error, the higher the number, the more it tries to compensate during rendering. 0 is too precise. Let's choose something between .15 and .2
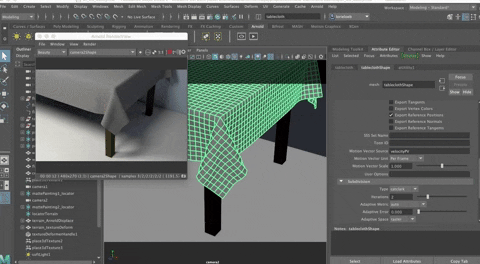
Now, the subdivision smoothing will happen during rendering to save some memory!
You can change the material back to the one you want for rendering. The aiUtility shader just makes it easier to see what will happen during render.
Ambient Occlusion
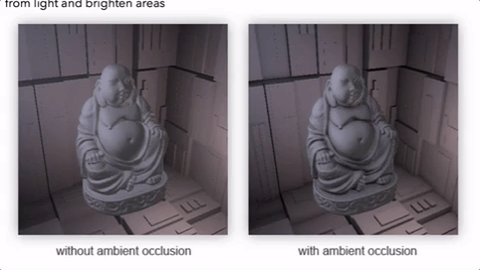
Ambient Occlusion is an important rendering detail that helps create a realistic lighting effect by calculating how the light will spill onto surfaces that are deep vs shallow. Ambient occlusion is a shading/rendering technique that calculates how each point in the scene is exposed to ambient lighting. In other words, if you imagine a how light falls off from a source, the ambient occlusion is an indirect lighting method that tries to predict how the light spills onto the creases and interior surfaces of the object. It helps to darken folds that are tucked deeply away from light and brighten areas
You will create an Ambient Occlusion layer and shader by creating a Render Layer in the brand new Render Set Up window in Maya and doing a Shader Override to put the aiAmbientOcclusion material onto the objects in your room. Then you will render out that layer, and use Multiply in Photoshop to combine the AO layer and the diffuse layer you already rendered.
Here is a step by step process:
Open the Render Set Up Window by clicking the icon to the right of the Hypershade icon

Or use the Main Menu (Windows>Rendering Editors >Render Set Up)
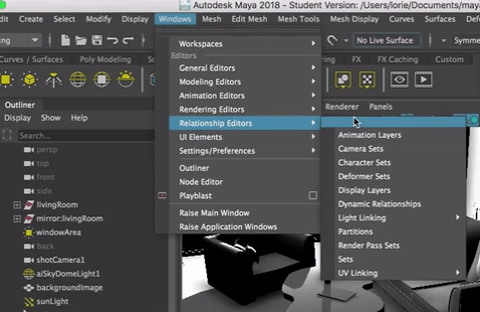
This is a cool new tool for setting up your rendering.
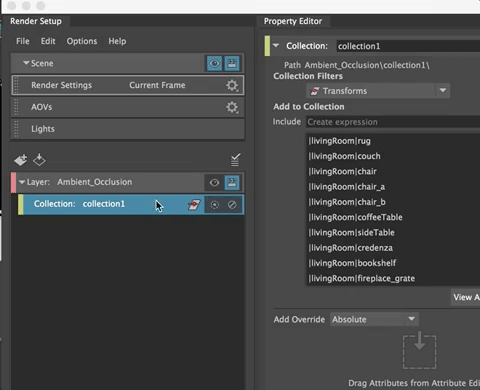
Create a New Render Layer

Rename it AO or Occlusion or Ambient_Occlusion

Right Click on the Layer and Create a New Collection

In the Outliner, select the geometry you want to apply Ambient Occlusion to (generally, all the objects in your scene that are part of the interior architecture, the furniture, rugs--you don't add ambient occlusion to lights, cameras, or objects that already have an ambient occlusion map, such as materials from substance source).
MMB drag them into the collection you just made.

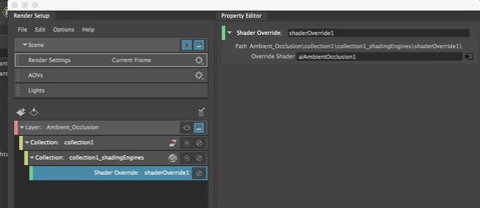
Right click on the Collection and Create a new Shader Override
Click on the checkerboard to the right of the Shader Override in the Render Set Up window and then Create an Arnold Shader that is aiAmbientOcclusion

Now you can adjust the Ambient Occlusion attributes. Generally, the default is fine, but you can actually use this to alter the image quite a bit.
(Details on attribute settings for Ambient Occlusion can be found here: https://support.solidangle.com/display/NodeRef/ambient_occlusion)
You could render out the entire scene with the ambient occlusion layer by clicking on the Scene and making sure it is visible, or, better still, you can render out the ambient occlusion layer separately by activating it.
If you looked at your Render Settings, you will see you have the Ambient Occlusion Render layer active

**Then you can render out the Ambient Occlusion Layer following the steps for rendering the image.
In Photoshop
- Open both the master and Ambient Occlusion layers in one file.
You can open one and then LMB drag the other into photoshop.

- It will give you some Read options for the OpenEXR format and choose As Alpha Channel.

- You may need to adjust the master layer a bit first to fix any color or exposure problems you see.
- Be sure the AO pass is below the diffuse layer in the Photoshop layers. You can drag them to change the order.

- In the Layer Editor, Use Multiply to see both layers

You can adjust the transparency of the AO layer if it is making your image too dark.
and Save as open EXR, png or jpg or tiff image (be sure to turn off the Alpha Channel and any transparency.
For more about image formats: https://www.photoup.net/differences-between-file-formats-raw-dng-tiff-gif-png-jpeg/