Tutorial_Rigging Concepts
CS22 Loeb
I want to introduce you to a few fundamental concepts we use in rigging. Rigging is the process of creating a system that allows a 3D character to move (to be animated).
In animation houses (Pixar, Disney, Sony, for example), the person in charge of the rigging is generally a Technical Director (TD) because rigging is generally a technical operation with lots of custom scripts to allow for particular motions.
Look at Motion
The best way to understand the complexity of motion is to observe it. TD's look at parkour videos (or create them) to understand the complexity of movements a character is going to have before starting to rig.
Terms:
Joints Sometimes called bones. These work just as in a human body--they are points of articulation. On a leg, you would put a bone from the hip, moving down the thigh to the knee. A joint at the knee so it can bend there. And then connect a bone down to the ankle, where the leg also moves.
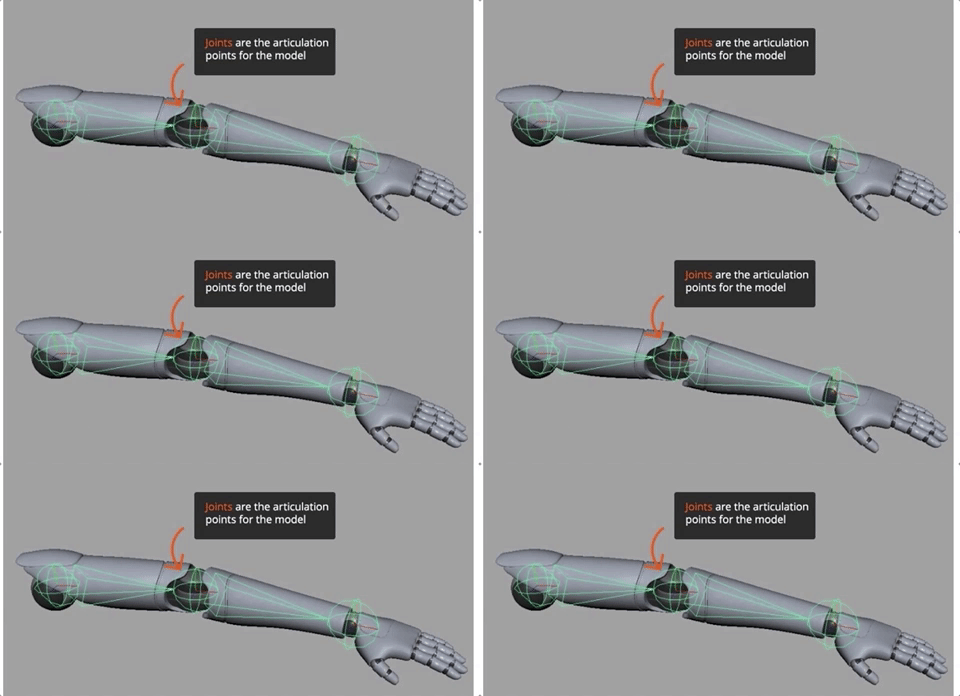
Image from www.pluralsight.com
Kinematics is the study of motion. It is the "branch of mechanics concerned with the motion of objects without reference to the forces which cause the motion." www.Dictionary.com
Forward Kinematics Often called FK, Forward Kinematics is motion that follows the hierarchy of the character, with motion going from the parent to the child.
Inverse Kinematics Called IK, is the opposite of FK. In FK, the parent drives the movement through the hierarchy. In IK, the child influences the movement of the parent. (Where the wrist goes, the upper arm moves, for example)
Controls Curves created to assist the animator. Each curve is linked to a particular motion or set of movements and the animator can move the character's rig and set keys directly on the curves, rather than having to select joints individually.
Driven Keys Driven keys are connections between objects that allow keys on one attribute to drive the keys on another. The "Driver" is the object/attribute that controls the animation/motion of the "Driven" object/attribute. Controls for animation are often made using Driven Keys, so that the Control Curve is the Driver and the joint is the Driven.
Constraints Constraints limit an object's position, rotation, scale, hierarchy. Constraints are great tools in rigging and animating because, like Set Driven Keys, it sets up a relationship between the Control Curve and the joint motion.
Skinning Skinning is the process of binding the geomtry of an object to the joints/bones. It assigns each vertex to a particular joint or set of joints to determine how that vertex will respond to changes in the joint.
Painting Weights Weight painting is the step you do after skinning your character's geometry to the joint system. It allows you to change the way each vertex is influenced by the joints by assigning a weight. If the weight of influence of a joint on a vertex is 0, then moving the joint has absolutely no influence on that vertex. If it is 100, then that single joint has total influence over how the vertex moves. If a vertex is influenced by more than one joint (for example if a vertex is influenced by both the hip rotation and the knee flex) then the weights are something between 0 and 100 for each joint. Each vertex has a total weight of 100 when it is skinned, which means that either a single joint or a combination of joints influences each vertex on the skinned geometry. Weight painteng is a way to ensure that the geometry behaves as you would expect during a variety of movements.
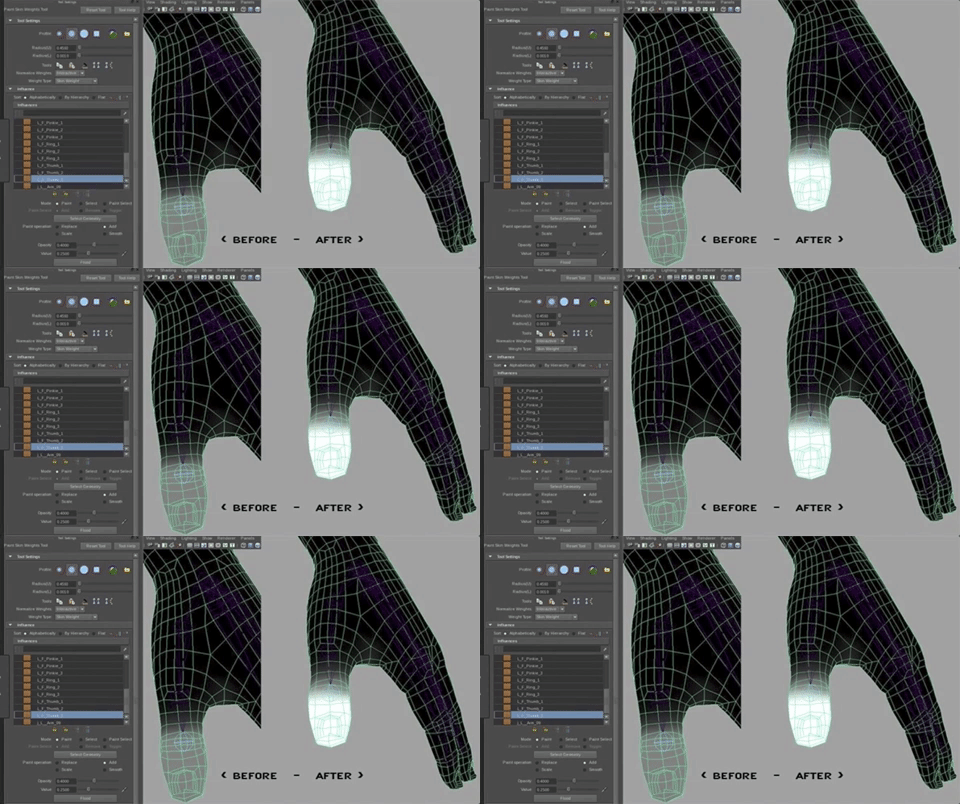
3dFiggins.com
In the example above, white equals 100 and black is 0. First you select the joint, and then paint the weights of the verts so that the verts at the tip of the thumb are totally influenced by the movement of the thumb joint. The grayed area is where the verts are influenced by both the thumb tip joint and the knuckle of the thumb.
Deformers There are lots of kinds of deformers. We used a bend deformer to create the upper arch in the room tutorial. Deformers modify or deform an object and can be used in addition to a regular joint system. Cluster deformers, for example, allow you to manipulate a set of vertices with one single control (and then that control can be constrained to a control object for animating). Lattice deformers are great for creating motion that undulates (like a tail). You could use a joint system for that, or you can use a lattice.
Blend Shapes Blend shapes are deformers. They are often used to create facial animation, but you can use blend shapes to create any animation you want to. Blend shapes are morphs from one set of vert locations to another.

Blend shapes can be used on one part of the body at a time (see image above) or they can be used to create total changes in expression (see image below)

(Image from www.pluralsight.com)
Generally, adding joints to a character's face is not suggested as the motion is organic and complex. Instead, we use a mix of deformers and blend shapes.
Let's try it
Parenting
The most basic kind of rigging is parenting.
We've looked at parenting and hierarchies before, but not in this context.
Download and open the folder "Rigging Scenes" from Google Drive. Open "RiggingParenting.mb" in Maya

In this artist dummy arm model, I have a series of individual objects--each object can move independent of the other.
To create the hierarchy, select the hand (the child), shift select lower arm and hit "p" to parent them.
Now you can still select the hand to move it, but if you click on the lower arm, the wrist/hand moves the hand.

Now select the lower arm, shift select the upper arm and hit "p". Now if you move the upper arm, you move the lower arem AND AND the hand.

In the Outliner you see the hierarchical relationship.
This allows you to move the entire arm from the shoulder.
But it still doesn't pivot the way you would want--moving around a pivot that is at the joints.
To fix this, in the front or, better yet, the top orthographic view,
move the pivot points for your object (hold the d key down and move it)
You can use "snap to projected center"
 to keep the pivot mostly centered, but do check it from the top and side views to be sure.

you want the pivot points to be at the center of the wrist, elbow and shoulder.
Now select the upper arm and hit e to move the entire arm. The parts of the arm pivot correctly around where the joints would be.

Undo to get back into a straight arm position.
You can keep moving to the lower arm and rotate it or to the hand and they move as you would expect.
Again, this is the simplest kind of rigging, utilizing parenting and FK, and would be a totally acceptable method to rig a simple robot!
You can undo parenting by MMB dragging the child out from the parent in the Outliner or Hypergraph: Hierarchies or you can use shift + p to unparent.

Intro to Joints
Joints are a series of bones that allow for a variety of movements at specific places. When you make a joint you aren't actually creating any geometry...the joints you see are just graphical representations. They don't render out as an image.
To work with joints, use the file "jointIntro.mb" that is in the Rigging Scenes Folder
This is the same artist's dummy arm I made for you from before, without any sort of hierarchy set up.
Go into the Rigging Module
Work in the Top Orthographic View
You will create joints using the Joint Tool that is found in the Skeleton Menu by clicking Create Joints.
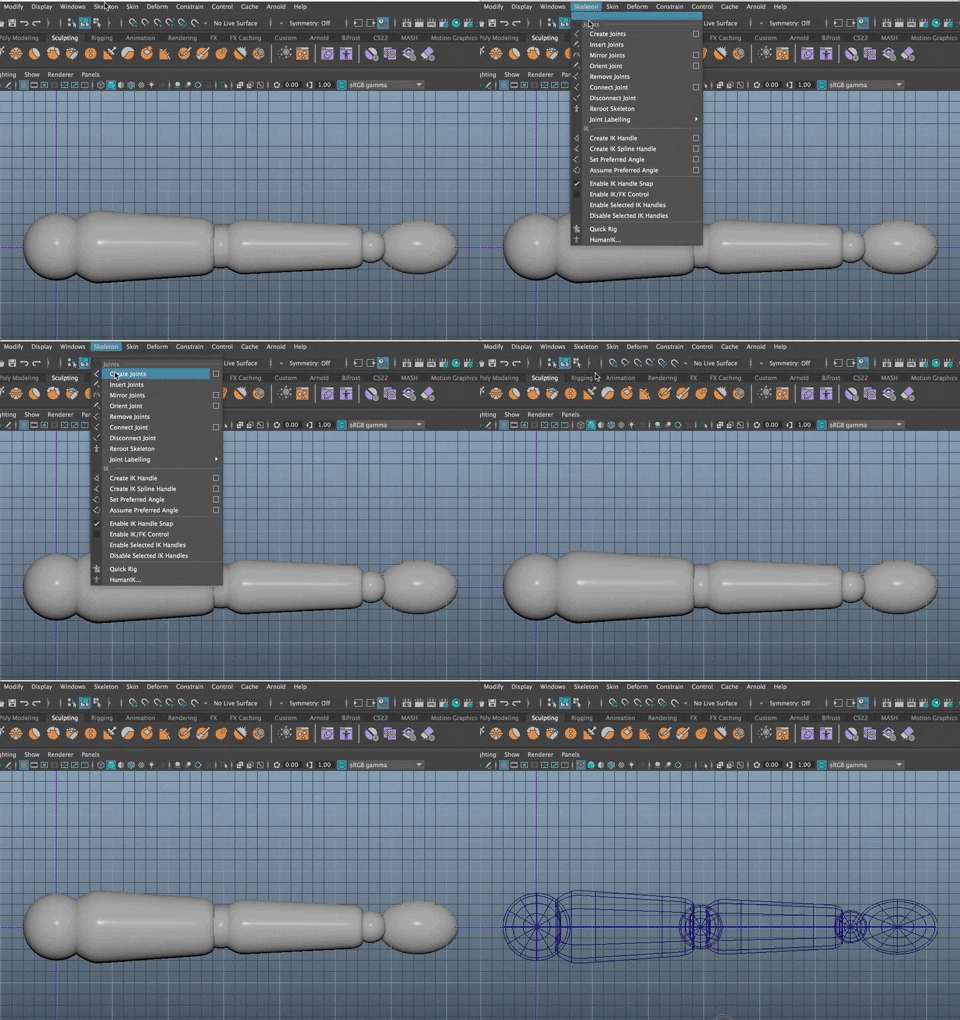
Hit 4 to go into wireframe mode
With "Snap to Projected Center" on
click once at the center of the shoulder sphere, then again at the elbow and then at the wrist.

Hit Enter
NOTE: When you create joints, they are, by default, created on the grid. If we were making joints for an arm that was above the grid, you'd need to move them up in Y to fit them into place.
Instead of using Wireframe mode for making the skeleton, you can go into the Viewport Menu and go to Shading>X-Ray Joints

The joints move as you might expect, but they are not attached to the geometry
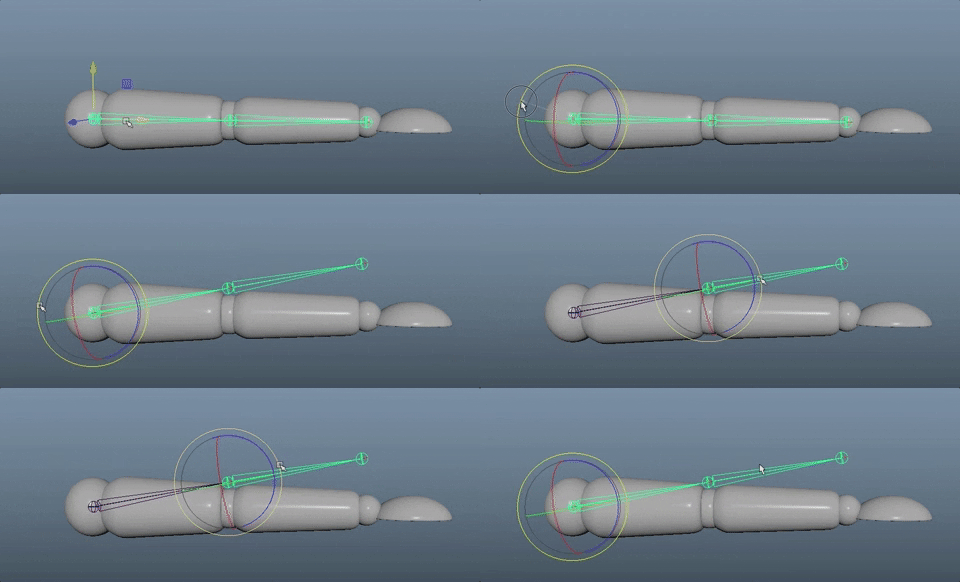
The joints are also in a hierarchy with Joint 1 (the first joint you put down, as the parent of Joints 2 and three. The joints are actually the round icons.
You can see that in the Outliner.

To move through any hierarchy, you can use the UP and DOWN arrows.
Now let's simply parent the objects to the joints.
Select the hand geometry (the child) and shift select the last joint - joint 3. hit "p"
Select the lower arm geometry, shift select joint 2 and hit "p"

Select the upper arm geometry, shift select joint 1 and hit "p"
Check out the hierarchy in the Outliner!
Now you can rotate any of the joints and the geometry will move with the joint.

You will notice that the joints move in ways an arm wouldn't --extra rotation, for example. You can also do things you wouldn't want to do in an animation, such as scaling or translation. We will cover adding custom attributes, locking and hiding attributes, and limiting attribute values to a certain range later on.
IK Handles
In the example above, you were moving the joints from the parent down through to the child. In other words, if you move the parent, the child comes along but each child can still move independently, as you would expect in a hierarchy. To have the hand reach out and grab something you would play with the values, moving the shoulder/upper arm, then the elbow, then the wrist.
This is called Forward Kinematics or FK
Inverse Kinematics (IK) allows the movement to flow in the other direction--beginning with the child.
Kinematics is the study of the mechanics of movement, withouth thinking of the forces involved (muscles, nerves, physics).
With Inverse Kinematics, you set up a chain reaction that starts with an effector, that is placed at the child joint and then moves the object up through the hierarchy to the parent according to the mathematical formula applied.
Using the same scene as before, with the joints parented to the geometry and the rotations back to 0 so the arm is straight....
In the Rigging Module
Be sure you are in the Top Orthographic view
Go to Skeleton>Create IK Handle>Options Box
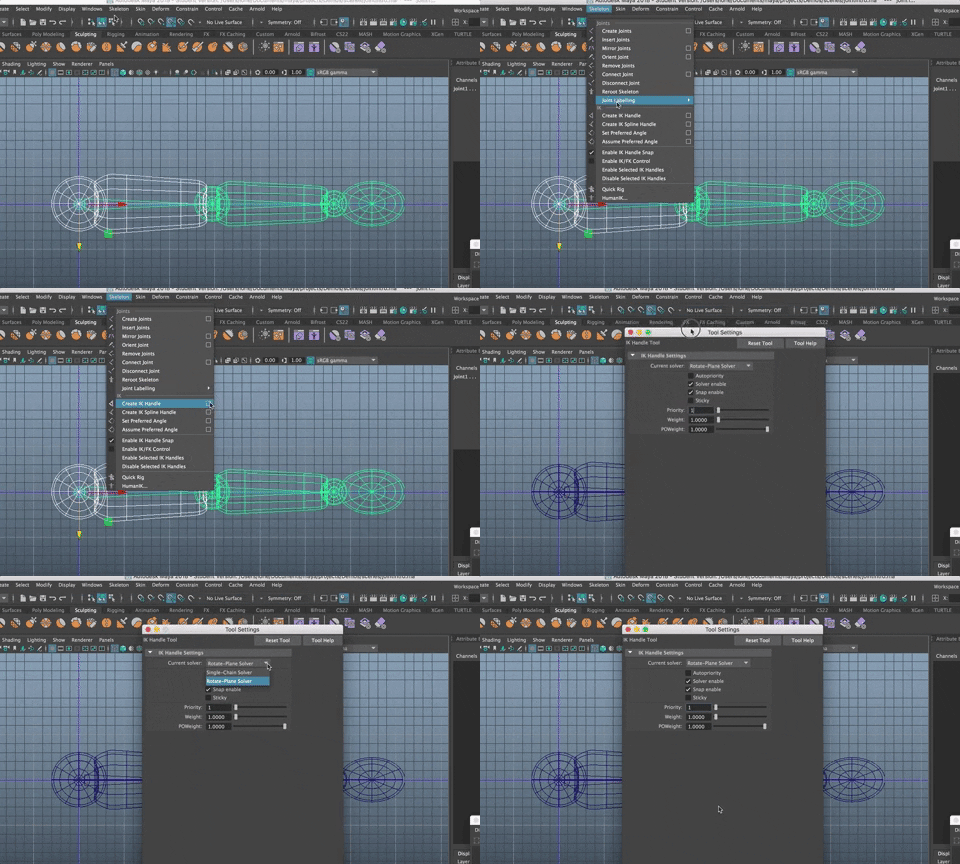
You have two options for the solver (the formula) Single Chain or Rotate-Plane. Choose Rotate-Plane. The other defaults are good.
Go ahead and click on Joint 1 at the shoulder (the parent) then click on the child joint, in this case at the wrist, joint 3
You will see that the joints turn red and there is an indicator at the wrist joint. The indicator shows the direction of the solver and the way the bend will be.
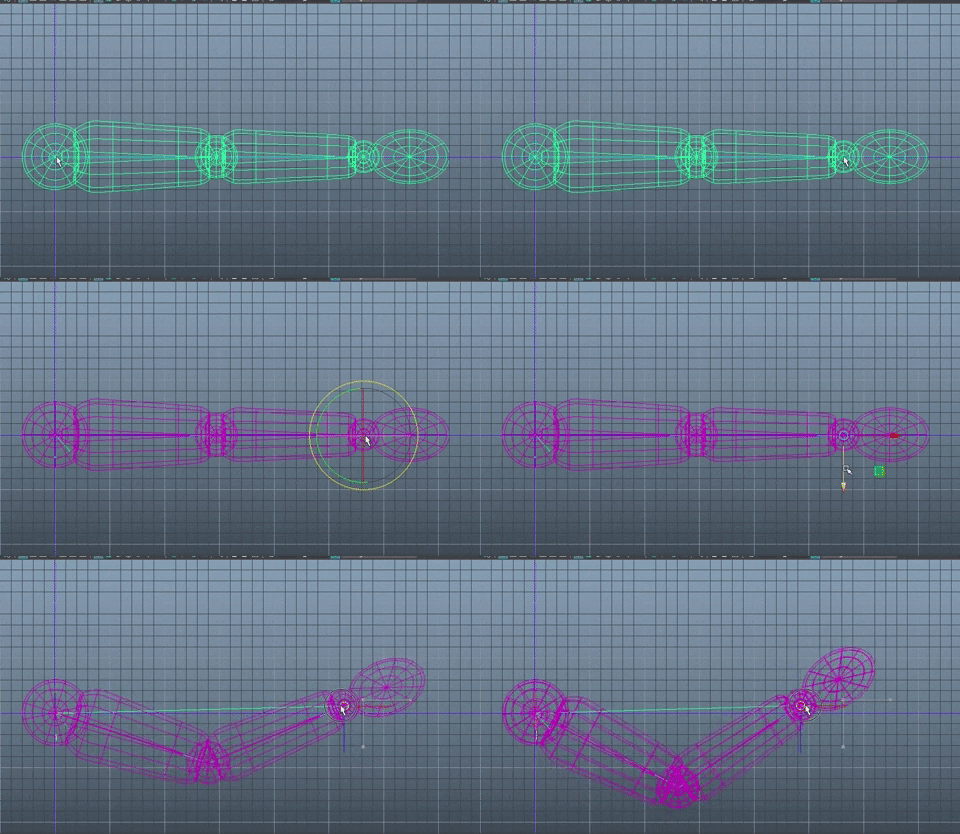
Select the indicator and, using the MOVE TOOL (w), move the wrist. The elbow comes along.
Rigging a Robot
You can use these techniques to rig a simple robot.
Open the file artistRobotDemo.mb from the Files to Download for Class folder, or use your robot model to create the rig.
Be sure you deleted history. Freeze Transformations. Make sure your robot is set up on the X axis facing positive Z with the Y axis exactly down the middle.
Depending on your robot, you will rig your robot in various ways. If the motion is simple, you can rig the robot with a simple grouping and parenting method as shown above--no need for joints or IK. As you get more complex or more human-like, you will want to add in joints and IK. For that, you can either use a mix of the method below and the joint method above, or use the Quick Rig or HumanIK methods shown in another tutorial.
Generally, when you start rigging a robot, you need be sure your outliner is set up correctly.
The artistRobotDemo.mb file has all the various objects completely separate. For this model, with this motion, you could COMBINE the hand with the wrist, the lowerarm with the elbow, the upper arm with the shoulder and then using that pivot as we did above.
Most robots have more individual pieces, so let's learn another approach that may work better for your robot--using groups.
Remember that when you create a group, you also create a pivot point. As you remember from above, the pivot point can be enough to create a movement.
Depending on how your robot moves: You want to create a group for each of the arms and a group for the torso of your robot, and a group for each of the legs, and one for the head if you have multiple objects there. Keep the neck separate, but you can group it to itself and name it.
Note: If your robot has arms that bend, you need to create groups for the lower arm and upper arm and then group them into an arm group, so you have multiple pivot points. same for the legs! In this file, we want the wrists, elbows, knees and ankles to moe, so we need multiple groups for each arm and leg.
Select the hand and then the wrist and hit CTRL + g to group them.
Keep going...
Be sure to name all your groups!

So before you start, your outliner is a set of groups for the various robot body parts.
Now select each group, one at a time.
Center the Pivot (Modify>Center Pivot)
Then hold the d key and move the pivot for each group to the center of where the joint rotation woudl begin.
To save time, you can create a keyboard shortcut for Center Pivot. I am using Option + shift + c.
You will use Center Pivot a LOT.
If you prefer, you could add center pivot to your custom CS22 shelf.
Now, as you did above, move the pivot point (hold d) for each group to the spot where it would move.
Put a pivot for the head around the center of the head, between the eyes.
Put pivots at each shoulder, elbow, wrist for the arms, depending on how they move.
Be sure to be precise when setting the pivot points and check from multiple angles!!!!
Think about whether the waist moves with the upper body or hips and group accordingly.
Create a group for individual objects, too--grouping them to themselves and setting the pivot as needed.
Now Create a robotGeo group that contains all the geo for the robot.

For this more complex robot, you still need to parent the geometries to create a heirarchy up the arms and legs. Do that NOW (parent rhand to rforearm, then rforearm to rupperupperarm, etc).
Parent the torso to the waist and the head to the neck.
SAVE
Creating the Control Rig
Now you want to create a control rig that will be the controls that will drive the animation. You do that using NURBS curves.
Under the Modeling Module
Go to Create>NURBS Primitves>Circle
Scale the circle out so it is as wide as your character and then some. This is the control that will move the entire rig.

Make sure it is centered from the top, around your robot.
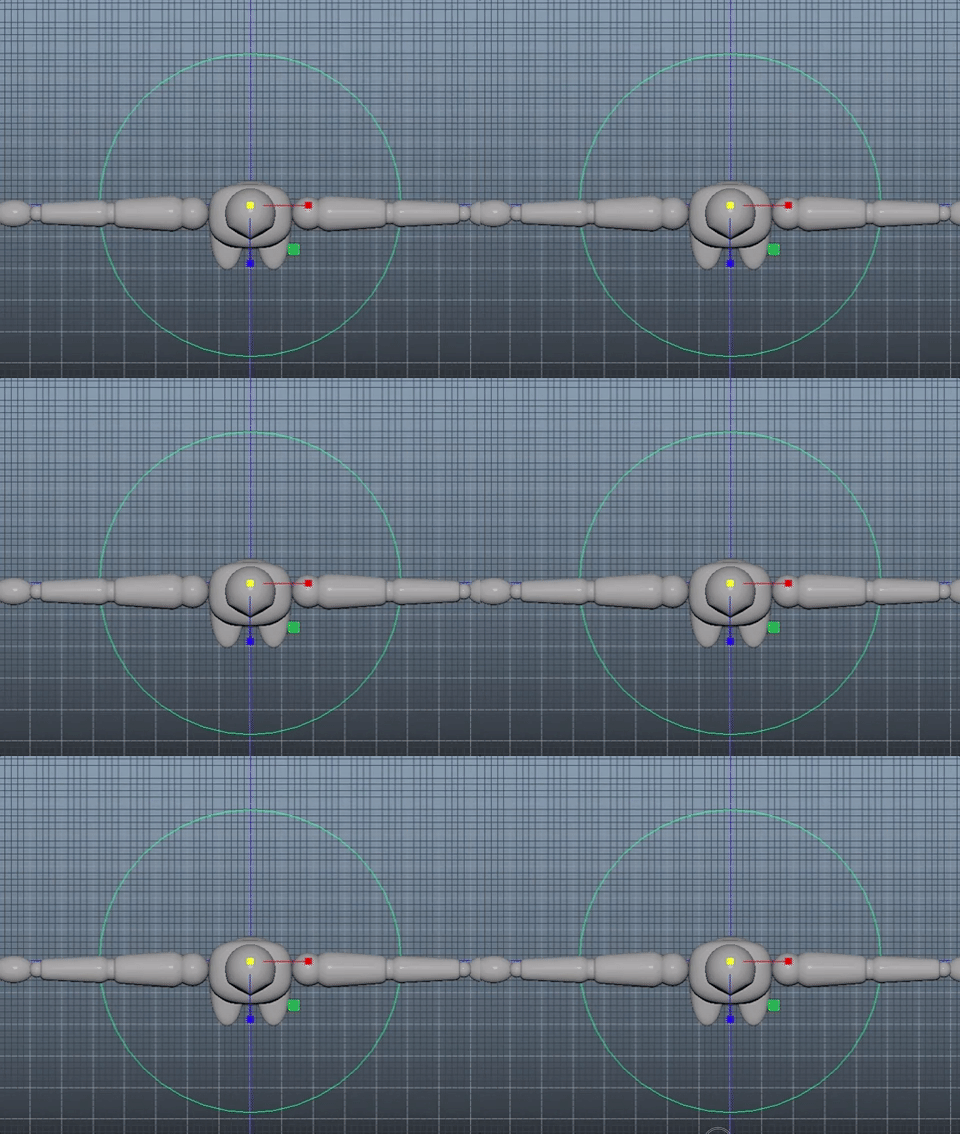
You will parent the entire robotGeo group to the curve so that when you move the curve in any way, the robot comes along.
Select the group, shift select the NURBS circle and hit "p"
Rename the control to ALL_Control
Create a NURBS circle that will be the control for the rotation of the head.
Move it up to the head and scale it so it is bigger than the head but not too big.
Select the head group, shift select the control and hit "p"
Rename the control to Head_Control
Keep going, creating circles for all the simple rotations at the joints. Be sure to name controls on the left side of the character's body l and the ones on the right side with r.
Controls on the right side of the body are often red and on the left side blue. You can change the color of the NURBS circle in the attribute editor for the circle.
Open the Drawing Overrides tab Check ON Enable Overrides For color, drag the color to the color you want.
You probably don't want to allow scaling with the controls.
(More coming....)