CS 22/122 3D Modeling
Lorie Loeb
Practice 1: Tools
Practice Sheets are used to walk you through some tools or techniques. Sometimes we will complete these together, in class, and other times they are given as homework. Although there is nothing to turn in, if you don't complete these, you will find it very hard to complete your projects. In other words, do all the practice work as it impacts the quality of your work in the class (and, as a result, your grade).
Setting up the Project
If you haven't already set up a practice project, you will do that now (see instructions on Practice Sheet 0 or below)
*It is extremely important to set up your project every time you start working on Maya. You first set up the new project, and later you just make sure you are working within that project, in the correct directory structure.
It is very tempting to get lazy and just work on the desktop. THAT IS A MISTAKE! You won't feel it at first, but as you continue working and your scenes get more complex, the problems will start to escalate and you will regret taking shortcuts.*
To reiterate---Every time you work in Maya, you need to set up your project or make sure you are in the correct project.
Start a new project.
Go to File>Project Window.
Click on New in the upper right corner.
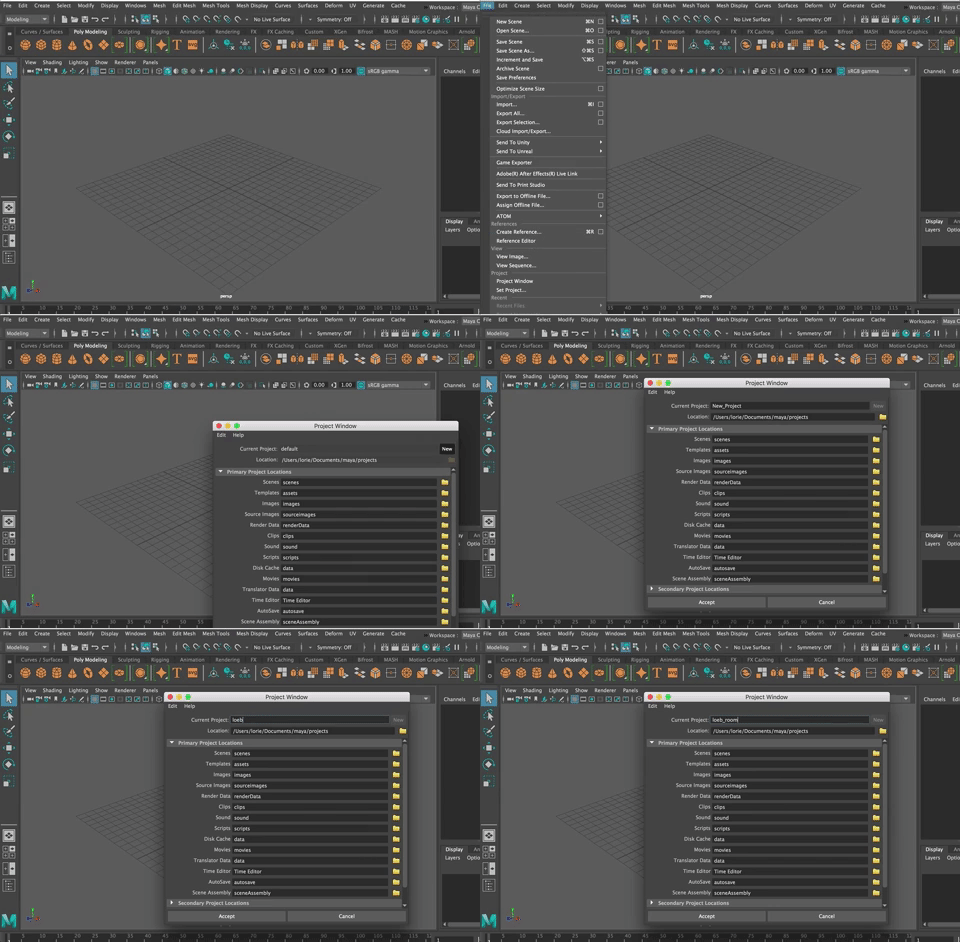
Create a project called loeb_Practice (putting your name instead of mine.)
In this course will make a separate project for each of the assignments plus one for the practice sheets and the in-class exercises.
Right now, create one for the practice sheets.
and click "Accept" to accept the default folders in your project.
Then go to File>Save Scene As
Make sure the Current Project is set to the project you want (loeb_room, for example). You can choose the project from the dropdown window or go to Set Project.
Then name your scene in the File Name window. Make sure you are saving your file as a Maya Ascii file (.ma)
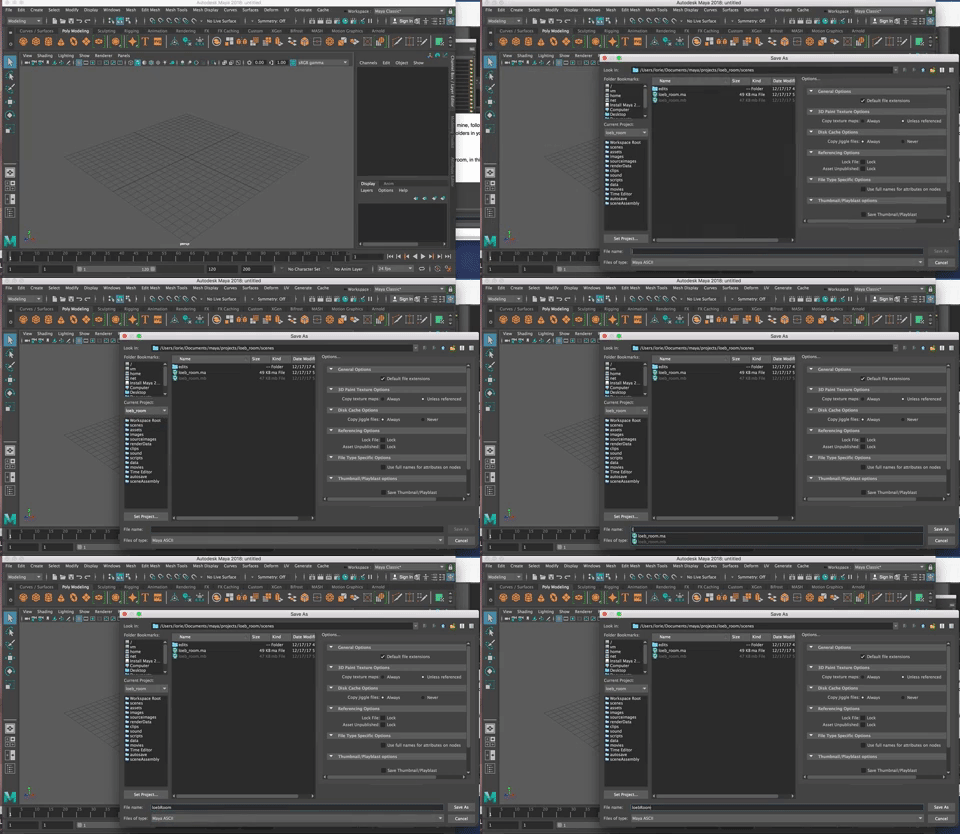
Be sure to use your name as part of the scene name, so we can distinguish all the scenes with the same name from each other. Hit "SAVE AS"
You can tell you are set up if you see the full string at the top of the Maya window, including the location (in documents folder), the correct name of the project and the correct name of the scene plus .ma

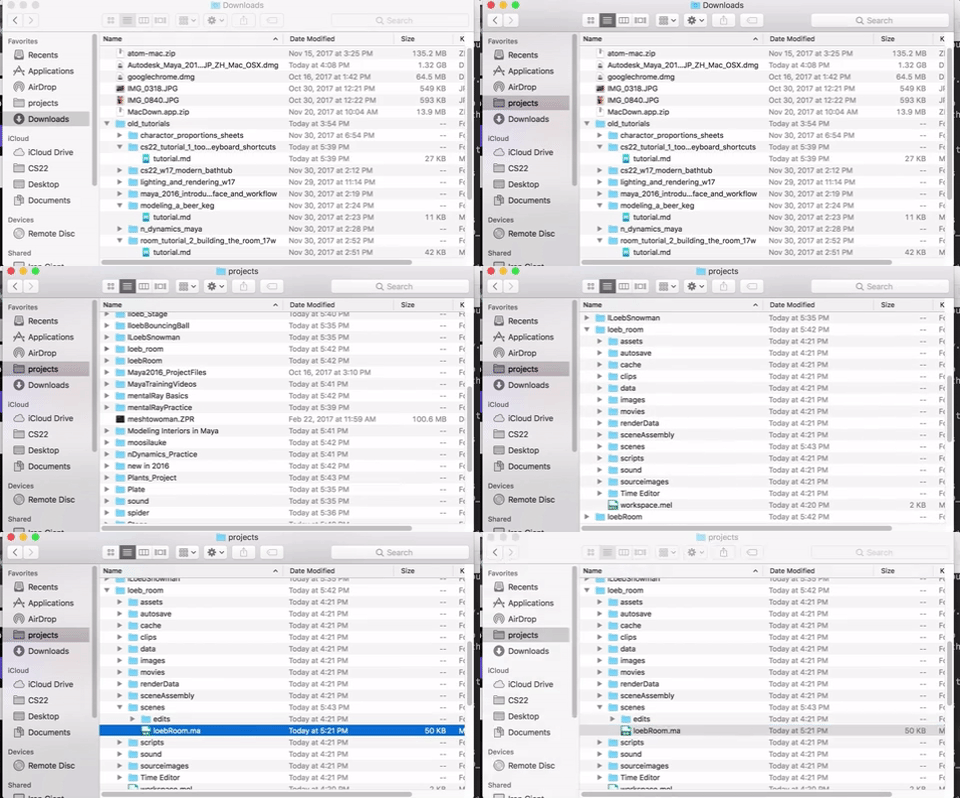
Notice that you are working in the Documents/maya/projects directory and within that directory there is the projects directory/loeb_Room and then the scene file in the scene directory scenes/loebRoom.ma
If you don't see that, you need to fix that right away!!!
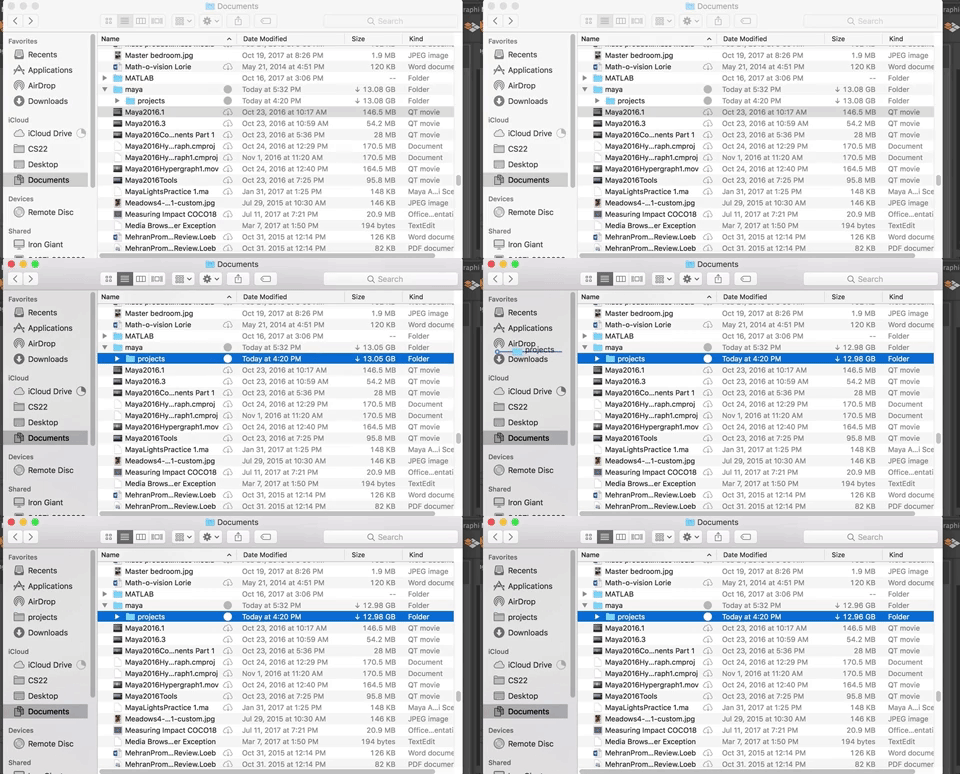
Note: Since we are the only class using this lab this term, you can plan to use the same computer most of the time. To make it easier to find your Maya projects, move the projects folder to the Favorites in the Finder.
Then, when you click on the projects folder, you can open your files and they will be in the proper directory.
Navigating the menu items:
There are numerous ways to access menu items in Maya besides going up through the main menu bar.

My favorite way is to learn the keyboard commands. A complete list of keyboard commands is attached at the end of this tutorial.
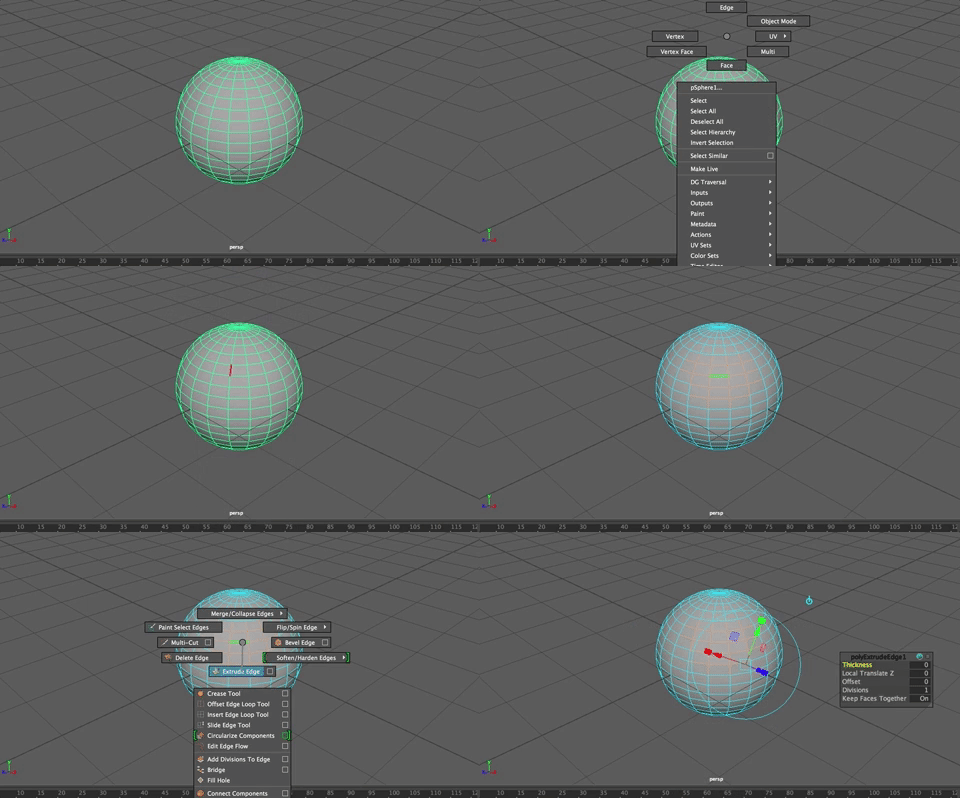
Another option is the Marking Menu. The Marking Menu can be found by holding down the space bar. It is a great way to get to all the tools and menu items you need.
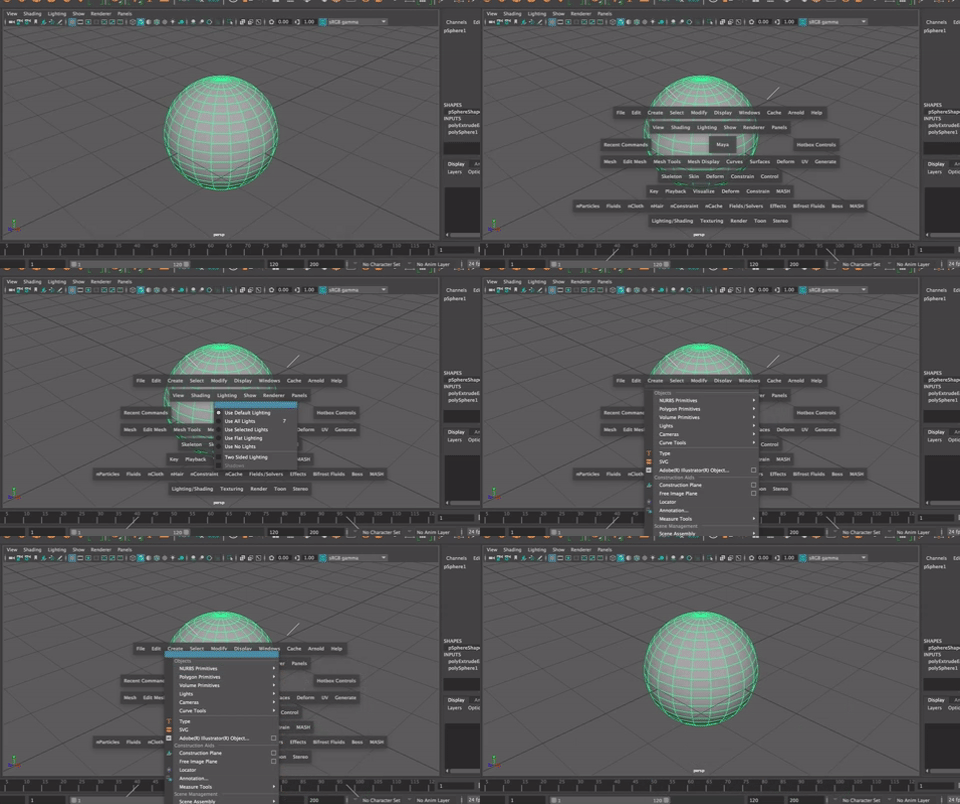
Still another way to get to the menu items is to use the Shelf. The shelves are found at the top of the Maya window. You will find the most commonly used tools under each tab. You can click directly on the menu icons.

Modeling Toolkit:
Another handy way to navigate the most common modeling tools in Maya is with the Modeling Toolkit, found on the right side of the viewport when you choose the Modeling Standard Workspace or click on the icon of the hammer and cube, or, in the Maya Classic Workspace, choose the Maya Modeling ToolKit tab along the right side of the workspace.

The modeling ToolKit is a shortcut to navigating through many of the most common commands used during modeling. I won't always reference this method of working, but remember it is there for you to use. Many people love the Modeling Toolkit. I tend to use keyboard shortcuts more as it is faster.
One thing I like about the modeling toolkit is that you can scroll to the bottom and get to all the keyboard shortcuts (hotkeys)
Preparation:
Be sure you are in the Modeling Module.

First, Create a polygon cube (Create>Polygon Primitives>Cube). Then click on the polyCube 1 in the INPUTS node in the Channel Box to open the input options for the polygon cube node.

Change the values of Width, Height and Depth to 4. The fasted way to do that is to shift select all three value windows and change the value in one to change all three.
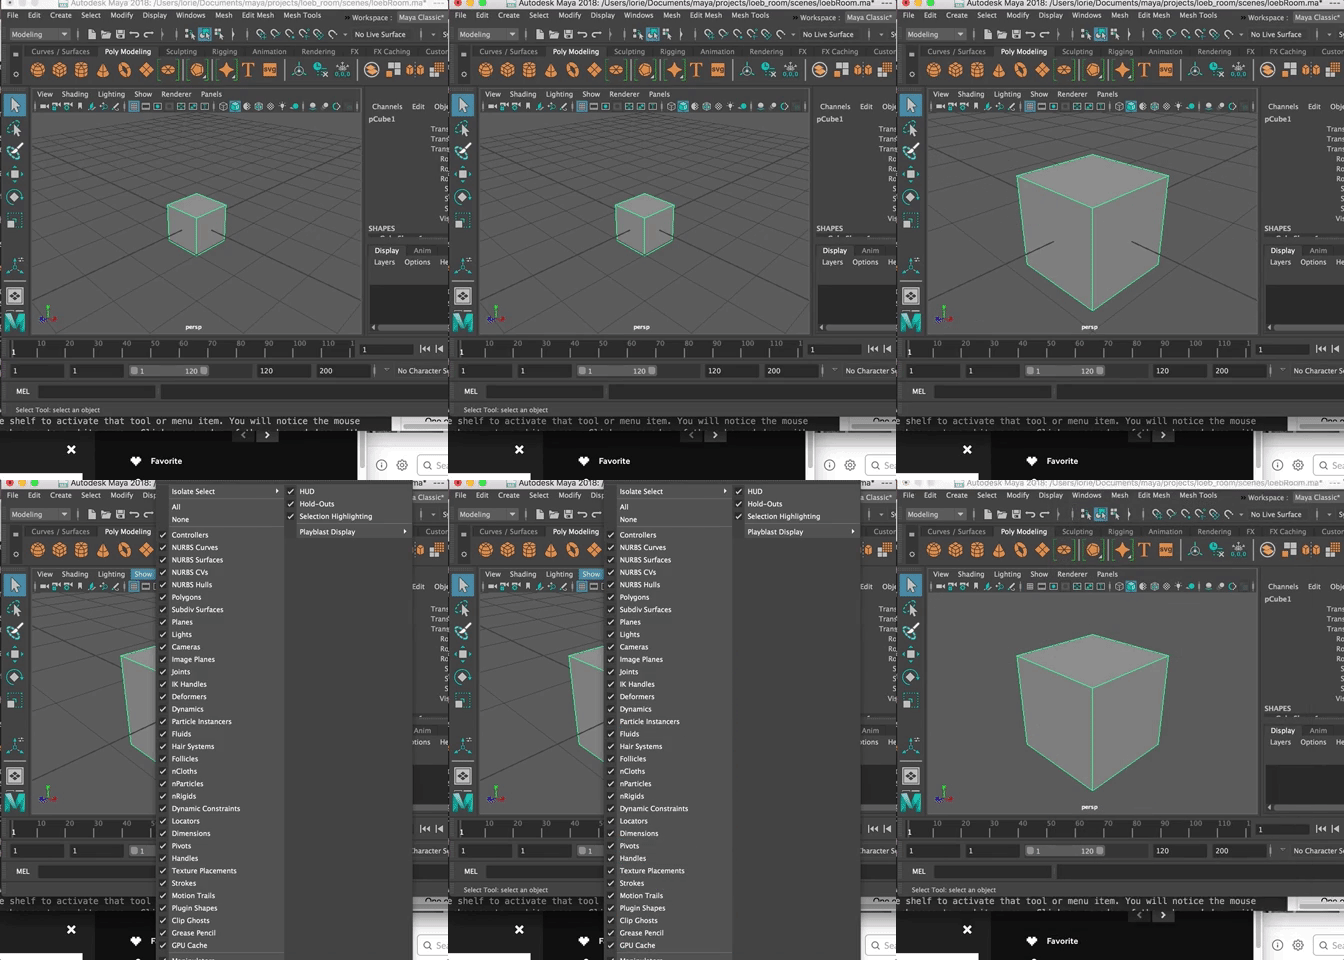
Make sure your view panel is set so that the only view is the perspective camera view and so that the polygon is large enough to see it well. With the cube selected hit the "f" key to frame selected.

A common mistake among beginning Maya users is to forget to adjust the view so that the object you are working on is big enough to see well. If it is too small, it is difficult to get the kind of detail and mouse to track in and out as needed.
To make it a bit easier to see the cube, under the view panel menu, go to Show and deselect Grid to turn off the Grid view.
Insert Edge Loop Tool
One of the tools you will use a lot is the Insert Edge Loop Tools. Edge loops are a path of polygon edges that are connected by their shared vertices. In other words, they are a chain of edges that loop around a polygon. Extra edges allow you to modify and move a shape in greater detail.
With the cube in Object Mode, Shift Right click and choose Insert Edge Loop Tool from the Marking Menu that comes up. Using keyboard commands is THE BEST way (in my opinion) to navigate in Maya.
You will notice the mouse icon changes to a white arrow (instead of black). Click on an edge of the cube and drag with the mouse to see a green dotted edge loop that goes all around the cube.
If you don't let go of the mouse, but instead hold it and drag, you can move the edge while it is still dashed, to place it where you want it.
When you let go of the mouse, the edge is inserted. The tool stays active until you hit the Q key or choose the Selection tool from the Tool Box Menu.
Using Keyboard Commands like Shift + RMB is a great way to reduce mouse motions and save time. In fact, if you work in the Workspace called Modeling - Expert, all the shelves and menu items disappear to make the work space as big as possible. In this Workspace you use keyboard commands or the Marking Menu that comes up when you hold down the shift key.
You can add as many edge loops as you want to an object. This increases the detail on the object.
Play with this tool to see how it works. You will use it a LOT. Remember: To switch back to a normal select tool icon and get out of insert edge loop tool mode, click on the select tool in the Tool Box (or hit the Q key on the keyboard)
NOTE: Edge loops can only be inserted into quads. If you ever have trouble using the Insert Edge Loop, it is probably because you are not inserting it into a set of quads (four sided polygons).
Multi-Cut Tool, Cut, Merge, Delete
The multi-cut tool is another way to divide faces into parts. As with all tools, there are multiple ways to find it. It is in the Modeling Toolkit, in the tools section
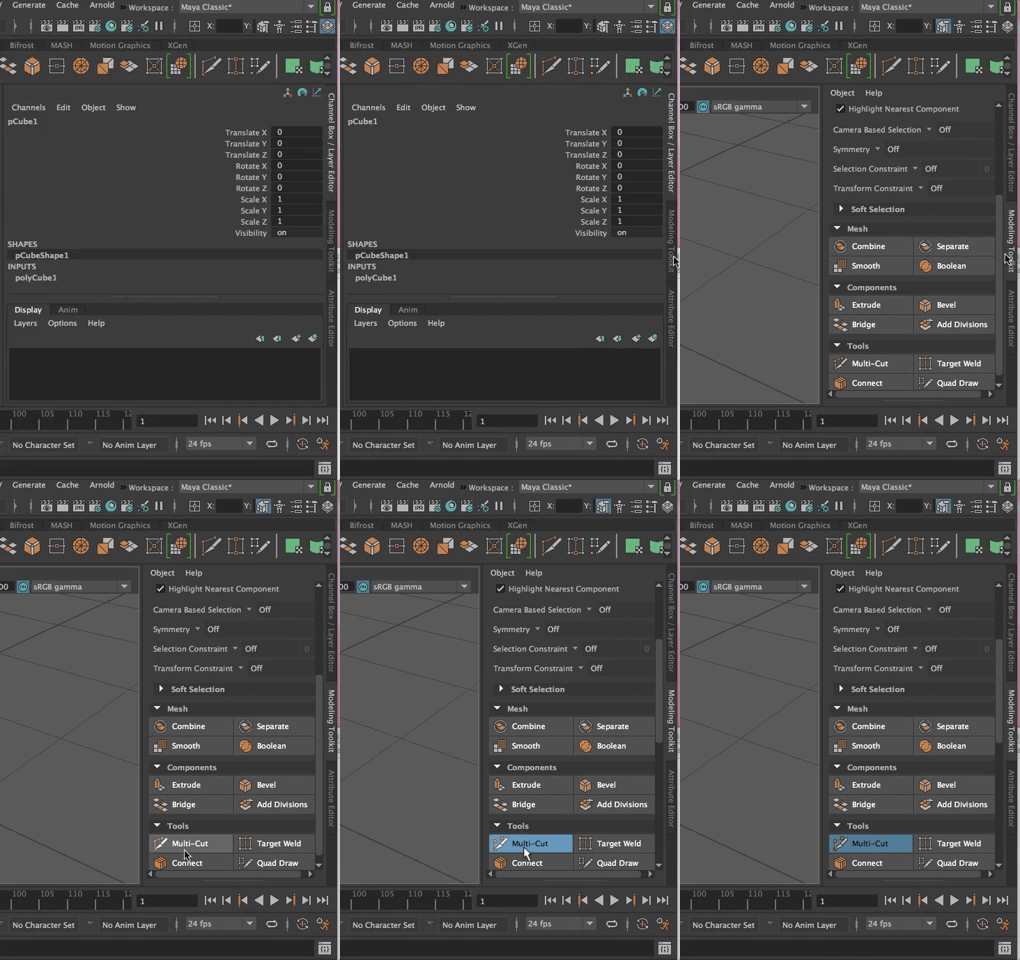
But we will do our best in this class to use keyboard shortcuts. Whatever mode you are in (object, vertex, face, edge, etc), hitting shift + right click brings up a marking menu for that tool.
Be sure you are in OBJECT MODE.
Choose Multi-cut from the marking menu.
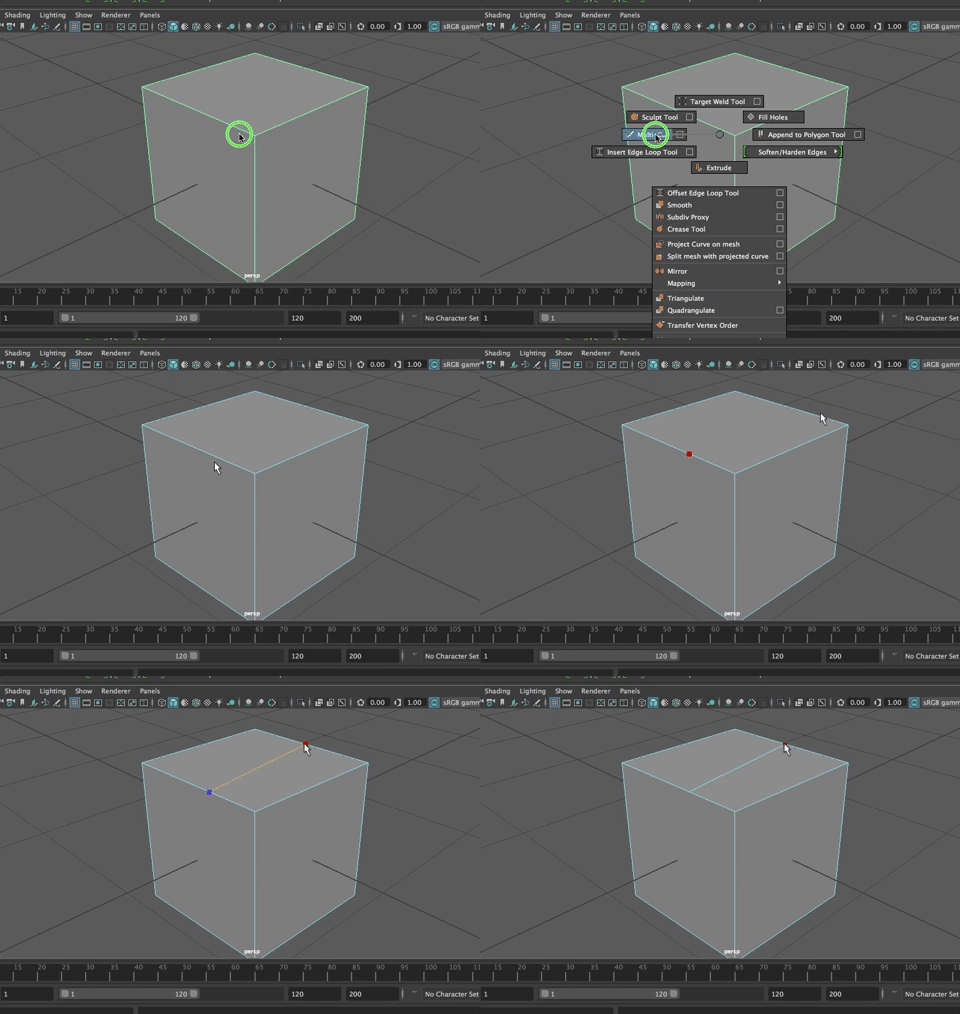
This brings up the Multi-cut tool (the tool tip icon is an x-acto blade). You can use this to cut through faces with any number of edges (remember: Insert Edge Loop only works on faces with four sides--QUADS).
Click on an edge, then on another edge and a line appears. Keep clicking until you have made the cuts you'd like.
Hit ENTER
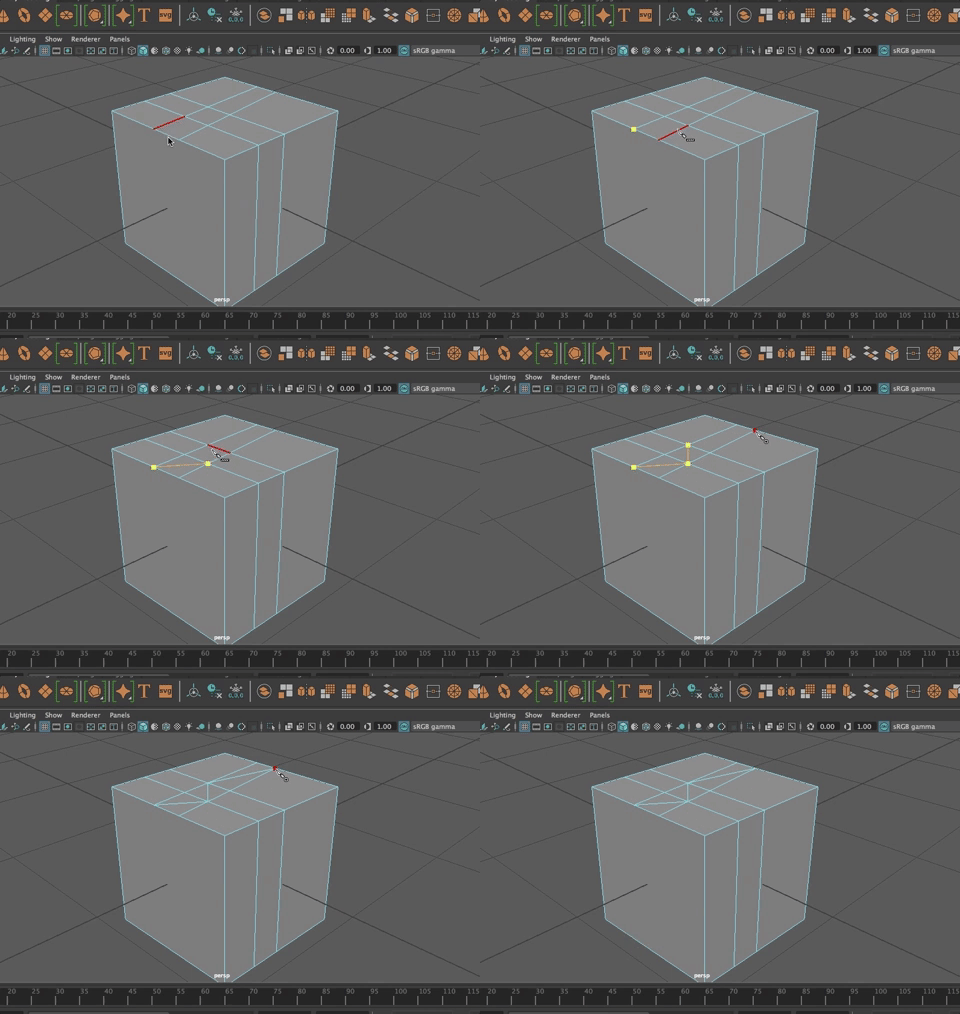
Hitting CTRL with this tool enabled, inserts an edge loop
And the tool will snap to verts if you are near one as shown below
In the Modeling Toolkit in Maya 2018 and above, you will notice that there are options for the tool plus, if you scroll down, you can find the Keyborad Shortcuts for the tool, too
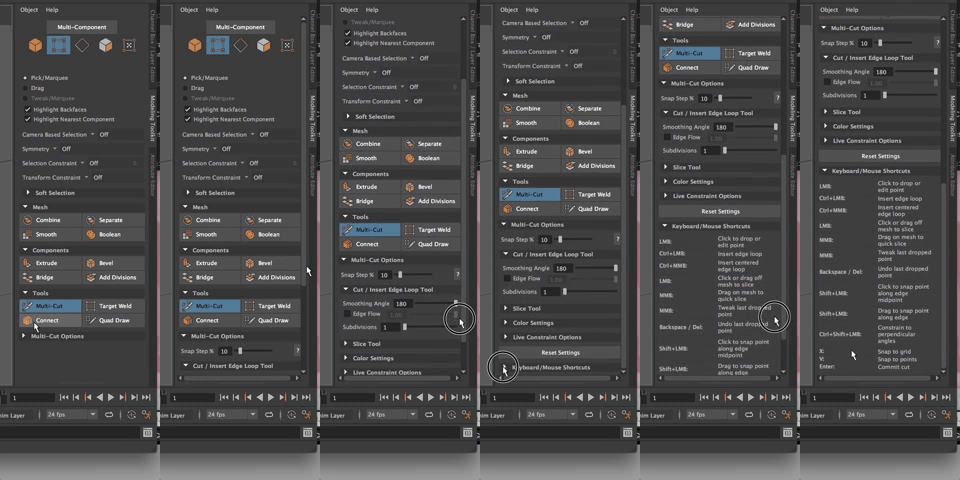
These can be super super handy to learn!!! You will notice as we move through the course that I will start using keyboard shortcuts more and more and expecting you to follow along.
For example, Hitting CTRL + LMB you insert an edge loop, but hitting CTRL + MMB you insert an edge loop at the center.
MMB drag allows you to move the last dropped vert.

Shift + LMB snaps the vert to the center of the edge as you lay it down. Again, lots of handy shortcuts that make modeling easier and more precise. Learn them!
You can also make a cut straight through your object by dragging the tool across it.
To exit the Multi-Cut tool hit Q on the keyboard or deslect it from the Modeling tool kit.
To delete Edges
You can delete an edge, as long as it isn't a border edge, by simply selecting it (in edge mode) and hitting delete as shown below.

The problem is that it leaves behind the vertices.
There are three ways to delete those extra verts.
- Select the verts and delete them
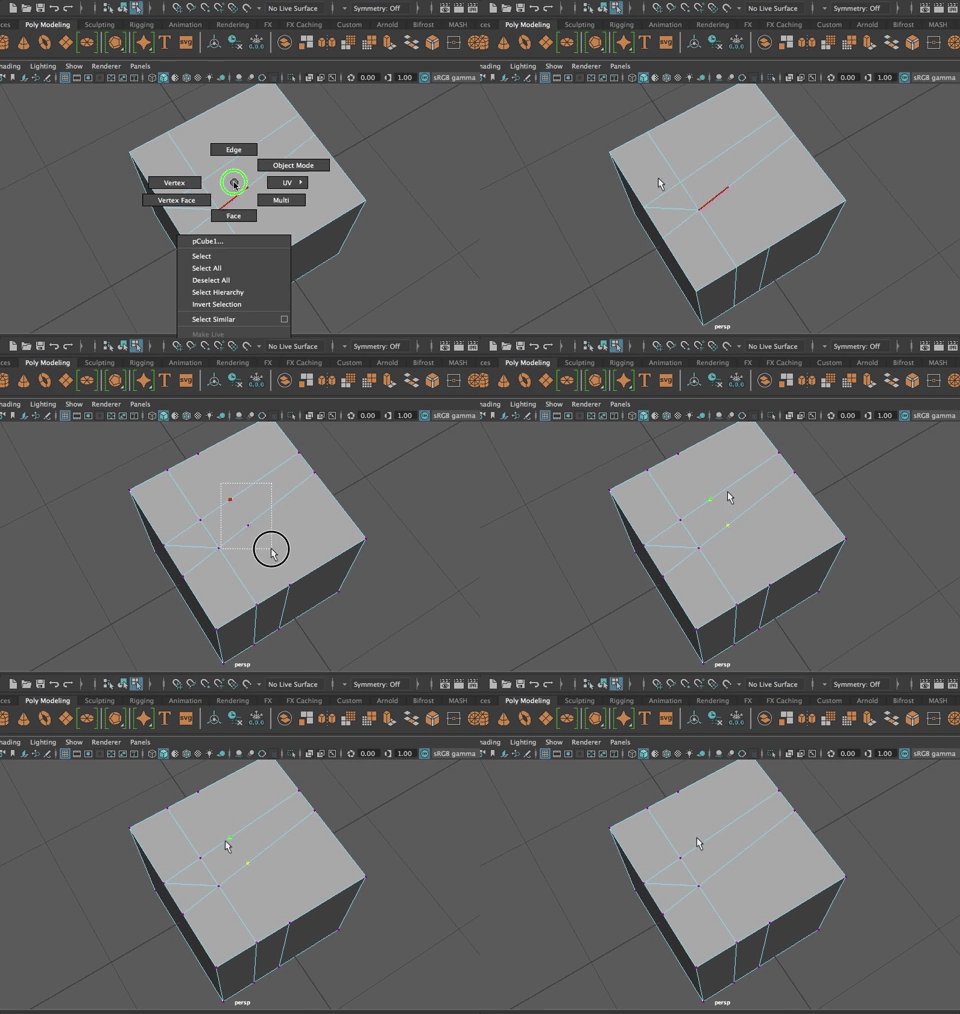
- In vertex mode, You can select the entire object, hit delete, only the extra verts are deleted.
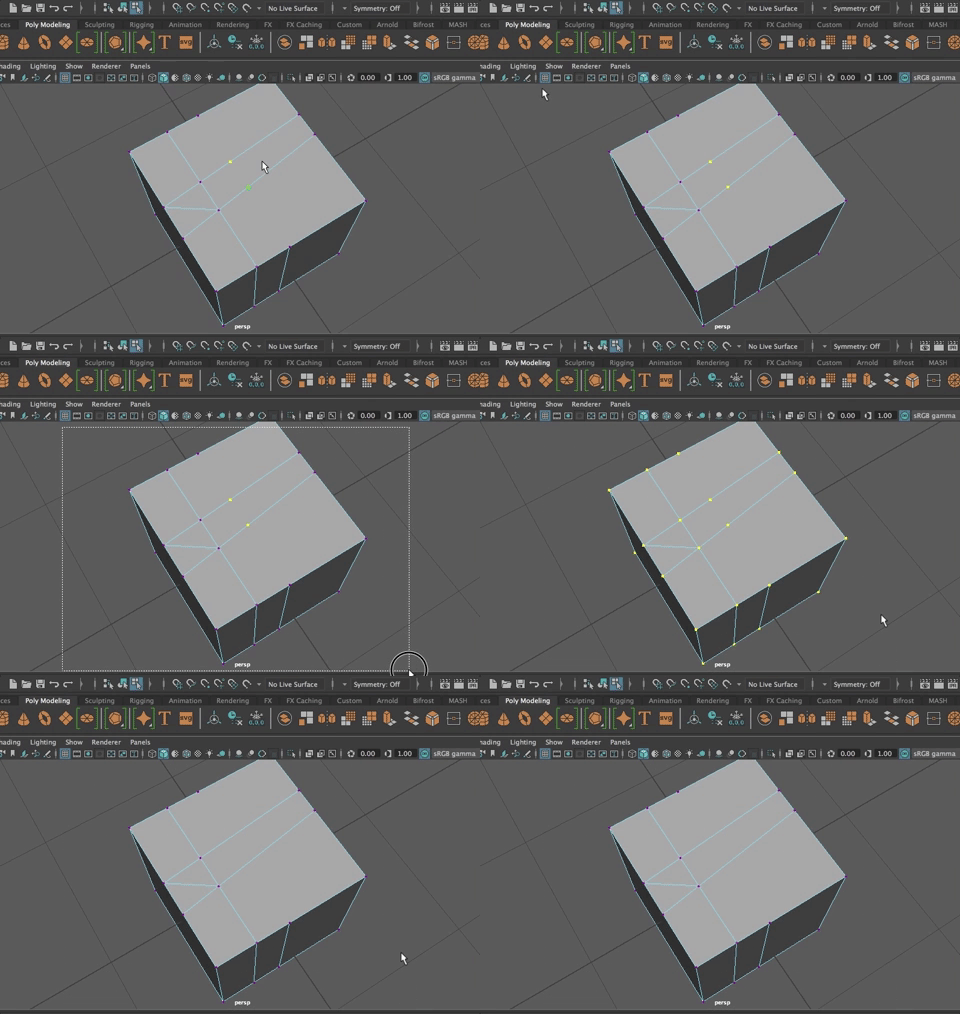
NOTE: Any poly with just two edges, the vert will be deleted when you use this method.
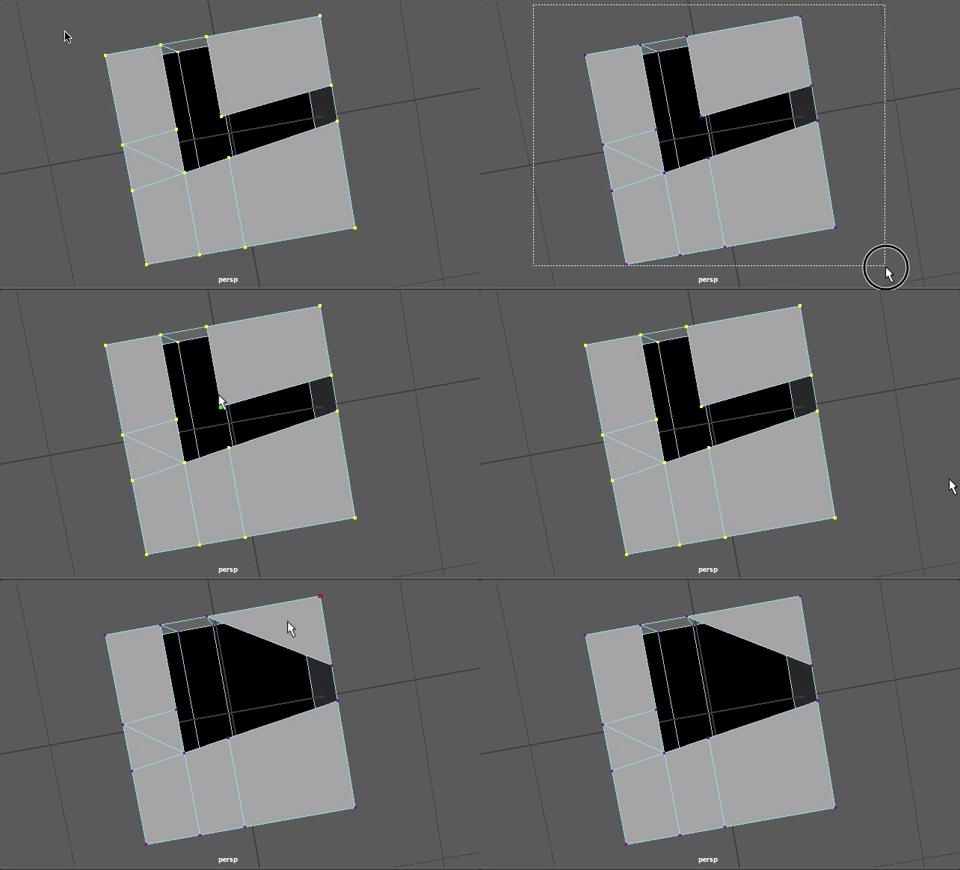
- To save the extra steps, when deleting the edge, hit CTRL + delete and both the edge and the verts are deleted.

Deleting Faces
You can delete faces by selecting them and hitting delete.

Extrude Tool
One of the most powerful tools for modeling, is one that has been around since the beginning of computer graphics and 3d modeling. It is the extrude tool. When I first started modeling (before Maya, in the early 1980's), basically, the only way to build a 3D model was to extrude simple shapes. Needless to say, I love this tool!
Start with a new cube. Scale it up a bit (r key) and frame up on it (f key)
- **In face mode, select the top face and hit CTRL + e **
- Drag the edge upwards in local z (the blue arrow) and you will see that there are four new faces that have been created.
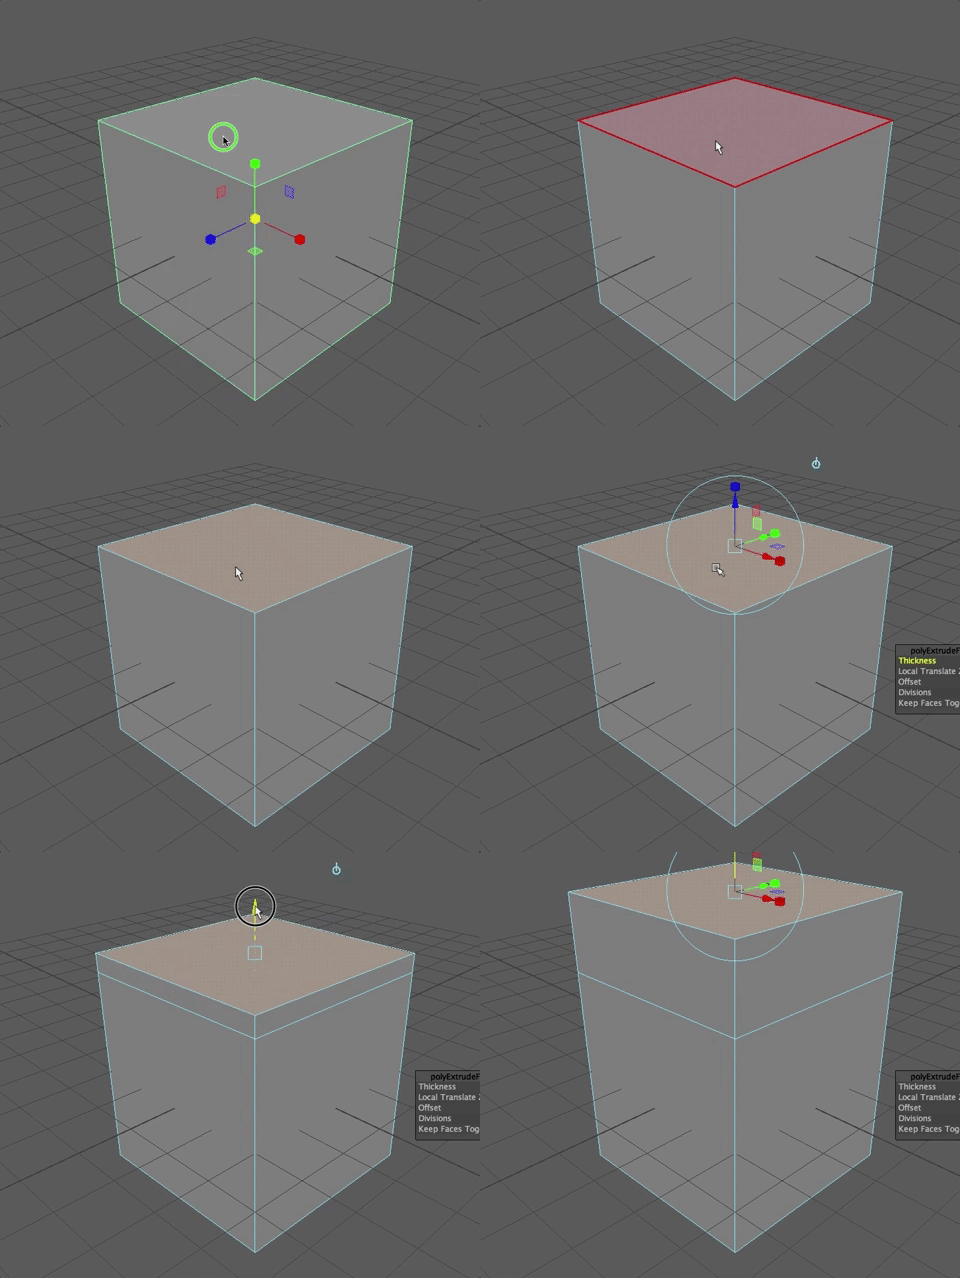
Of course, you can get to the extrude tool in a myriad of other ways, this keyboard shortcut is the method I prefer and suggest you use. (CTRL + e)
On the manipulator handle for extrude, you will see that you can also scale and rotate.
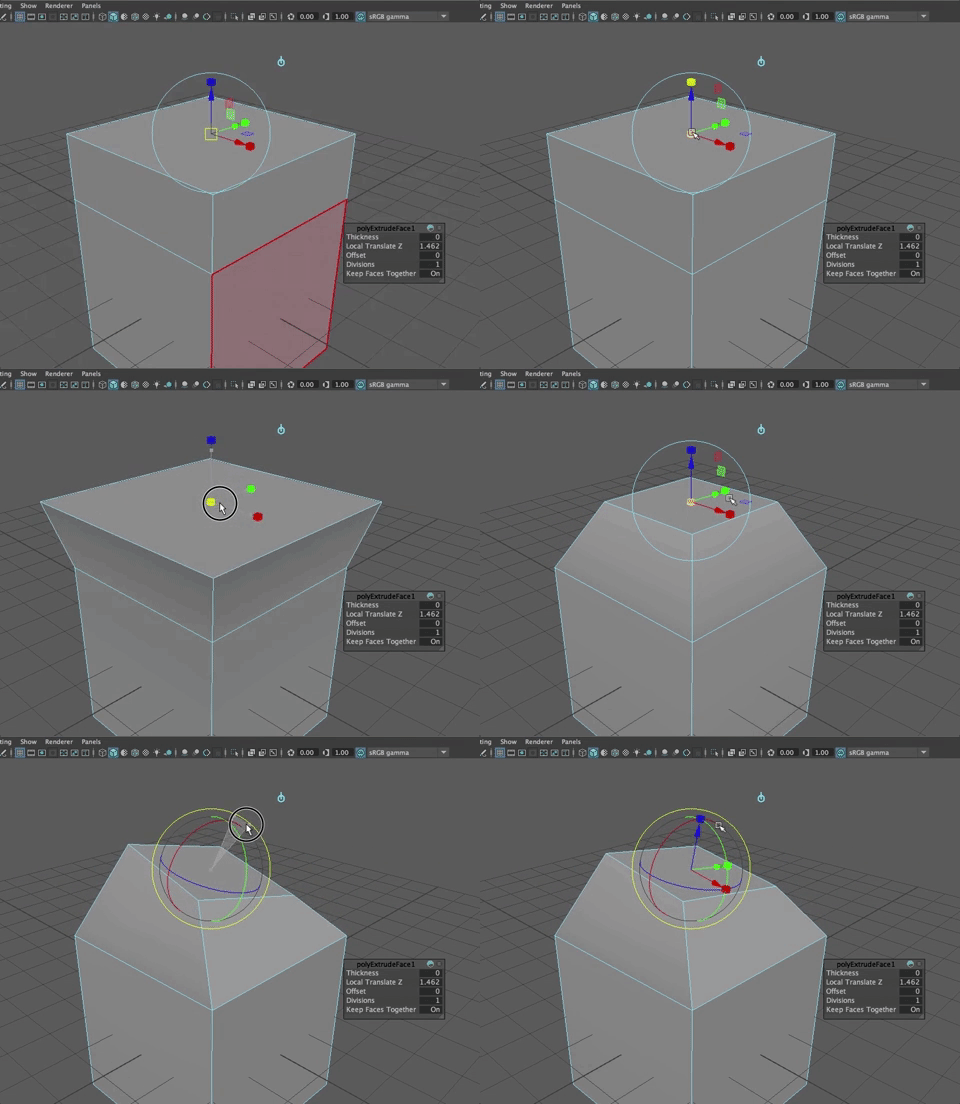
The manipulator is in LOCAL Mode, which means that the center of its universe is the object (not the world) and Z is perpendicular to the face. Notice that world y is up, but local Z, in this case is up.
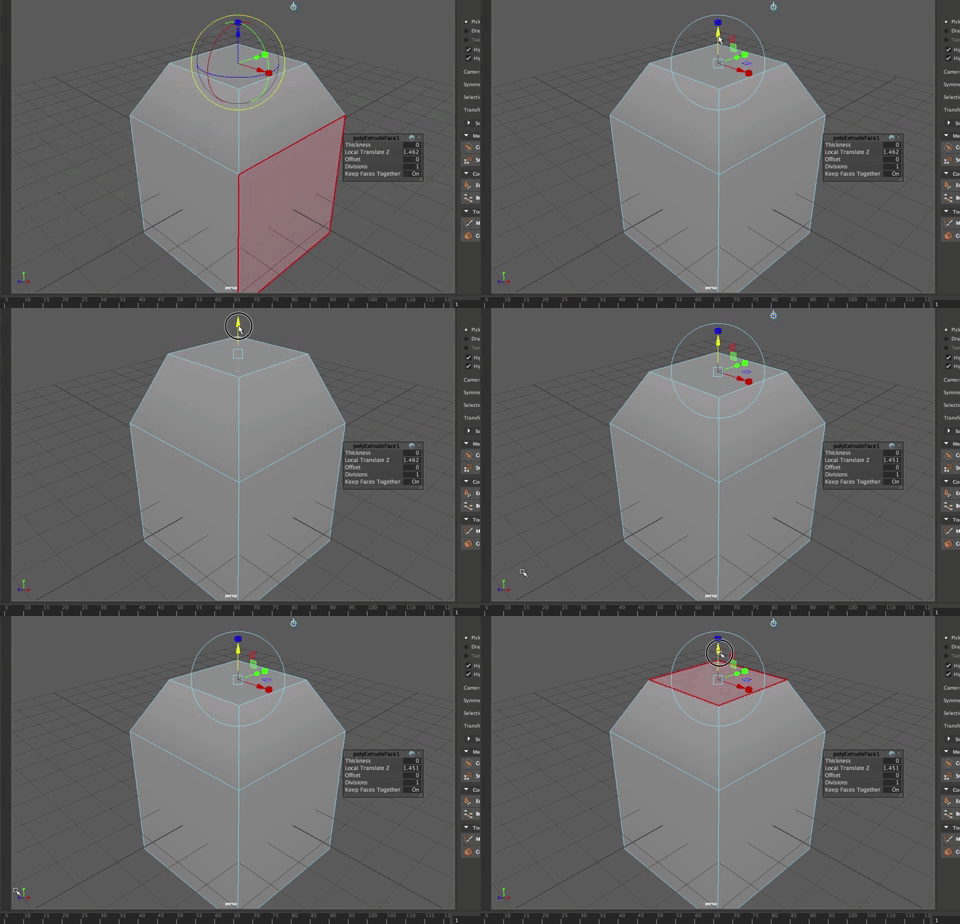
If you click on the little blue circle with the line (up and to the right of the manipulator tool) the manipulator handles shift to world view and the manipulator moves because it relates to the object world pivot point instead of the center of the selected face.
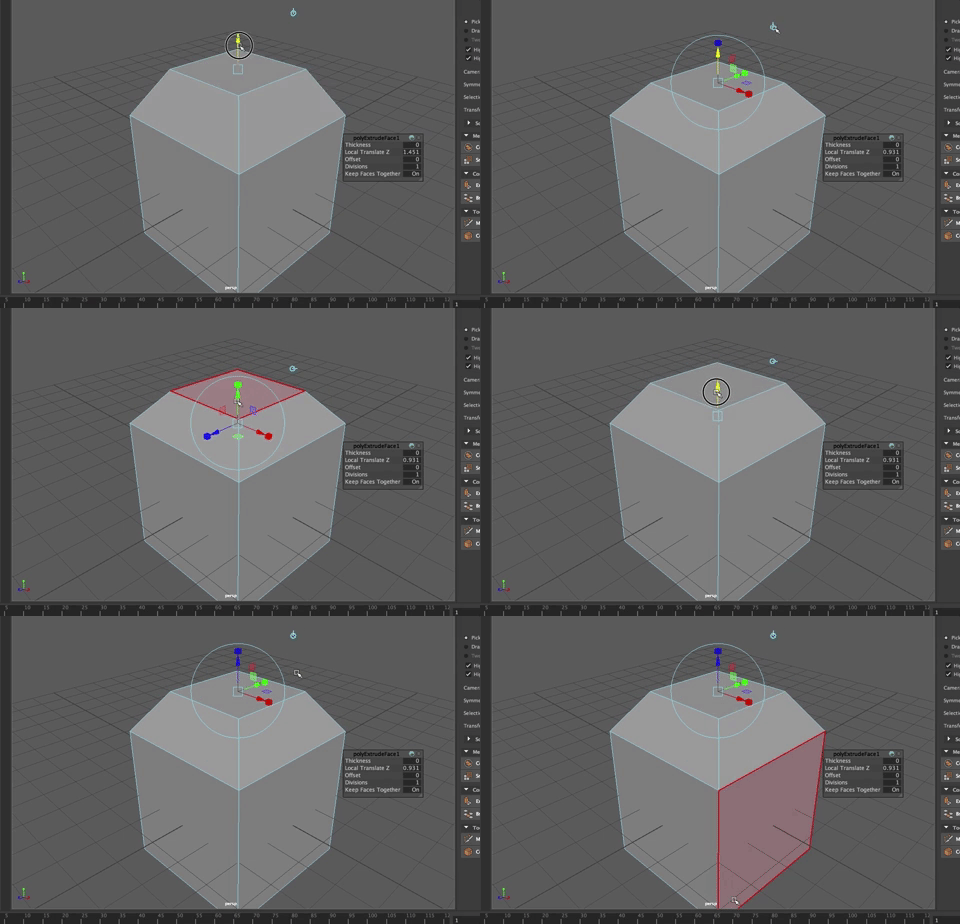
Click the blue icon again to go back into Local Mode
You can also drag along a constrained edge by clicking on the red, green, or blue square. 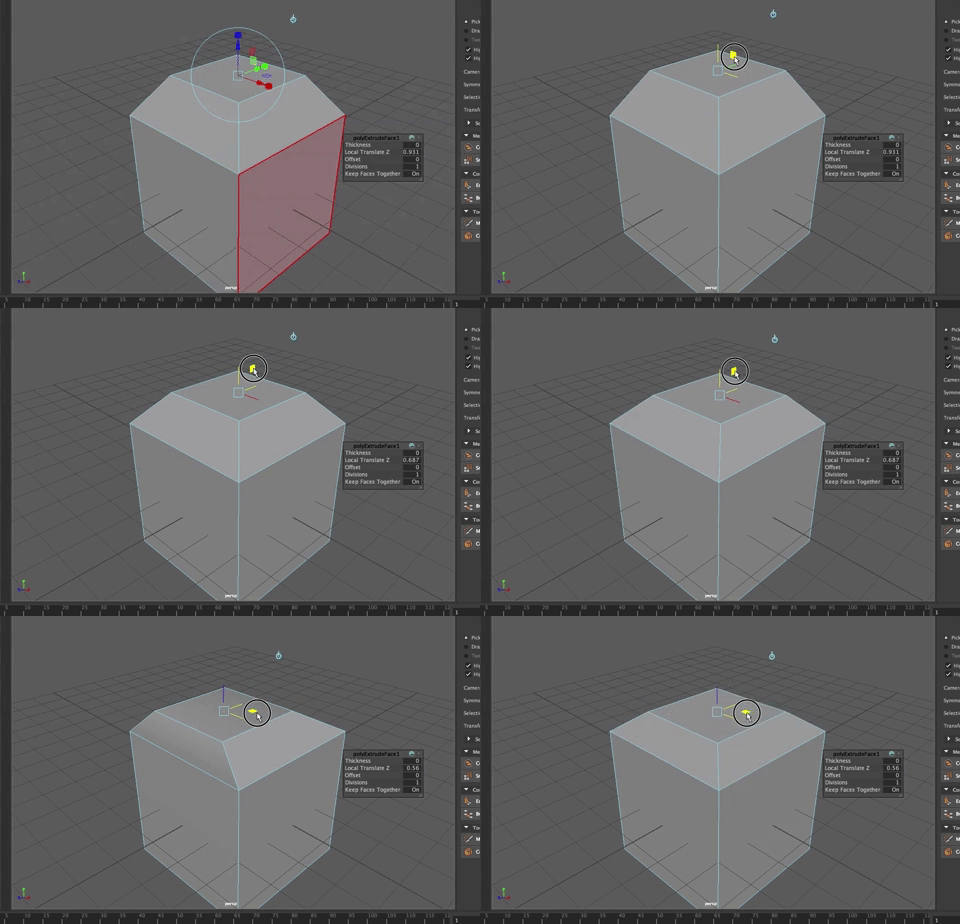
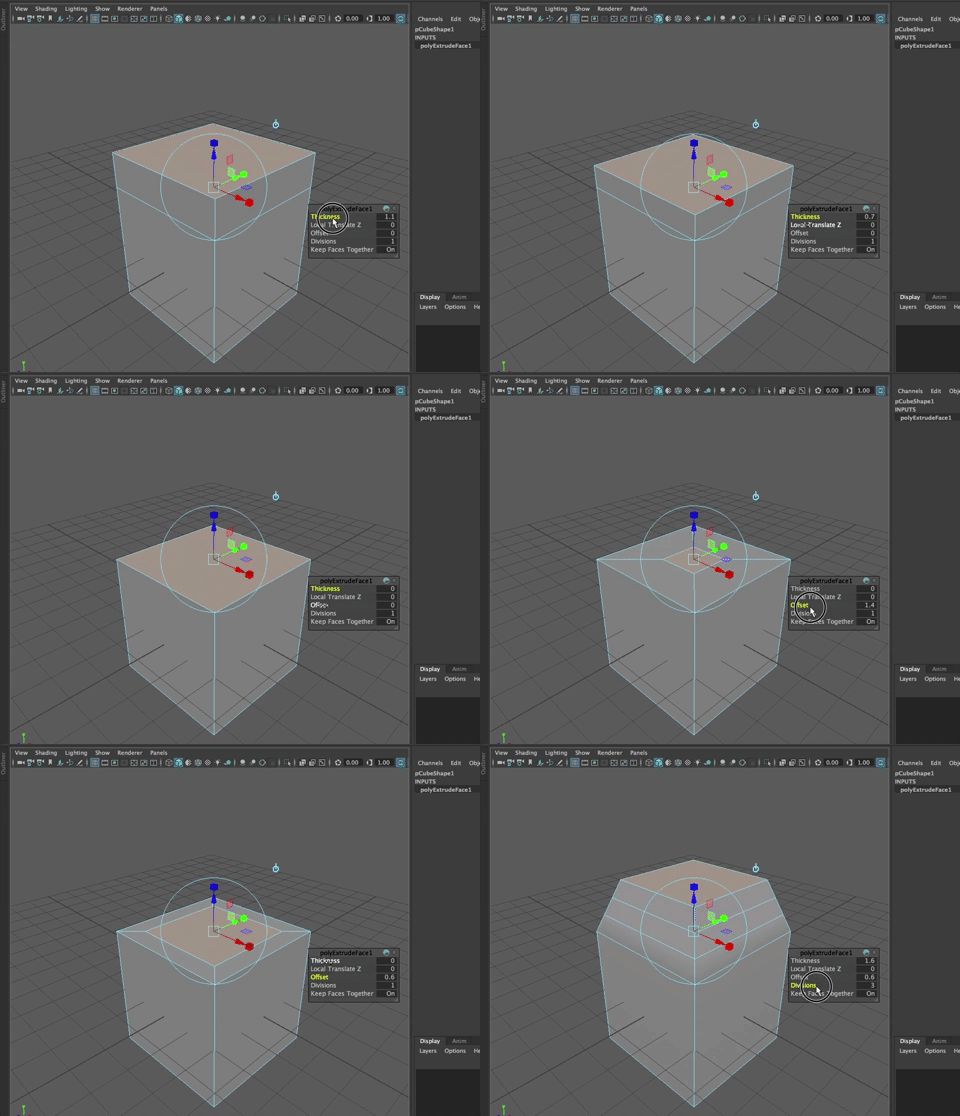
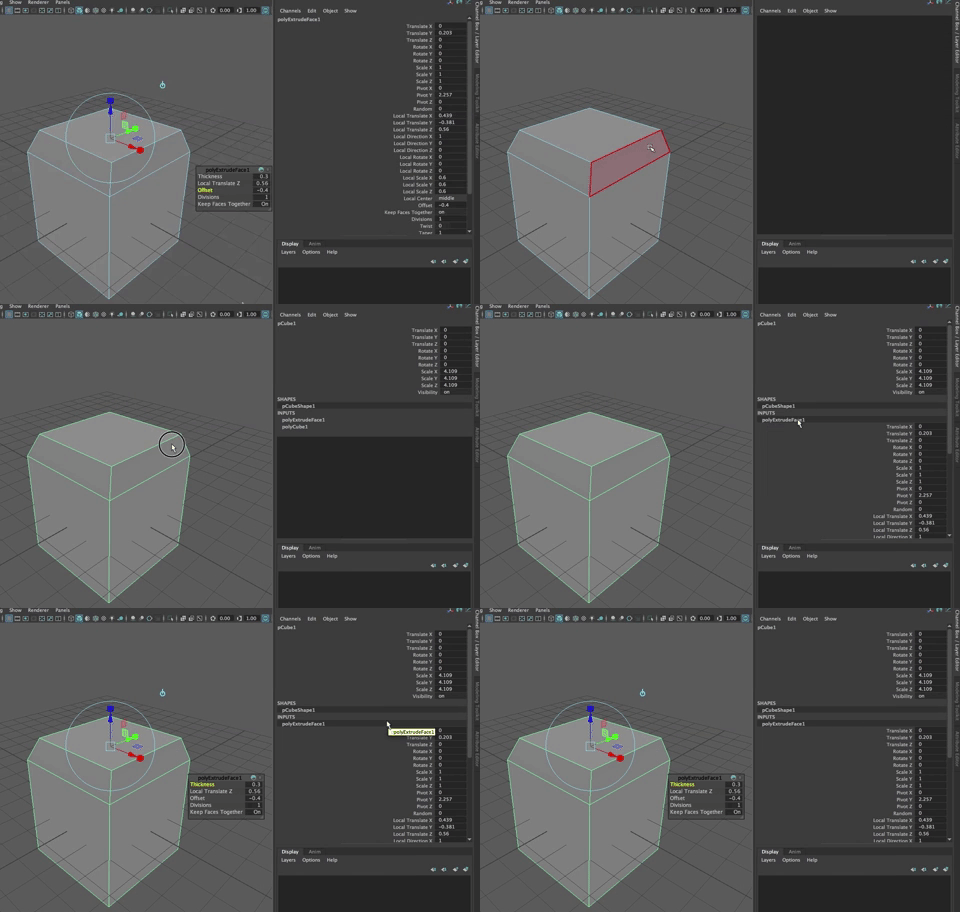
There is a small subset of common inputs that shows up in the Viewport. You can use this to manipulate the shape, either using the virtual slider (just click on the attribute and LMB drag) or entering values directly
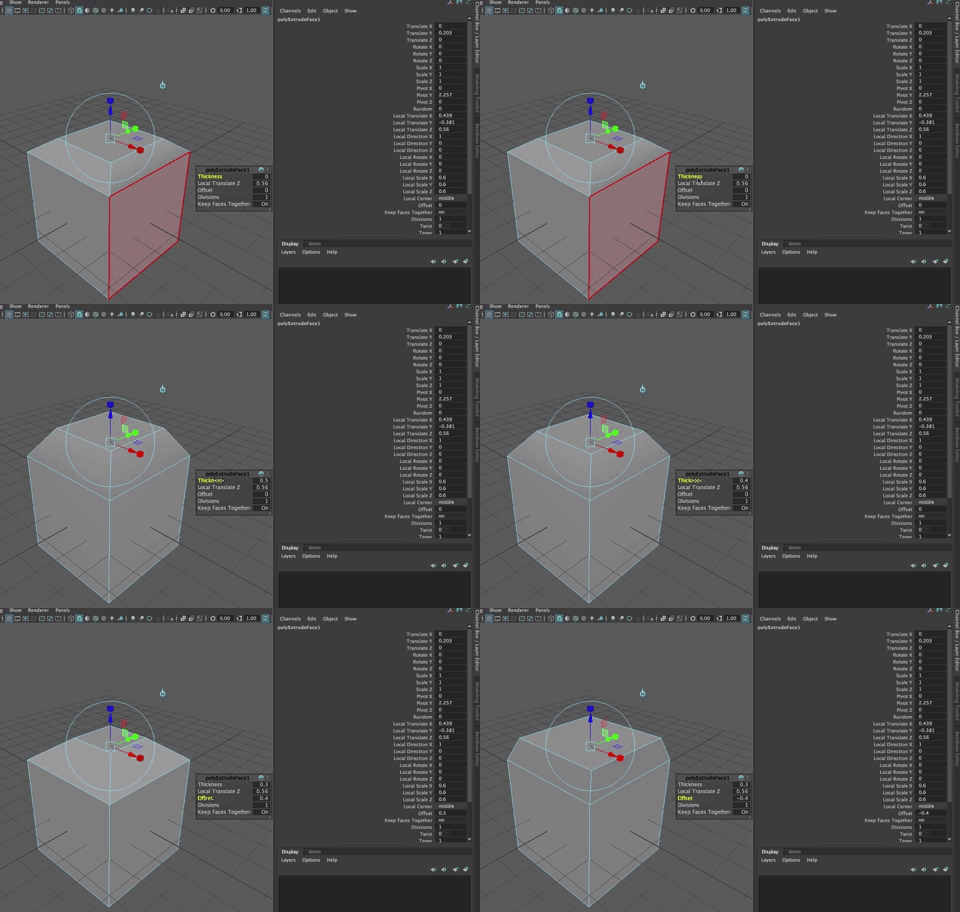
This is a very handy way to work with your tools. In extrude, you can adjust thickness, local translate z (in this case, it has the same effect as thickness) offset (like scale), divisions, and keep faces together (we'll get to that next).
Keep Faces Together
This is a super cool way to make complex objects quickly. We will play with this more soon. For now, if you extrude two or more faces you can use the tool Let's try it.
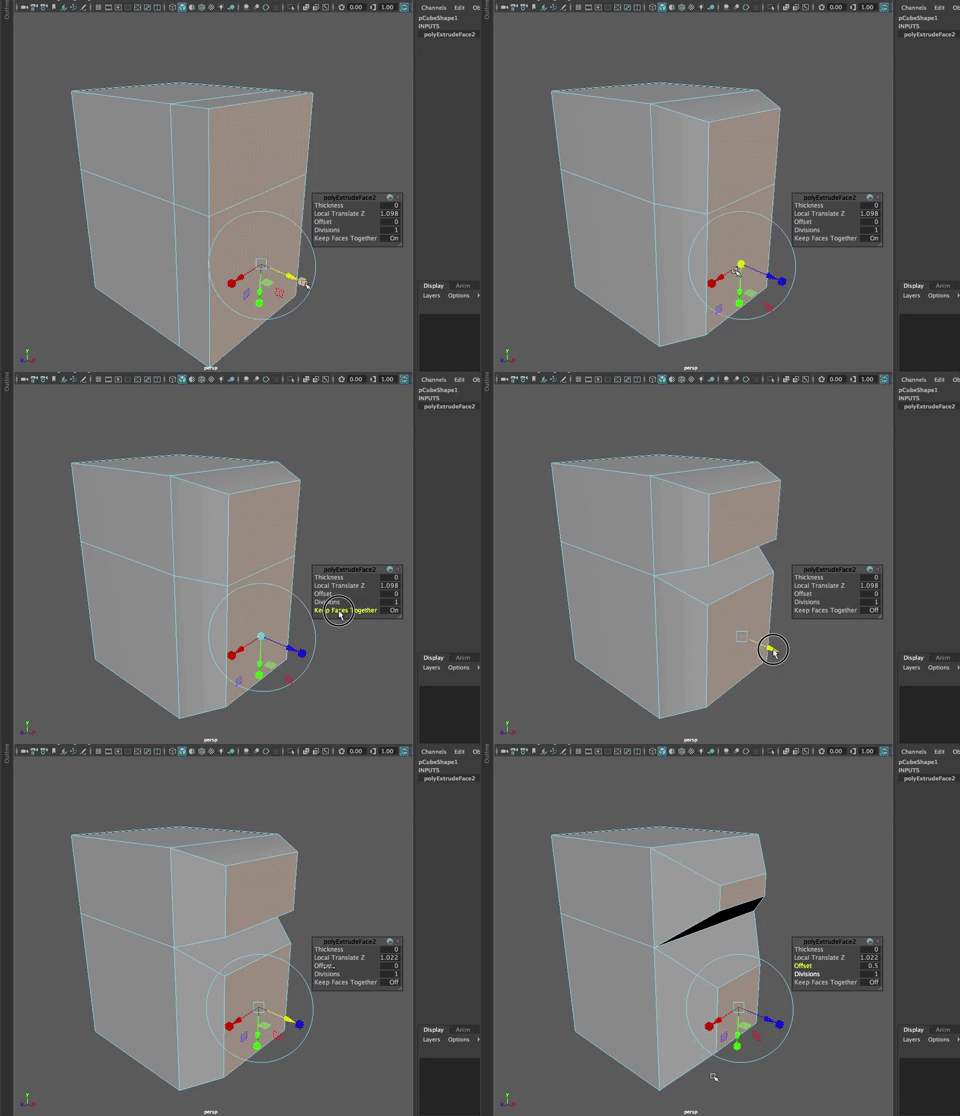
Most of the time you keep the faces together, but...
Offset
Offset can be pretty cool, too. If you select multiple faces, extrude, and use the offset tool, you can create an edge loop as shown
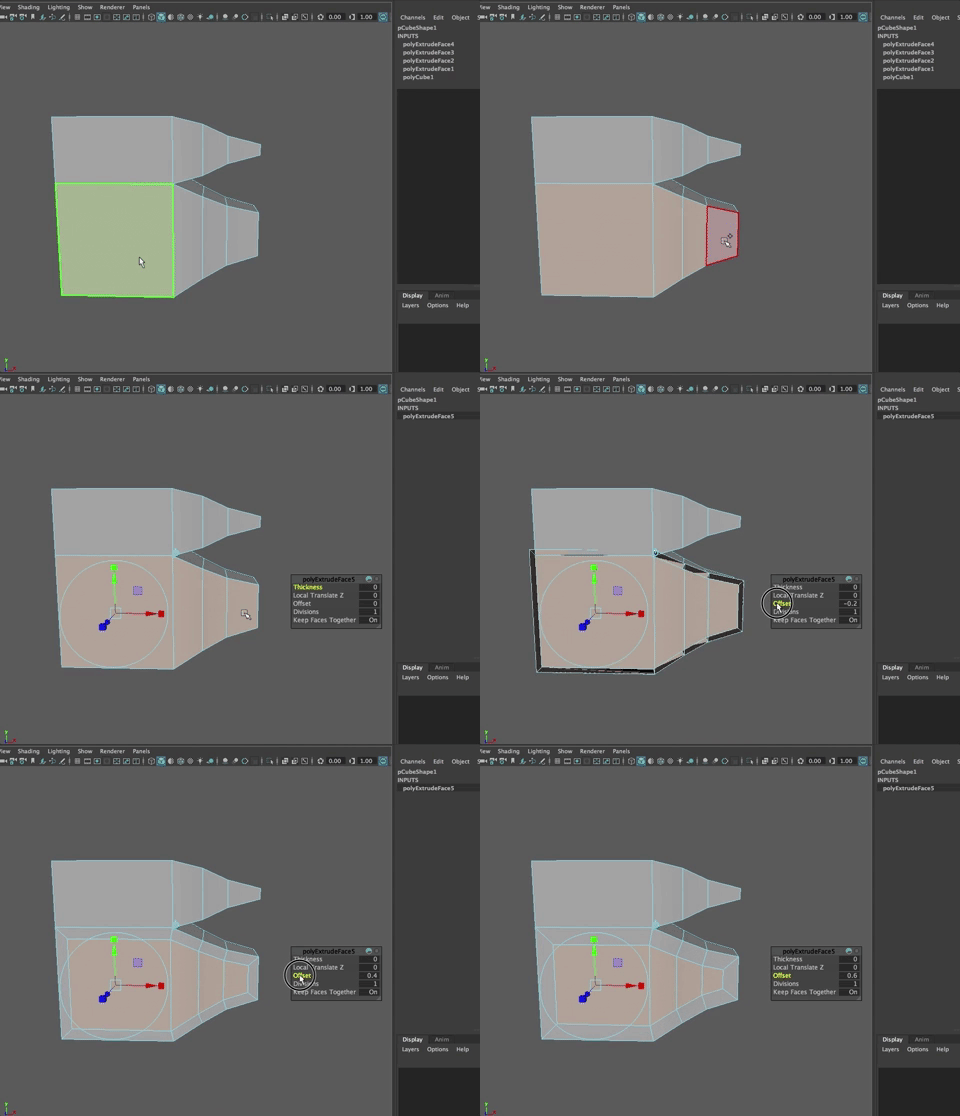
It can mess up if it gets too small, but it is super handy, as you could then select some subset of faces and extrude again.
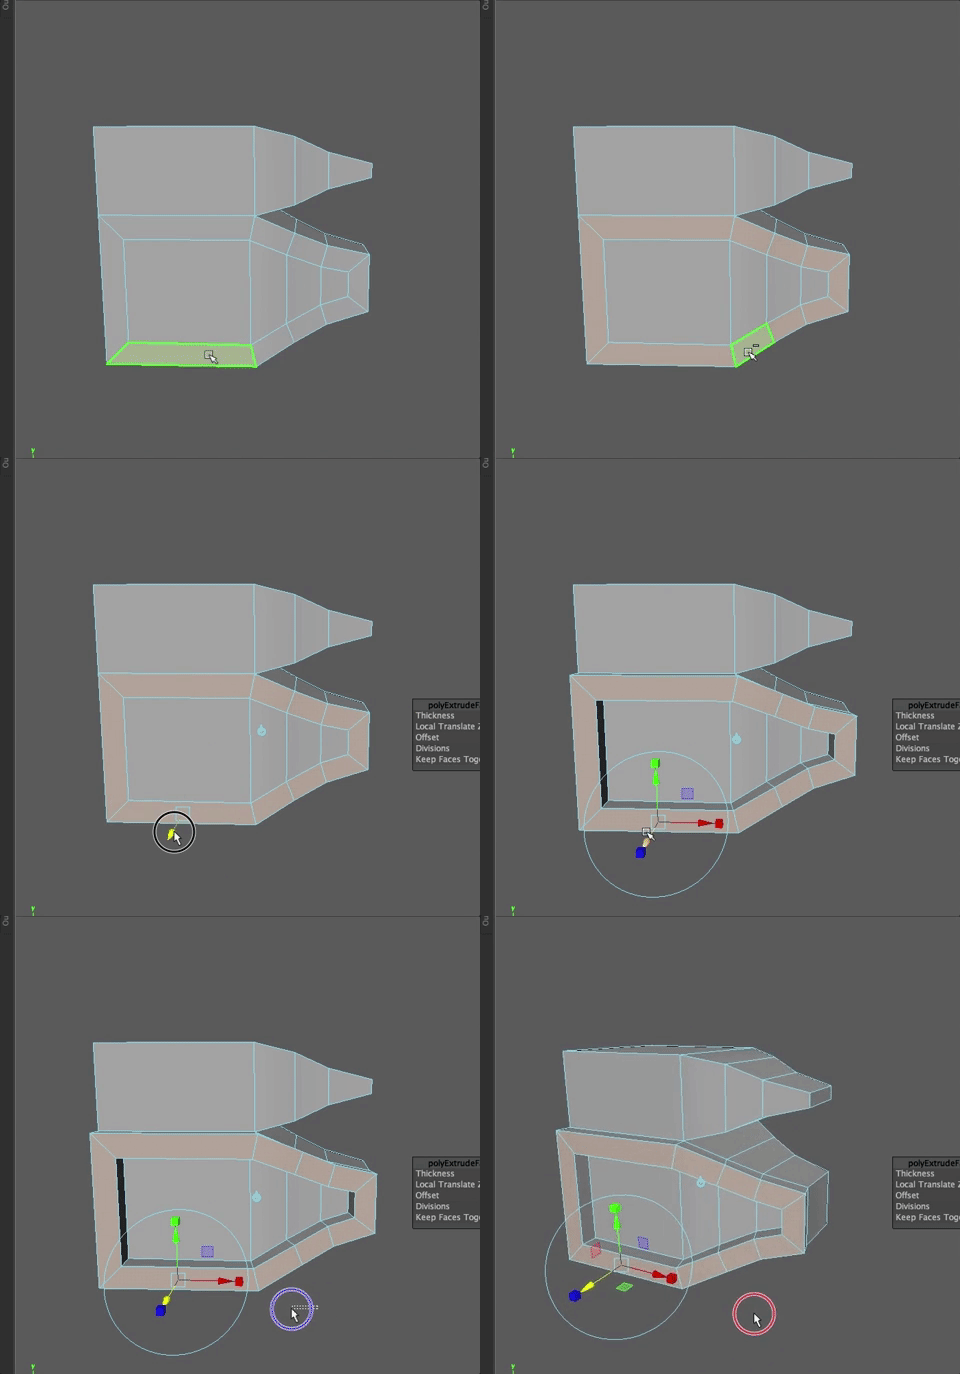
*TRICK: To select a ring of faces, select a face and double click on the face next to it, as shown above. *
How to get a manipulator tool back
If you lose the manipulator handle, you can use the values in the Channel Box for that node, or hit "t" to bring back the last used tool
Bevel tool
Look around you. Look at the edges that seem sharp, like the window frame, table top, or computer screen. When you look carefully, you will see that most aren't actually hard edges. In fact, there are rarely hard edges on things. They are generally rounded to some degree. To get this look, we use the Bevel Tool.
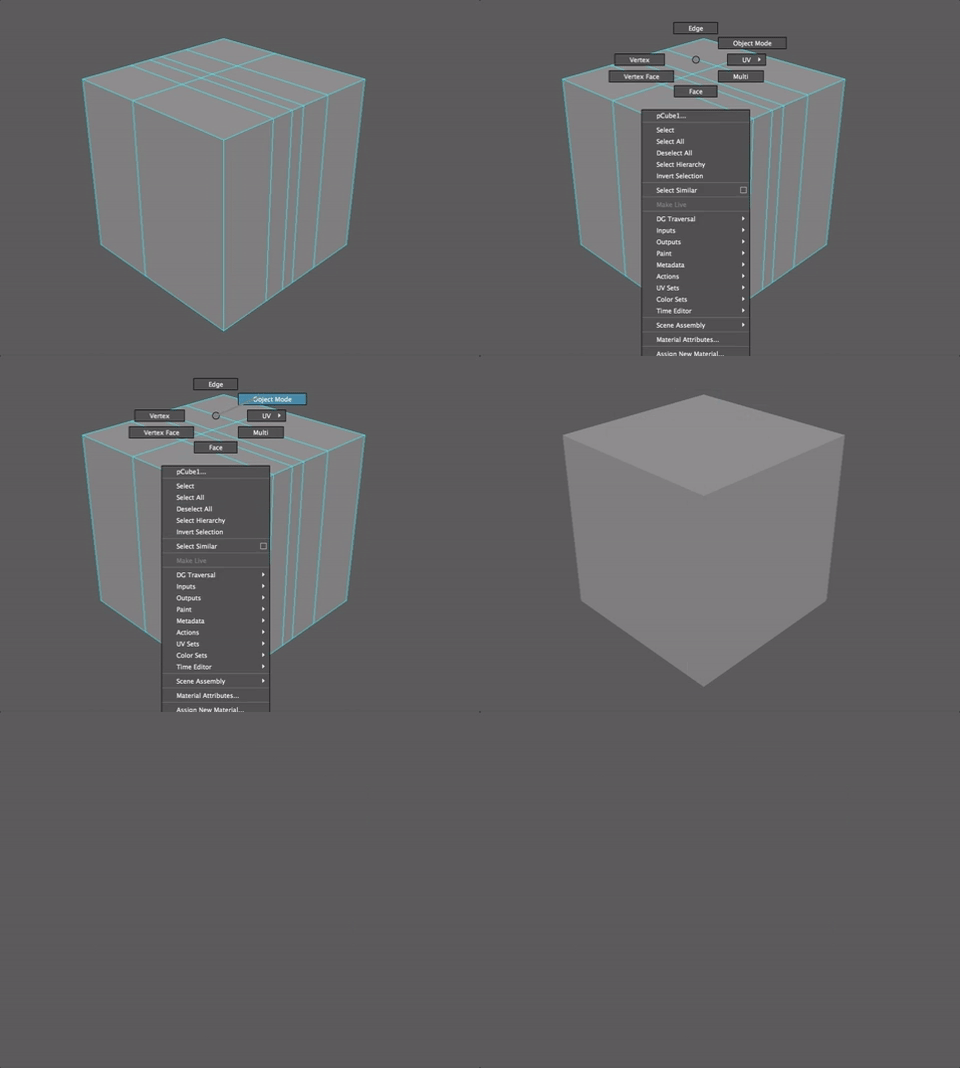
Undo (z) until you have a simple polygon cube or delete the one you have and make a new one as you did before. Note: You need to go into Object Mode to delete the cube RMB click and choose Object Mode. The cube edges are green now. Hit the Delete Key
Once you have a simple cube, select the edges you want to bevel. Make sure you are in component mode. You can do that by
by right clicking on the cube and choosing EDGE !
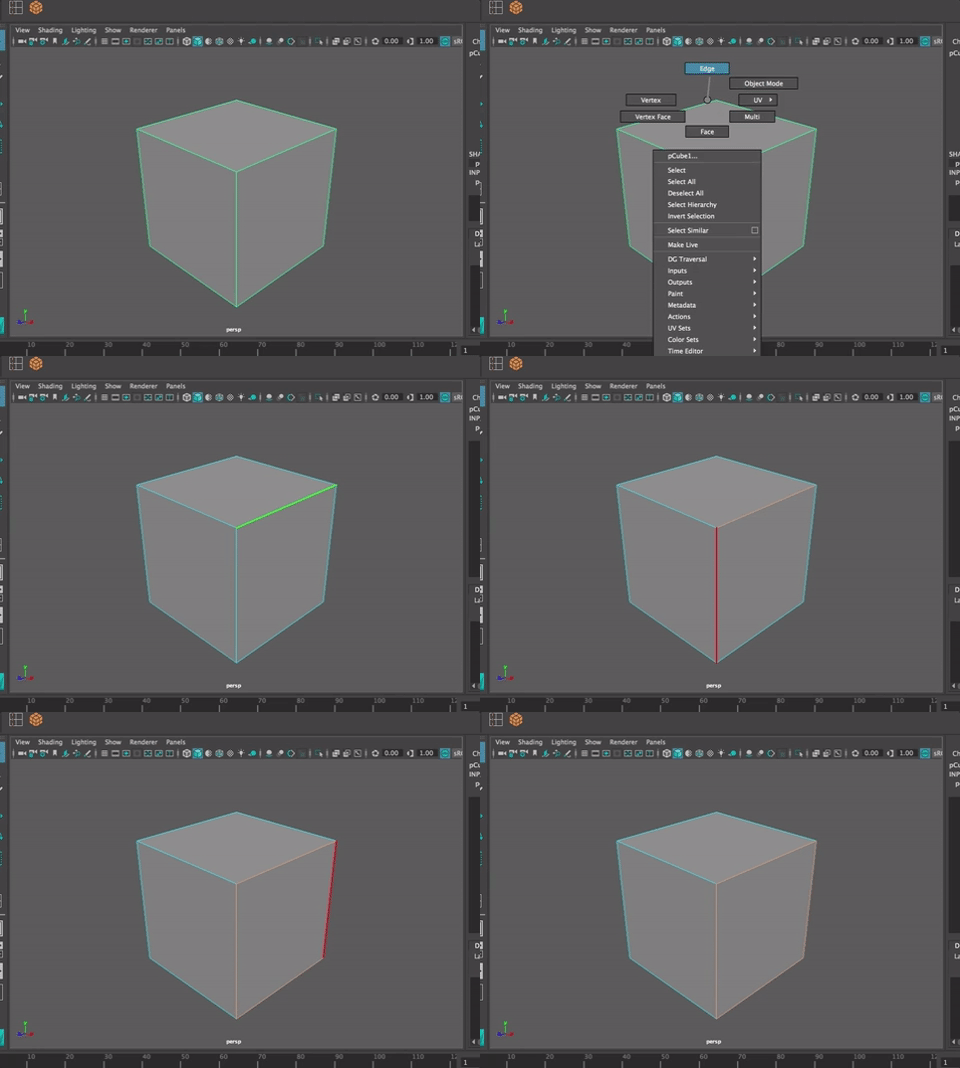
When you are in Component Mode the edges are Blue instead of Green.
Select all four edges around one face on the cube by shift selecting them. The edges change from blue to orange when selected.


A small window opens in your viewport. This is an easy way to adjust the INPUTS for the Bevel. Put your mouse over the Fraction Value and left click drag. You will see the virtual slider icon (even though it is a left click) Drag left and right to adjust the amount of the offset.
You can also use this window to add more segments (or edges) to the bevel. Try changing the value and see what happens.
The segments value is another you will use a lot. Change the value in this attribute and you get more or less edges in the bevel. Try it. Change the number to 3.

If you click in the viewport that small window disappears. You can either undo (z) or go to the INPUTS node in the Channel Box to make the change you want.
In the INPUTS node in the Channel Box, click on
polyBevel1 node, to open the attributes of the Bevel node. There are quite a few options. Offset type is generally kept as a fraction. The Fraction number refers to the fraction of the distance between the beveled edge and the two edges on either side, that the bevel will take up.
Select the word Fraction to highlight it.
In the viewport, MMB drag left and right to see the changes as the number changes. This is a virtual slider method that is very handy in modeling. Because there is such a large distance between the selected edge and the surrounding edges, a very small number looks best.


You will notice that there are more attribute values in the INPUT window that can be adjusted.
CV Curve Tool
CV stands for Control Vertex. A CV curve is a NURBS curve or spline made of control vertices. The CV Curve Tool is used to make a CV Curve.
Go back into Object mode by RMB clicking on the cube and choosing
Object Mode. Delete this cube and start again with a new one.
Hit the space bar quickly to get the four camera views.
Put your mouse into the side view and hit the space bar quickly again.

Now reposition the camera (Alt + MMB) so the cube is at the bottom of the window and looks like this:
With the CV Curve tool selected, start at the top of the cube, snapping to the top edge (hold the x key and click on the cube to snap it to the grid) and then click along the side view to create a curve, clicking between 4 and 10 times. (Note: when making a curve, use just as many points as it takes to make the curve you want. Too few and the curve lacks shape, too many and it is extra work in computing and the curve looses its smoothness.
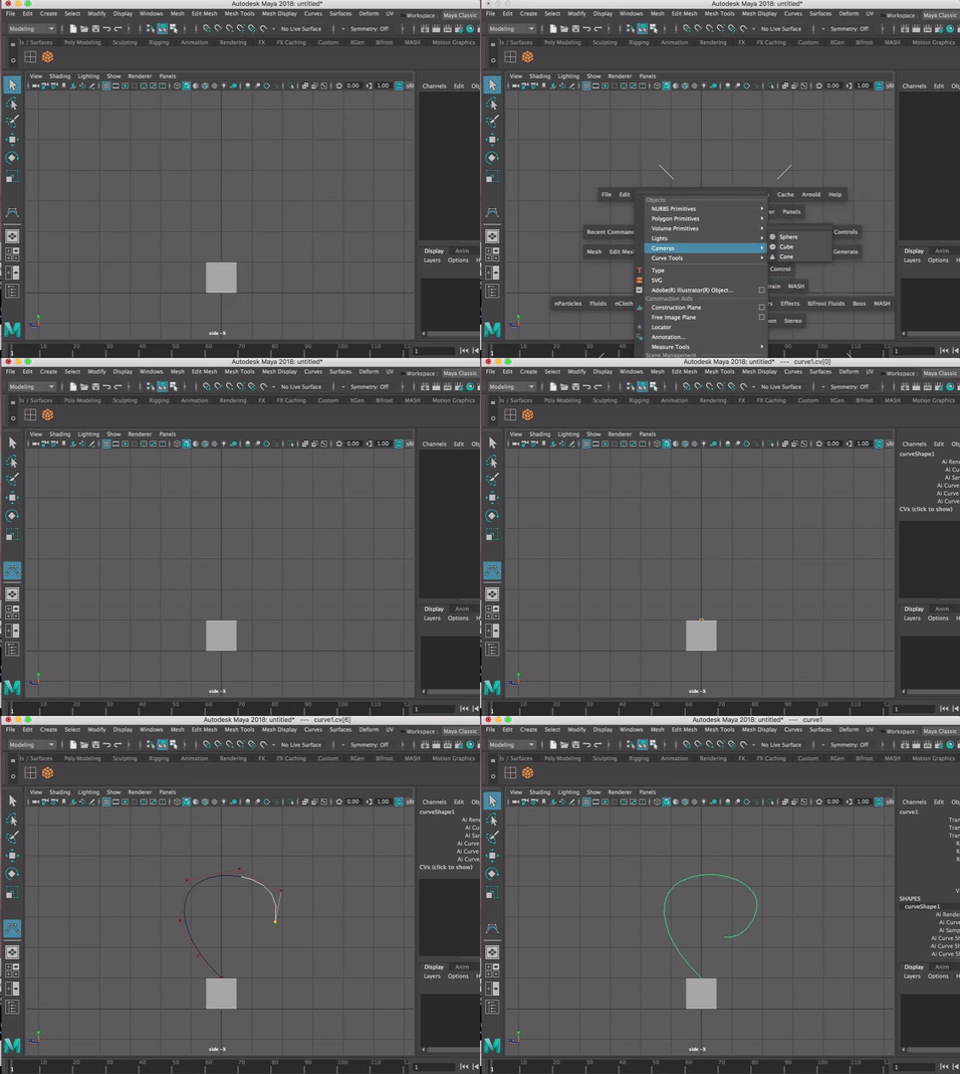
Hit Enter on your keyboard to finish the curve.

If you want to change the shape, RMB click on the curve and select Control Vertex. Using the Move Tool, drag CV's until you get the desired shape.
Go back to Object Mode when you are finished adjusting the shape.
We will use the curve tool together with the extrude tool to create a cool shaped object.
Extrude Along a Curve
Extruding "pulls new polygons out from existing faces, edges, or vertices, with options to transform and reshape the new polygons as they are pulled out from the selected originals."(from Maya Help)
In this case, we are going to extrude the face of the cube along the CV curve we just made.
Go back to the Perspective single view. If the CV curve is not in the center of the cube, move it there now.
In Component Mode, go to Face and select the face at the top of the cube, then shift select the CV Curve.
Hit Shift and RMB to bring up the Marking Menu and choose Extrude
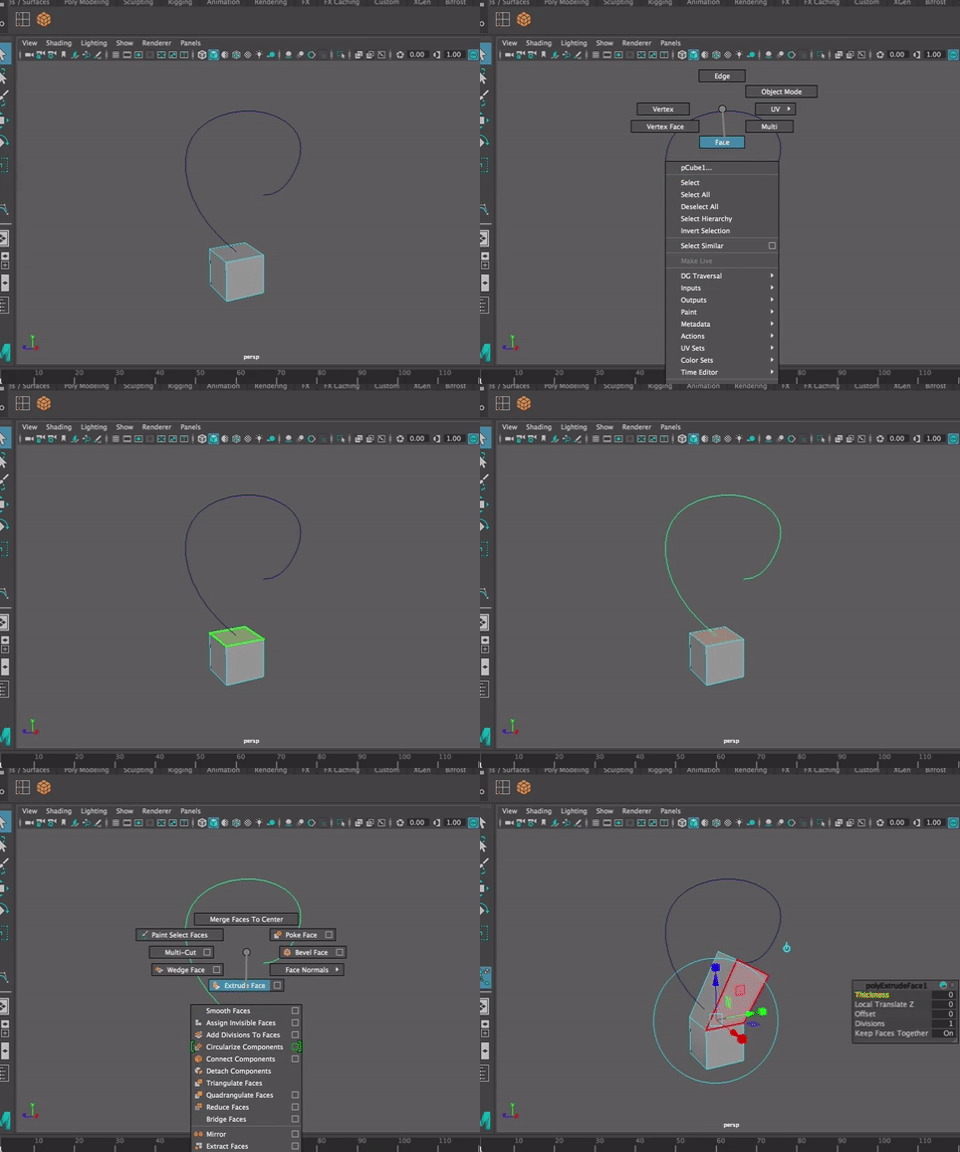
It won't look like a face moving along the curve. That is because there aren't enough divisions to let the shape curve. In the
The extruded face jumps out to the endpoint of the curve. Add divisions by changing the Divisions Value. You can LMB click and drag left and right to change the value and get the desired shape.
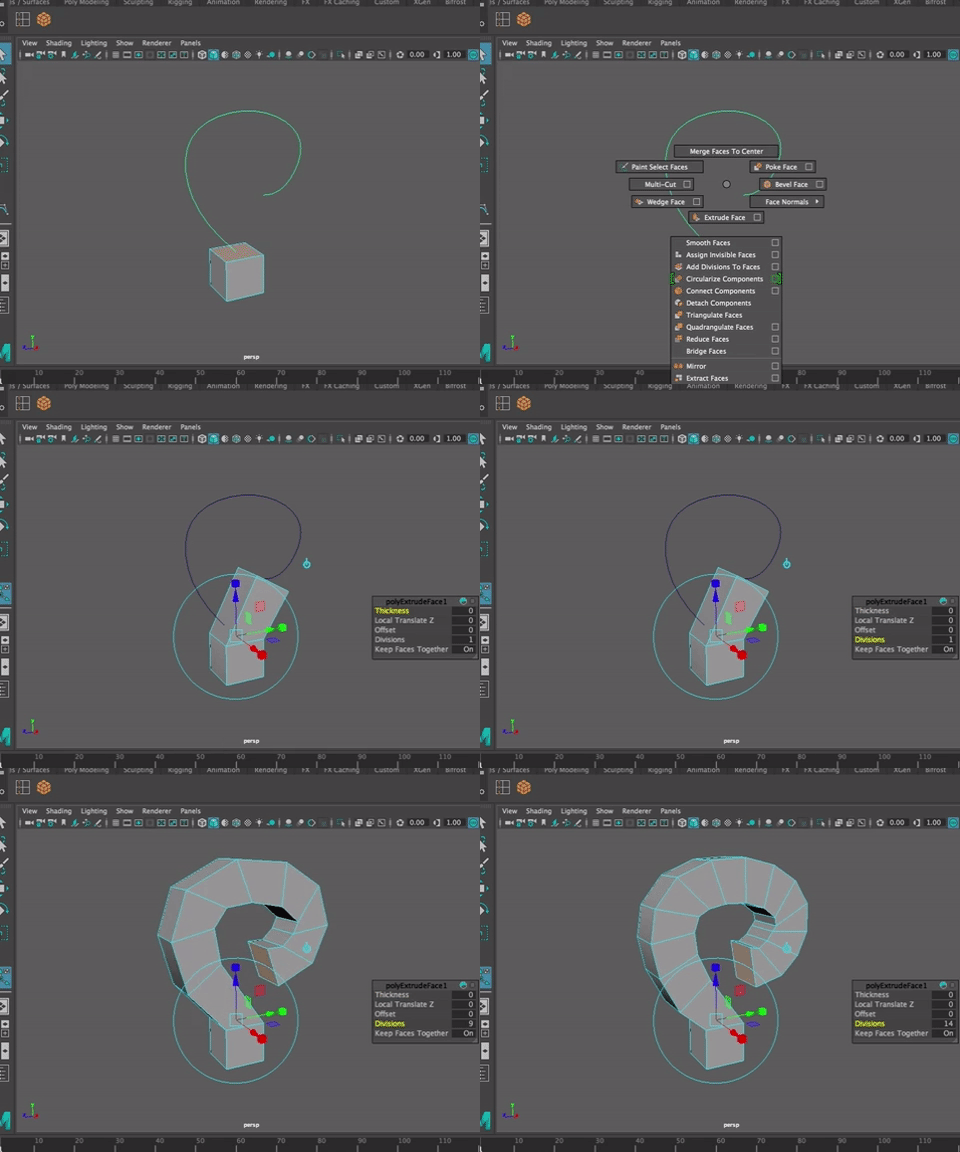
You can go to the INPUT node for polyExtrudeFace1. Again, you will notice there are more attributes in the Input Node that can be changed than show up in the small window when you first use the tool. The window has the most common attributes but sometimes you want to change more than that.
In this case, Select Taper by LMB selecting it in the Channel Box
If you MMB drag in the workspace to create a virtual slider, you can see what happens as the number of taper. Same for Twist.

There are other ways to use the Extrude Tool. It will become one of the most commonly used commands. A few things to keep in mind:
You can extrude a face or an edge.
When you extrude you have two modes you can work in - local and world.
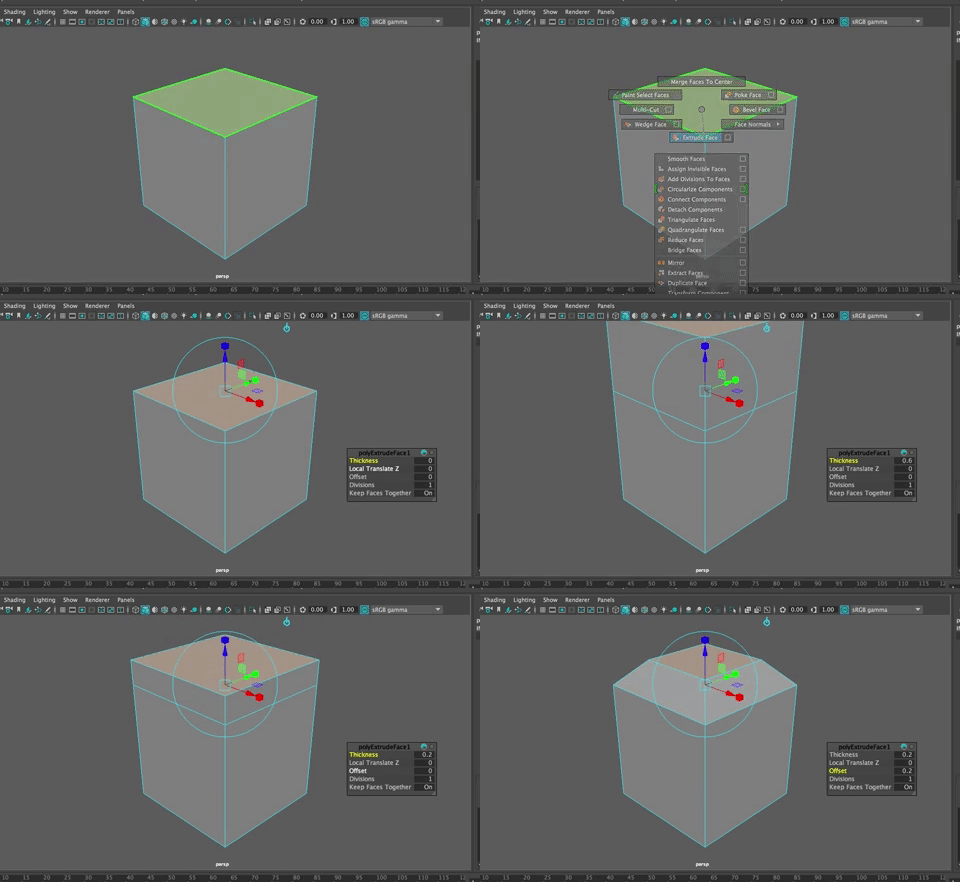
You are in Local mode by default. This means that Translate Z is perpendicular to the face.
Click the blue circle icon to the top right of the object to toggle between local and world mode. In world mode, the manipulator handles correspond to the XYZ world axis directions.
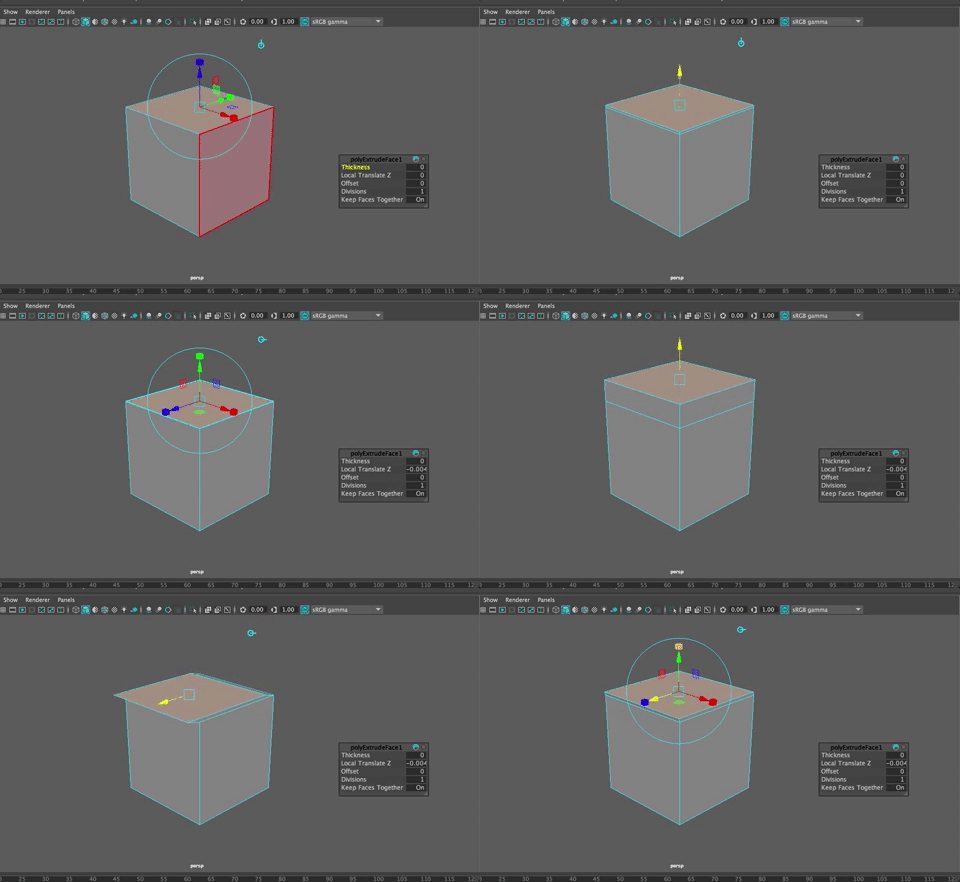
- In all modes, you can translate, scale, or rotate.
- You can extrude multiple times to continue creating new geometry.
- When you extrude, YOU MUST move the geometry or else you will end up with two faces on top of each other which causes non-manifold geometry and will totally mess you up later on.
Summary
Modeling in 3D often begins with a simple primitive that is modified by adding detail and moving components around. If you Shift RMB click on the object you get the marking menu that corresponds appropriately.
Most of the tools and commands you'll use with Polygons can be found in the Edit Mesh and Mesh Tools menus. The Insert Edge Loop tool, bevel tool, and extrude tools are all extremely handy. Practice with them to feel comfortable.
Tip: You can change the speed of the change between attribute values in the small popup window that comes up. Just click on the pie shaped icon or right click on it to choose the spped of the value changes. The smaller the pie, the smaller the increments as you drag.

